Multimedia Navigation System - Rosen Electronics
Multimedia Navigation System - Rosen Electronics
Multimedia Navigation System - Rosen Electronics

Create successful ePaper yourself
Turn your PDF publications into a flip-book with our unique Google optimized e-Paper software.
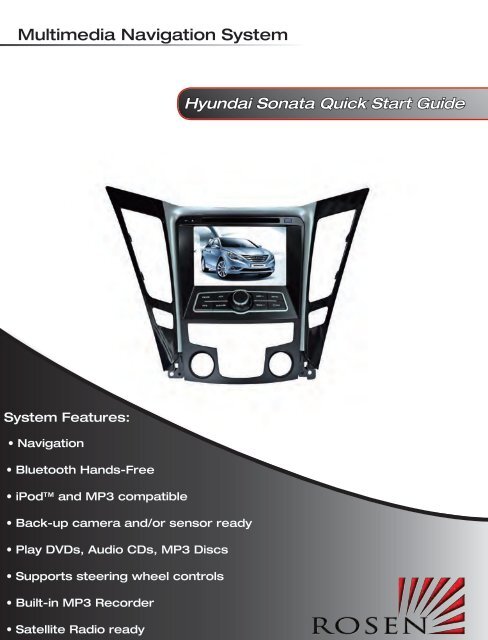
<strong>Multimedia</strong> <strong>Navigation</strong> <strong>System</strong><br />
Hyundai Sonata Quick Start Guide<br />
In-Dash Multi-Media /<br />
<strong>Navigation</strong> <strong>System</strong><br />
Honda Toyota Accord Venza Quick Start Guide<br />
<strong>System</strong> Features:<br />
• <strong>Navigation</strong><br />
• Bluetooth Hands-Free<br />
• iPod and MP3 compatible<br />
• Back-up camera and/or sensor ready<br />
• Play DVDs, Audio CDs, MP3 Discs<br />
• Supports steering wheel controls<br />
• Built-in MP3 Recorder<br />
• Satellite Radio ready
Notices<br />
NOTICE OF INTENDED USE<br />
Some features of <strong>Rosen</strong> Entertainment <strong>System</strong>s are not intended for viewing by the driver when the vehicle is in motion,<br />
such as movie playback. When using navigation, minimize the amount of time spent viewing the screen and use voice<br />
prompts as much as possible. Avoid prolonged use of the touch screen controls. Such use might distract the driver or<br />
interfere with the driver’s safe operation of the vehicle, and thus result in serious injury or death. Such use might also<br />
violate state or local laws.<br />
<strong>Rosen</strong> Entertainment <strong>System</strong>s disclaims any liability for<br />
any bodily injury or property damage that might result<br />
from any improper or unintended use.<br />
Copyright © 2009 by <strong>Rosen</strong> Entertainment <strong>System</strong>s. All rights reserved. Except as permitted<br />
under the Copyright Act of 1976, no part of this publication may be reproduced or distributed in<br />
any form or by any means, or stored in a database or retrieval system, without the prior written<br />
permission of <strong>Rosen</strong> Entertainment <strong>System</strong>s.<br />
About the Registered Marks<br />
This product incorporates copyright protection technology that is protected by method claims<br />
of certain U.S. patents and other intellectual property rights owned by Macrovision Corporation<br />
and other rights owners. Use of this copyright protection technology must be authorized<br />
by Macrovision Corporation, and is intended for limited viewing uses only unless otherwise<br />
authorized by Macrovision Corporation. Reverse<br />
engineering or disassembly is prohibited.<br />
iPod ® is a registered trademark of Apple Computer, Inc.<br />
NOTE: Features and specifications listed in this manual are subject to change without notice.<br />
1
Basic Functions<br />
Turning The <strong>System</strong> On/Off<br />
Vehicle ignition must be On or in ACC Mode to<br />
operate system.<br />
Press the POWER button on the panel to turn the<br />
system ON/OFF<br />
When the vehicle is turned off, the unit will<br />
automatically turn off.<br />
Screen Organization<br />
Your system will automatically default to the last screen you were on prior to turning off the unit.<br />
The Information Bar is located at the<br />
top of the screen. Depending on the<br />
source, it will provide information or content<br />
sensitive controls<br />
This will take you to the Settings<br />
Menu for advanced control settings.<br />
The Source Tabs located at the bottom of<br />
the screen will give you direct access to<br />
common sources.<br />
Note: “PHONE” is highlighted BLUE when a phone is paired to <strong>Rosen</strong> Bluetooth.<br />
2
E<br />
Radio<br />
Touch Button Descriptions<br />
Short touch to seek previous and<br />
next available stations.<br />
Long touch to scan. Each station<br />
will play for several seconds.<br />
Touch to select AM and FM1,2 & 3 preset<br />
screens.<br />
Satellite Radio (If Equipped)<br />
Short touch to seek previous and<br />
next available stations.<br />
Touch to select SAT 1,2 & 3 preset<br />
screens<br />
Preset Channels<br />
To set a station as a Preset, press and hold the<br />
button. The name of the channel for SAT Radio<br />
or station frequency for AM/FM Radio will<br />
appear in the button when saved.<br />
Short touch the desired Preset button to select<br />
that channel.<br />
3
When the optional iPod interface is connected to a compatible iPod player, the audio files stored<br />
on the iPod can be played through the system.<br />
Note: Sleep mode should be enabled on the iPod to reduce battery drain if the iPod is left<br />
connected with the vehicle off.<br />
Touch Button Descriptions<br />
Show/hide the key pad<br />
Repeat the current played song<br />
Scan and play songs in the<br />
current folder. The next song will<br />
be played after the current song<br />
has played for several seconds.<br />
Play songs in the current folder<br />
in random order.<br />
Touch to enter category list. The<br />
system categorizes into 6 options<br />
Press once to display song<br />
information.<br />
Press twice to display spectrum<br />
graphics.<br />
iPod Audio<br />
Play A Song<br />
Touch the song shown on playlist to play.<br />
Select previous song<br />
Select next song<br />
Page up<br />
Page down<br />
Play/Pause<br />
4
CD/DVD<br />
CD/DVD<br />
Play/Pause track<br />
Stop track<br />
Play previous song/chapter<br />
Play next song/chapter<br />
Repeat current song played<br />
CD Only<br />
Change audio EQ setting<br />
Change spectrum display<br />
Play songs on disc in random order<br />
Scan songs for several seconds<br />
Copy song to Favorites folder<br />
DVD Only<br />
Long Touch in DVD mode to show the DVD<br />
control screen. To return to full screen,<br />
either touch the image or let the screen idle<br />
for 10 seconds<br />
Set up DVD<br />
E<br />
Change language<br />
Show current title info<br />
Main DVD menu<br />
Shows information such as Chapter,<br />
Time Elapsed, etc<br />
5
Bluetooth Hands-Free<br />
Note: This system requires a Bluetooth enabled phone. Bluetooth phones and software vary by<br />
brand and date of manufacture. Some phones or phone functions may not be compatible or may<br />
operate differently with this system during use. Phone compatibility problems are not warrantable<br />
issues.<br />
There are several different Bluetooth screens in<br />
the PHONE function. The first screen you will see<br />
is the Call Screen. To switch between screens,<br />
press the PHONE tab repeatedly.<br />
Pairing Your Phone<br />
Place your phone into discovery mode.<br />
Press the PHONE tab to open the<br />
Bluetooth set-up page.<br />
Press “Pair” to pair your cell phone for<br />
the first time. You will only need<br />
to do this once, unless you connect to a<br />
different cell phone or the connection is<br />
deleted.<br />
“Pairing” will be displayed on the screen. After<br />
the connection succeeds on your phone, select<br />
“<strong>Rosen</strong>” and enter the password (1234). The system<br />
will indicate “Linking” and then “Connected.”<br />
When your phone is connected its name will be<br />
displayed on the unit.<br />
Select Auto Connect If you desire the<br />
system’s Bluetooth feature to automati<br />
cally detect your cell phone when the<br />
system is turned on.<br />
Select Auto Answer to set the system to<br />
automatically pick up after three rings.<br />
E<br />
Note: If using factory Bluetooth, please refer to your vehicle’s owner’s manual.<br />
6
Making/Ending A Call<br />
You can dial the number from your<br />
phone or use the touch-screen shown at<br />
the right by entering the number, then press<br />
the Call button.<br />
Clear last number<br />
Press to redial the last number dialed with<br />
the touch screen.<br />
Press to transfer call between cell phone<br />
and car speakers.<br />
Press to end the call.<br />
Answer An Incoming Call<br />
For incoming calls, the system will<br />
automatically switch to the answer screen.<br />
Press to answer.<br />
Press the icon to refuse or end the call<br />
Press to transfer call between cell phone<br />
and car speakers.<br />
Note: While in <strong>Navigation</strong> mode the incoming call box will disappear. Touch the screen to<br />
show the incoming call box.<br />
Call List<br />
The call list can be used to view missed,<br />
received and made calls.<br />
The system will not display your cell phone’s<br />
internal phonebook but will show the last<br />
numbers missed, received or made. Press the<br />
appropriate button on the screen to view the<br />
numbers. To make a call from the list, touch the<br />
number on the screen and it will automatically dial<br />
the number.<br />
E<br />
7
Settings<br />
Press to enter the Settings Menu. To<br />
change system settings, select desired<br />
option.<br />
<strong>System</strong> Settings<br />
The time displayed on all screens<br />
Turn the backup camera On/Off<br />
Button beep On/Off.<br />
Settings Menu Screen<br />
Spectrum On/Off<br />
Display the microphone level. Press to<br />
switch between “STD and HIGH”<br />
Guidepoint<br />
Phone Reminder On/Off<br />
(If using <strong>Rosen</strong> Bluetooth)<br />
Settings Screen<br />
Allows voice prompt to interrupt main<br />
audio when directions are being given.<br />
Audio Settings<br />
The AUDIO screen will allow you to adjust<br />
audio settings such as Treble, Mid Range,<br />
Bass and 5.1 Channel.<br />
Press to reset back to original audio<br />
settings<br />
Display Settings<br />
Change the brightness, color and contrast of the<br />
display.<br />
Audio Screen<br />
Press to increase the value<br />
Press to decrease the value<br />
Press to reset back to original display<br />
settings<br />
8<br />
Display Screen
Understanding the Map<br />
<strong>Navigation</strong><br />
The top part of the screen shows<br />
you what the next street is and which<br />
direction to turn on your route<br />
Select the Quick<br />
Menu to access the<br />
most used functions<br />
These displays show<br />
you the distance, time<br />
left and the estimated<br />
arrival time of your trip<br />
Shows you the street<br />
you are currently on<br />
Access the <strong>Navigation</strong> Menu<br />
Find an address or Point of Interest and<br />
access the Favorites and History menu<br />
Displays the route details and allows<br />
you to edit, change or cancel existing<br />
route<br />
Displays current position, surrounding<br />
map area and route.<br />
Customize the navigation software<br />
9
Quick Menu<br />
Located in the top right corner of the<br />
map screen is the Quick Menu. In<br />
this screen, there is a selection of<br />
functions that are frequently needed<br />
during navigation.<br />
You can use this option to search for<br />
places of interest along the way of<br />
your route, such as: Gas Stations,<br />
Restaurants, Parking, etc.<br />
Modifying Existing Routes<br />
You can modify an existing route by accessing either the Quick Menu or Main <strong>Navigation</strong><br />
menu<br />
You can use this option to select<br />
an alternative route to your<br />
destination.<br />
This option is a good way to<br />
change road types and modes.<br />
You can avoid highways, allow<br />
toll roads, etc.<br />
10
Enter or Find Address<br />
If you are on the Map screen, press MENU. In the <strong>Navigation</strong> Menu, select Find Address.<br />
Note: By default, the software proposes the country and state where you are currently<br />
located.<br />
1. Touch “City Name” and the keyboard<br />
screen will appear.<br />
2. Your current city will automatically<br />
default. To search for a different city,<br />
start typing each letter of the City<br />
name<br />
Tap to confirm city<br />
3. A “Select City” screen will appear.<br />
This will show a list of cities that<br />
match your selection. Touch the city<br />
you desire.<br />
4. Select “Street” and the keyboard<br />
screen will appear.<br />
11
5. Start typing each letter of the street<br />
name.<br />
6. A Street Name list will appear. Select<br />
the one you are looking for.<br />
7. Repeat these steps for House number,<br />
or if you do not know it, you can select the<br />
SELECT STREET option.<br />
8. A map will appear.<br />
Click Next and a short<br />
summary of the route will flash on the<br />
screen for a few seconds.<br />
9. After the summary, the map appears<br />
showing the entire route.<br />
Tap to start your journey.<br />
12
<strong>Rosen</strong> <strong>Navigation</strong> Information<br />
Safety Information and Precautions<br />
WARNING! Please read and follow the following safety precautions.<br />
Failure to follow the instructions below may increase<br />
your risk of collision and personal injury.<br />
The <strong>Rosen</strong> <strong>Navigation</strong> software is not a substitute for your personal judgment. The route suggestions should never supersede<br />
any local traffic regulation or your personal judgment and /or knowledge of safe driving practices. Prior to completing any maneuvers<br />
suggested by your <strong>Rosen</strong> <strong>Navigation</strong> software (for example, a U-turn or a left turn), verify that you can legally and safely<br />
complete the maneuver. Do not follow route suggestions if they direct you to perform an unsafe or illegal maneuver, would place<br />
you in an unsafe situation, or would route you into an area that you consider unsafe.<br />
Do not use the <strong>Rosen</strong> <strong>Navigation</strong> software to locate emergency services (such as police, fire stations, hospitals, and clinics).<br />
The database may not include all emergency service providers. Use your own best judgment and ask for directions in these<br />
situations.<br />
If the vehicle is in motion, only a passenger should program the <strong>Rosen</strong> <strong>Navigation</strong> software. The driver should not program the<br />
system unless the vehicle is parked in a safe location.<br />
The <strong>Rosen</strong> <strong>Navigation</strong> software’s map database provides information on suggested routes without regard to factors that may<br />
affect your driving experience or the time required to arrive at your destination. For example, the system does not reflect road detours,<br />
closures or construction, some road characteristics (e.g., road surface, slope or grade, weight or height restrictions, etc.),<br />
temporary traffic congestion, weather conditions, and similar factors.<br />
Vehicle Position<br />
The <strong>Rosen</strong> <strong>Navigation</strong> software’s computer considers vehicle speed and heading changes, together with longitude and latitude<br />
information, to accurately determine vehicle heading and position on a digital map.<br />
Map and Information Database<br />
The map database used by your <strong>Rosen</strong> <strong>Navigation</strong> software was created using high-resolution aerial and land based data collection.<br />
Car navigation maps are frequently updated. While the database was judged to be as accurate as possible at the time of its<br />
release, a map database can never be 100% accurate. Road information that is maintained in the map databases, such as turn<br />
restrictions or road names may change over time.<br />
Errors or missing information in the map data are not covered by the Product Warranty. New and/or updates for the map data<br />
are the responsibility of the End-user.<br />
End-User License Agreement<br />
Please refer to the <strong>Rosen</strong> <strong>Navigation</strong> User’s Manual to review and accept the terms and conditions in the End-User License<br />
before operating this product.<br />
All rights reserved. Copyright 2011.<br />
DP-HY1121 Rev A