TTDM Operation and Maintenance Manual - California Detection ...
TTDM Operation and Maintenance Manual - California Detection ...
TTDM Operation and Maintenance Manual - California Detection ...

You also want an ePaper? Increase the reach of your titles
YUMPU automatically turns print PDFs into web optimized ePapers that Google loves.
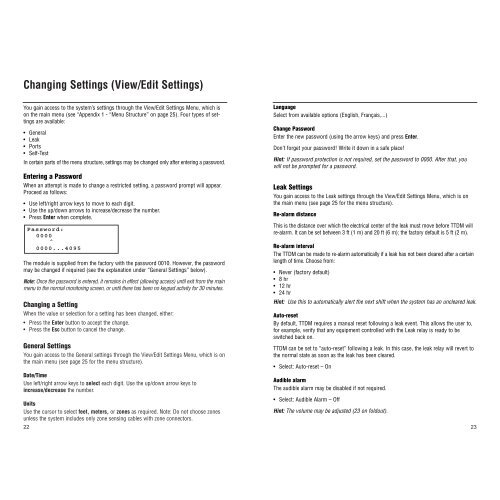
Changing Settings (View/Edit Settings)<br />
You gain access to the system’s settings through the View/Edit Settings Menu, which is<br />
on the main menu (see “Appendix 1 - “Menu Structure” on page 25). Four types of settings<br />
are available:<br />
• General<br />
• Leak<br />
• Ports<br />
• Self-Test<br />
In certain parts of the menu structure, settings may be changed only after entering a password.<br />
Entering a Password<br />
When an attempt is made to change a restricted setting, a password prompt will appear.<br />
Proceed as follows:<br />
• Use left/right arrow keys to move to each digit.<br />
• Use the up/down arrows to increase/decrease the number.<br />
• Press Enter when complete.<br />
Password:<br />
0000<br />
^<br />
0000...4095<br />
The module is supplied from the factory with the password 0010. However, the password<br />
may be changed if required (see the explanation under “General Settings” below).<br />
Note: Once the password is entered, it remains in effect (allowing access) until exit from the main<br />
menu to the normal monitoring screen, or until there has been no keypad activity for 30 minutes.<br />
Changing a Setting<br />
When the value or selection for a setting has been changed, either:<br />
• Press the Enter button to accept the change.<br />
• Press the Esc button to cancel the change.<br />
General Settings<br />
You gain access to the General settings through the View/Edit Settings Menu, which is on<br />
the main menu (see page 25 for the menu structure).<br />
Date/Time<br />
Use left/right arrow keys to select each digit. Use the up/down arrow keys to<br />
increase/decrease the number.<br />
Language<br />
Select from available options (English, Français,...)<br />
Change Password<br />
Enter the new password (using the arrow keys) <strong>and</strong> press Enter.<br />
Don’t forget your password! Write it down in a safe place!<br />
Hint: If password protection is not required, set the password to 0000. After that, you<br />
will not be prompted for a password.<br />
Leak Settings<br />
You gain access to the Leak settings through the View/Edit Settings Menu, which is on<br />
the main menu (see page 25 for the menu structure).<br />
Re-alarm distance<br />
This is the distance over which the electrical center of the leak must move before <strong>TTDM</strong> will<br />
re-alarm. It can be set between 3 ft (1 m) <strong>and</strong> 20 ft (6 m); the factory default is 5 ft (2 m).<br />
Re-alarm interval<br />
The <strong>TTDM</strong> can be made to re-alarm automatically if a leak has not been cleared after a certain<br />
length of time. Choose from:<br />
• Never (factory default)<br />
• 8 hr<br />
• 12 hr<br />
• 24 hr<br />
Hint: Use this to automatically alert the next shift when the system has an uncleared leak.<br />
Auto-reset<br />
By default, <strong>TTDM</strong> requires a manual reset following a leak event. This allows the user to,<br />
for example, verify that any equipment controlled with the Leak relay is ready to be<br />
switched back on.<br />
<strong>TTDM</strong> can be set to “auto-reset” following a leak. In this case, the leak relay will revert to<br />
the normal state as soon as the leak has been cleared.<br />
• Select: Auto-reset – On<br />
Audible alarm<br />
The audible alarm may be disabled if not required.<br />
• Select: Audible Alarm – Off<br />
Units<br />
Use the cursor to select feet, meters, or zones as required. Note: Do not choose zones<br />
Hint: The volume may be adjusted (23 on foldout).<br />
unless the system includes only zone sensing cables with zone connectors.<br />
22 23