Series 80 Gen 2 Continuous Line Furler Product Manual - Ronstan
Series 80 Gen 2 Continuous Line Furler Product Manual - Ronstan
Series 80 Gen 2 Continuous Line Furler Product Manual - Ronstan

You also want an ePaper? Increase the reach of your titles
YUMPU automatically turns print PDFs into web optimized ePapers that Google loves.
9072<br />
<strong>Series</strong> <strong>80</strong> <strong>Gen</strong> 2 <strong>Continuous</strong> <strong>Line</strong> <strong>Furler</strong><br />
<strong>Product</strong> <strong>Manual</strong><br />
The furler you have purchased is designed for the furling of sails with a “straight”<br />
luff, such as code zero sails, screechers or staysails. These sails are generally for<br />
upwind sailing, at true wind angles less than 90°. The furler is designed to have the tack of the sail attached to the furler and the<br />
head of the sail attached to the top swivel. This will provide furling along the whole luff of the sail.<br />
The sail must be either completely unfurled or furled – the furler cannot be used with a partially furled sail.<br />
You will require a synthetic luff cable (torsion line) with a thimble at each end, connected between the fork of the furler at the<br />
bottom and the swivel at the top. We recommend you discuss options with your sail maker for torsion line type, diameter and<br />
length, to suit your requirements. <strong>Ronstan</strong> recommends FSE Robline GFL torsion line – contact us for more information.<br />
<strong>Ronstan</strong> provides a range of accessories to suit this furler which can be found at the end of this manual.<br />
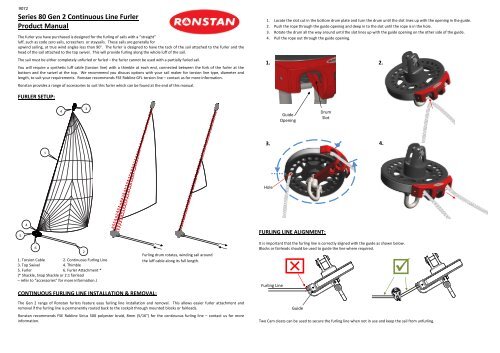
1. Locate the slot cut in the bottom drum plate and turn the drum until the slot lines up with the opening in the guide.<br />
2. Push the rope through the guide opening and deep in to the slot until the rope is in the hole.<br />
3. Rotate the drum all the way around until the slot lines up with the guide opening on the other side of the guide.<br />
4. Pull the rope out through the guide opening.<br />
1.<br />
2.<br />
FURLER SETUP:<br />
4<br />
3<br />
Guide<br />
Opening<br />
Drum<br />
Slot<br />
3.<br />
4.<br />
1<br />
Hole<br />
5<br />
4<br />
6<br />
1. Torsion Cable 2. <strong>Continuous</strong> Furling <strong>Line</strong><br />
3. Top Swivel 4. Thimble<br />
5. <strong>Furler</strong> 6. <strong>Furler</strong> Attachment *<br />
(* Shackle, Snap Shackle or 2:1 fairlead<br />
– refer to “accessories” for more information.)<br />
2<br />
CONTINUOUS FURLING LINE INSTALLATION & REMOVAL:<br />
Furling drum rotates, winding sail around<br />
the luff cable along its full length.<br />
The <strong>Gen</strong> 2 range of <strong>Ronstan</strong> furlers feature easy furling line installation and removal. This allows easier furler attachment and<br />
removal if the furling line is permanently routed back to the cockpit through mounted blocks or fairleads.<br />
<strong>Ronstan</strong> recommends FSE Robline Sirius 500 polyester braid, 8mm (5/16”) for the continuous furling line – contact us for more<br />
information.<br />
FURLING LINE ALIGNMENT:<br />
It is important that the furling line is correctly aligned with the guide as shown below.<br />
Blocks or fairleads should be used to guide the line where required.<br />
Furling <strong>Line</strong><br />
<br />
Guide<br />
<br />
Two Cam cleats can be used to secure the furling line when not in use and keep the sail from unfurling.
GUIDE ARM ALIGNMENT:<br />
The guide arm can be positioned in line or at 90 degrees to correctly align the furler mount with the deck or bowsprit attachment.<br />
Bolt<br />
PTFE Strip<br />
1. 2. 3.<br />
RS20<strong>80</strong><strong>80</strong> – Top Swivel Lashing Pin<br />
Use in place of the clevis pin on the top swivel to<br />
provide a more positive drive to the head of the sail.<br />
This helps to ensure a tight furl at the head.<br />
The head of the sail is lashed to the cotton reels on<br />
the ends of the pin while the torsion cable and<br />
thimble are attached to the centre section of the pin.<br />
Lash<br />
Head<br />
Thimble<br />
90° Shaft<br />
Hole<br />
Guide Arm<br />
In-line<br />
Shaft Hole<br />
MAINTENANCE:<br />
To change the orientation of the guide arm:<br />
1. Remove the bolt located in the guide arm underneath the drum.<br />
2. Rotate the guide arm and PTFE strip by 90° until the hole in the guide arm lines up with the alternate hole in the shaft.<br />
3. Re-connect the guide arm to the shaft using the same bolt.<br />
ACCESSORIES:<br />
Rinse regularly with fresh water to remove salt.<br />
Apply <strong>Ronstan</strong> RF3000 Sailfast (or a similar silicon based lubricant) over the body and components to enhance performance and<br />
prolong service life. (Do not use petro-chemical lubricants).<br />
Periodically remove fasteners and re-apply Tef-Gel® (TG-10) to prevent corrosion.<br />
Factory sealed bearings are maintenance free. Bearing and seal replacement can be arranged through your local <strong>Ronstan</strong> reseller.<br />
<strong>Furler</strong>s have a three year warranty – refer to www.ronstan.com for terms and conditions.<br />
RS20<strong>80</strong>20 - Snap-Shackle Adaptor<br />
Simply replace the shackle on the furler or top swivel with the snap-shackle adaptor for quick attachment of the furler to your bow<br />
fitting or the top swivel to your halyard.<br />
RS20<strong>80</strong>30 - 2:1 Fairlead<br />
Use in place of the shackle on the furler<br />
to provide a 2:1 purchase on the furler<br />
attachment. The tack line is dead ended<br />
at the deck or end of the bowsprit, runs<br />
up around the 2:1 fairlead, back down to<br />
a block, and back along the deck to a<br />
rope clutch. This configuration is a<br />
popular way of adjusting tension in the<br />
torsion cable, and hence the luff of the<br />
sail.<br />
RS20<strong>80</strong>40 – Thimble<br />
Used to terminate the torsion cable at both ends by wrapping the torsion cable around the thimble and then either stitching it to<br />
itself, or splicing it. The thimble also has an additional hole suited to lashing the tack of the sail to it. Lashing the sail to the thimble<br />
and not to the furler allows the torsion line and sail to be easily removed from the furler and top swivel as required.<br />
RS20<strong>80</strong>50 – Shackle<br />
Replacement shackles can be ordered to suit both the top swivel and the furler.