

Extang Tuff Tonno & Sabor Supplement F150 ... - RealTruck.com
Extang Tuff Tonno & Sabor Supplement F150 ... - RealTruck.com
Extang Tuff Tonno & Sabor Supplement F150 ... - RealTruck.com

You also want an ePaper? Increase the reach of your titles
YUMPU automatically turns print PDFs into web optimized ePapers that Google loves.
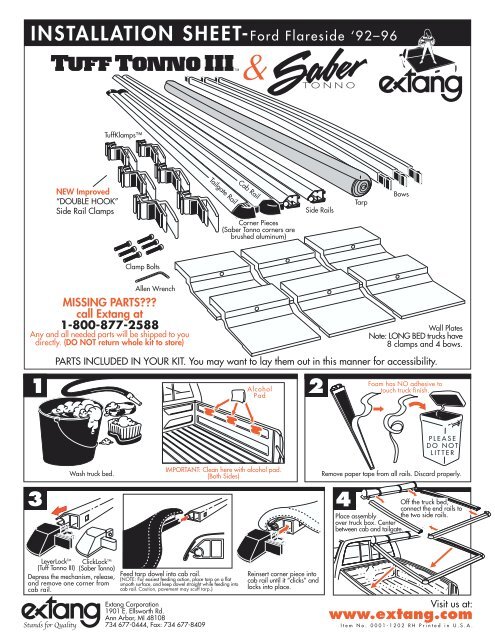
INSTALLATION SHEET-Ford Flareside ‘92–96<br />
<strong>Tuff</strong>Klamps<br />
NEW Improved<br />
“DOUBLE HOOK”<br />
Side Rail Clamps<br />
Tailgate Rail<br />
Cab Rail<br />
Corner Pieces<br />
(Saber <strong>Tonno</strong> corners are<br />
brushed aluminum)<br />
Side Rails<br />
Tarp<br />
Bows<br />
Clamp Bolts<br />
Allen Wrench<br />
MISSING PARTS???<br />
call <strong>Extang</strong> at<br />
1-800-877-2588<br />
Any and all needed parts will be shipped to you<br />
directly. (DO NOT return whole kit to store)<br />
Wall Plates<br />
Note: LONG BED trucks have<br />
8 clamps and 4 bows.<br />
PARTS INCLUDED IN YOUR KIT. You may want to lay them out in this manner for accessibility.<br />
1 Alcohol 2<br />
Pad<br />
Foam has NO adhesive to<br />
touch truck finish.<br />
PLEASE<br />
DO NOT<br />
LITTER<br />
Wash truck bed.<br />
IMPORTANT: Clean here with alcohol pad.<br />
(Both Sides)<br />
Remove paper tape from all rails. Discard properly.<br />
3<br />
4<br />
Off the truck bed,<br />
connect the end rails to<br />
Place assembly the two side rails.<br />
over truck box. Center<br />
between cab and tailgate.<br />
LeverLock TM<br />
ClickLock TM<br />
(<strong>Tuff</strong> <strong>Tonno</strong> III) (Saber <strong>Tonno</strong>)<br />
Depress the mechanism, release,<br />
and remove one corner from<br />
cab rail.<br />
Feed tarp dowel into cab rail.<br />
(NOTE: For easiest feeding action, place tarp on a flat<br />
smooth surface, and keep dowel straight while feeding into<br />
cab rail. Caution, pavement may scuff tarp.)<br />
<strong>Extang</strong> Corporation<br />
1901 E. Ellsworth Rd.<br />
Ann Arbor, MI 48108<br />
734 677-0444, Fax: 734 677-8409<br />
Reinsert corner piece into<br />
cab rail until it “clicks” and<br />
locks into place.<br />
Visit us at:<br />
www.extang.<strong>com</strong><br />
Item No. 0001-1202 RH Printed in U.S.A.
5<br />
When positioning wall plates be sure that they fit correctly against the truck bed wall.<br />
The plates must seat against the bottom of, and parallel to, the wall indentation.<br />
Place the rail assembly over the side of the truck box. Center<br />
rails evenly between cab and tailgate. (NOTE: Some applications<br />
have hard rubber risers (square rubber pad.) A riser must go toward tailgate.<br />
Some applications will have a riser at both ends, (most have no riser).<br />
6<br />
Clamp Spacing (Same for each side)<br />
See the stickers located on each side rail for clamp<br />
position, or refer to the dimensions given below.<br />
Note: Remove stickers after installation.<br />
12<br />
inches<br />
12<br />
inches<br />
Place Clamp<br />
Here<br />
STICKER<br />
Center middle clamp<br />
Press wall plate<br />
firmly in place.<br />
Allow wall<br />
plates to set<br />
over night.<br />
After wall plates<br />
have set, insert side<br />
rail clamp all the<br />
way into rail.<br />
Note: Measure all distances from screw hole centers.<br />
7<br />
8<br />
Insert bow onto top or bottom peg.<br />
(Top peg for performance, Bottom for good looks.)<br />
Upper<br />
Peg<br />
Lower<br />
Peg<br />
Insert clamp bolt in place.<br />
Do Not Overtighten<br />
Ends are spring loaded<br />
for easy installation.<br />
Push and hold on<br />
spring end and let the<br />
other end slide on with<br />
the spring action.<br />
SPECIAL<br />
FEATURE:<br />
Two pegs<br />
offer two<br />
height<br />
adjustments.<br />
Note:<br />
Bow End does not<br />
fit between pegs.<br />
Do Not<br />
Place<br />
Between<br />
the Pegs<br />
9<br />
PUSH<br />
DOWN<br />
PRESS & SLIDE<br />
YOUR HAND<br />
Close-up of downward rotation of<br />
rear rail. You will feel the “snap”<br />
effect and see it tighten snugly.<br />
A. Release lever on both corners of<br />
tailgate rail and tilt up rail.<br />
For <strong>Tuff</strong> <strong>Tonno</strong> III:<br />
For Saber <strong>Tonno</strong>:<br />
B. Attach tarp at front by pressing down on edge of tarp with the palms<br />
of your hands (about only 12 inches on each side). Then hook tarp to<br />
the tails rail’s groove and click down to tighten tarp. See close-up.<br />
C. Finish attaching tarp along each side by<br />
pushing down and sliding you hand towards<br />
each corner. You can feel the “grip” action.<br />
A. Attach tarp from front corner<br />
(12 inches) Repeat for each side.<br />
Note: Pull tarp out while pressing<br />
down in center of the side strip to<br />
flex hook open for easy attachement.<br />
Secure at Center<br />
of Tailgate<br />
B. Secure tarp at the<br />
middle of tailgate rail.<br />
C. Finish attaching tarp<br />
along each side by pushing<br />
down and sliding you hand<br />
front to rear, and on tailgate<br />
rail, by pressing out from<br />
the center.<br />
EASY USE OF TRUCK BED<br />
Tarp may be rolled up and secured with<br />
Velcro® for bulk hauling<br />
<strong>Extang</strong> Corporation, 1901 E. Ellsworth Rd., Ann Arbor, MI 48108, 734 677-0444, Fax: 734 677-8409, Visit us at: www.extang.<strong>com</strong>


