

Jeep Wrangler 4-Door - 2007-Newer Installation ... - RealTruck.com
Jeep Wrangler 4-Door - 2007-Newer Installation ... - RealTruck.com
Jeep Wrangler 4-Door - 2007-Newer Installation ... - RealTruck.com

You also want an ePaper? Increase the reach of your titles
YUMPU automatically turns print PDFs into web optimized ePapers that Google loves.
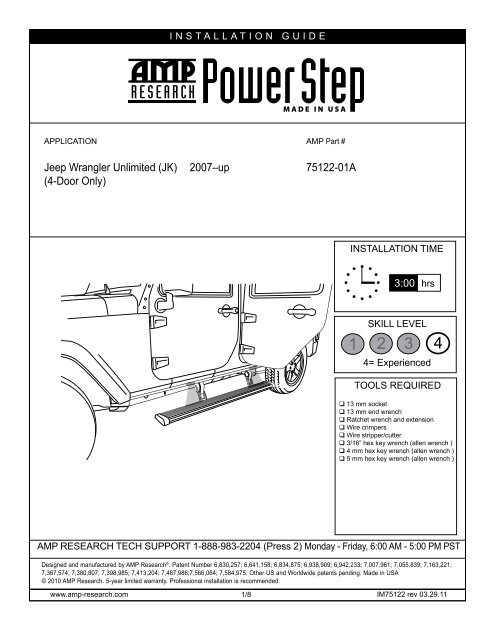
INSTALLATION GUIDEAPPLICATION AMP Part #<strong>Jeep</strong> <strong>Wrangler</strong> Unlimited (JK) <strong>2007</strong>–up 75122-01A(4-<strong>Door</strong> Only)INSTALLATION TIME3:00 hrsSKILL LEVEL1 2 3 44= ExperiencedTOOLS REQUIRED 13 mm socket 13 mm end wrench Ratchet wrench and extension Wire crimpers Wire stripper/cutter 3/16” hex key wrench (allen wrench ) 4 mm hex key wrench (allen wrench ) 5 mm hex key wrench (allen wrench )AMP RESEARCH TECH SUPPORT 1-888-983-2204 (Press 2) Monday - Friday, 6:00 AM - 5:00 PM PSTDesigned and manufactured by AMP Research ® . Patent Number 6,830,257; 6,641,158; 6,834,875; 6,938,909; 6,942,233; 7,007,961; 7,055,839; 7,163,221;7,367,574; 7,380,807; 7,398,985; 7,413,204; 7,487,986;7,566,064; 7,584,975. Other US and Worldwide patents pending. Made in USA© 2010 AMP Research. 5-year limited warranty. Professional installation is re<strong>com</strong>mended.www.amp-research.<strong>com</strong> 1/8IM75122 rev 03.29.11
PARTS LIST AND HARDWARE IDENTIFICATION19-03199-11 End cap left (x1)19-03199-12 End cap right (x1)19-02663-90 T-nut insert (x2)19-03236-90 Socket cap screw (x2)19-03237-90 Nut plate (x2)1 x2Step assembly20-03318-702 x210-03606-10 Driver10-03606-11 PassengerMotor Linkage3x210-03610-10Idler Linkage4x215-03600-90Adaptor5x219-03289-91Motor6x219-03238-90Motor Coverwww.amp-research.<strong>com</strong> 2/8719-03297-93Controller819-03717-90LWire HarnessIM75122 rev 03.29.11
AMP RESEARCH POWER STEP – JEEP WRANGLER (JK)PARTS LIST ANDHARDWAREIDENTIFICATION9 x219-03467-90U nut10 x819-02802-90Socket Cap11x816-02634-90Button Head Bolt12x619-02740-90Hex Flange Bolt13x816-03014-90Washer Black14 x419-03354-90Posi-Taps (Red/Grey)15 x619-02721-90Cinch Fastener16 x419-03352 -90Flat HeadCap Screw17 x2019-02805-90Cable Tie 6”18 x219-03339-90Cable Tie 11”19 x419-03302-90LED Lamp20 x419-02640-90Grommet21 x819-02989-90Butt Connectorwww.amp-research.<strong>com</strong> 3/8IM75122 rev 03.29.11
AMP RESEARCH POWER STEP – JEEP WRANGLER (JK)Locate rear linkage installation positionin front of rear body mountInstall adaptor as shownHole not used412Front of vehicleTorque to 16 ft-lbs.(22 N m)Passenger side shown above12Install Rear idler linkage.111333Slide motor assembly onto drive shaft and mountingbosses of driving linkage assembly. Use fl atheadsocket head cap screws (16) and tighten to 8 ft-lbs /11Nm.Motor faces to front of vehicle12Torque fasteners to16 ft-lbs. (22 N m)4Install U nut under vehicle, middle of frontdoor for front motor linkage as shown.(Some vehicles with factory steps mayalready include this u-nut)Front of vehicle passenger sideInstall motor linkage with motor2165Driver sideMotor Linkage5Passenger sideMotor Linkagewww.amp-research.<strong>com</strong> 4/8611122 13Torque fasteners to 16 ft-lbs. (22 N m)Repeat linkage installation on driver sideIM75122 rev 03.29.11
AMP RESEARCH POWER STEP – JEEP WRANGLER (JK)Mount step extrusion to linkage assemblies.Line up t-nuts in step assembly with slots inlower mounts of linkage assemblies. Fastenloosely to allow for adjustments.Line up rear of step extrusion with rear fenderwell.7101Tighten 4 socket cap screws with 3/16” allen wrench.Torque to 10 ft-lbs. (13.5 N-m)1108Remove fuse from Power Step wire harness.8+109Install controller on passenger side at fi rewall.Secure with 11” cable ties. Connect Red wireto positive battery terminal and Black wire tonegative battery terminal.710Route longest leg of wire harness across fire wallto driver side and under vehicle outside of framerail. Route shortest leg of wire harness down firewall and outside of frame rail on passenger side.7 8810 1112www.amp-research.<strong>com</strong> 5/8IM75122 rev 03.29.11
Remove passenger side front door sill.Lift carpet. Slit rubber grommet and pass triggerwires through grommet in floor into passenger<strong>com</strong>partment.13Posi-Tap instructions14Use Posi-Tap connectors to connect Power Steptrigger wires to like colored wires in the factorysystem as shown: Violet/White wire in loom<strong>com</strong>ing from front door, Violet/Yellow and Violet/Grey in main loom in door sill.InsertTightenStrip 3/8”Insert and15Tighten16Remove driver side door sill and pull upcarpet.Route Violet wire under carpet to driver sidedoor sill and connect to violet wire <strong>com</strong>ingfrom door as shown.17www.amp-research.<strong>com</strong> 6/818IM75122 rev 03.29.11
AMP RESEARCH POWER STEP – JEEP WRANGLER (JK)Insert plug from wire harness onto motor. Sliderubber grommet on wire harness into slot of motorcover. Insert motor cover onto motor. Slide motorassembly onto drive shaft and mounting bosses ofdriving linkage assembly. Use electrical tape to coverany exposed wire from the motor.5 6Insert plastic push pin rivets in mounting holes ofmotor cover. Use pliers to ease installation.615819 20On each side of the vehicle measure from the frontedge of the door line on the pinch weld to the specified lengths below. Measure at 8” for the front LEDlamp and 45” for the rear LED Lamp.Drill a 9/32” hole through pinch weld at locationsmarked out in step 21.21Insert grommet and lamp wires through drilled hole.Affix lamp to rocker panel surface. Make sure thelamp is affi xed to a clean, fl at surface.45”8”22Using supplied butt connectors, connect the lampwires. Red to Red, Black to Black.21201923www.amp-research.<strong>com</strong> 7/824IM75122 rev 03.29.11
AMP RESEARCH POWER STEP – JEEP WRANGLER (JK)Close and wrap with conduit and electrical tape. Secureall loose wires with cable ties, with lamp wires pulledupward to avoid any wire snagging.Reinstall fuse.25# 26Check that all doors activate the Power Step and the LED Lights work when doors open andclose. Reinstall any remaining trim panels.27Correct operation of Lights: All four lamps will illuminate upon opening any door of vehicle.Lamps will stay on until restowing of both Power Steps or until 5 minutes has expired with thedoors open. When the lights timeout after 5 minutes, they can be re-illuminated by closing andopening of any door of vehicle.www.amp-research.<strong>com</strong> 8/8IM75122 rev 03.29.11
Congratulations on your purchase of thegenuine AMP Research PowerStep!Here’s what you should know...POWERSTEP OPERATION The AMP Research PowerStep automatically deploys when any dooris opened. When both front and rear doors are closed, it retracts automatically under your vehicle.The drive system is designed to automatically stop if resistance, blockage or icing occurs.To reset, clear any obstruction, then simply open and close the door and normal operation will resume.MAINTENANCE TIPS - The stepping surface and linkages should be periodically washed with mild soapand water using a soft brush or sponge to dislodge any mud, dirt or accumulated road grime.In severe driving conditions, pressure washing the linkages is strongly re<strong>com</strong>mended.Avoid spraying the motors directly with high-pressure water. After washing, apply Silicone spraylubricant to the pivot pins of each linkage assembly. Remove any excess lubricant with a soft cleancloth. Do not apply Silicone spray, waxes or protectants like Armor All ® to the stepping surfaces.KEEPING PWhen washing your vehicle, the PowerStep can be set toremain in the deployed position with the doors closed. DO THIS...1.2. Close the door while continuing to press down on the step. (This will not harm the motor.)3. To resume normal operation, simply open and close the door. (Repeat for both sides of the vehicle.)C AU T I O N ! KEE P H A N D S AWAY WHE N THE P O WERSTE P I S I N M OT I O NAMP RESEARCH LIMITED WARRANTYAMP RESEARCH warrants this product to be free from defects in material and workmanship for FIVE (5) YEARS FROM DATEOF PURCHASE, provided there has been normal use and proper maintenance. This warranty applies to the original purchaseronly. All remedies under this warranty are limited to the repair replacement of the product itself, or the repair or replacementof any <strong>com</strong>ponent part thereof, found by the factory to be defective within the time period specified. The decision to repairor replace is wholly within the discretion of the manufacturer.for instructions. You must retain proof of purchase and submit a copy with any items returned for warranty work. Upon<strong>com</strong>pletion of warranty work, if any, we will return the repaired or replaced item or items to you freight prepaid. Damage toour products caused by accidents, fire, vandalism, negligence, misinstallation, misuse, Acts of God, or by defective parts notmanufactured by us, is not covered under this warranty.ANY IMPLIED WARRANTIES OF MERCHANTABILITY AND/OR FITNESS FOR A PARTICULAR PURPOSE CREATED HEREBY ARELIMITED IN DURATION TO THE SAME DURATION AND SCOPE AS THE EXPRESS WRITTEN WARRANTY. OUR COMPANY SHALLNOT BE LIABLE FOR ANY INCIDENTAL OR CONSEQUENTIAL DAMAGE.Some states do not allow limitations on how long an implied warranty lasts, or the exclusion or limitation of incidental orconsequential damages, so the above limitations or exclusions may not apply to you. This warranty gives you specific legalrights, and you may also have other rights that vary from state to state.FOR WARRANTY ISSUES WITH THIS PRODUCT PLEASE CALL AMP RESEARCH CUSTOMER SERVICE 1-800-315-9697WARNINGBe sure to read and precisely follow the provided instructions when installing this product. Failure to do so could place the vehicleoccupants in a potentially dangerous situation. After installing or reinstalling, re-check to insure that the product is properly installed.


