

Platinum Battery Brain Installation - RealTruck.com
Platinum Battery Brain Installation - RealTruck.com
Platinum Battery Brain Installation - RealTruck.com

You also want an ePaper? Increase the reach of your titles
YUMPU automatically turns print PDFs into web optimized ePapers that Google loves.
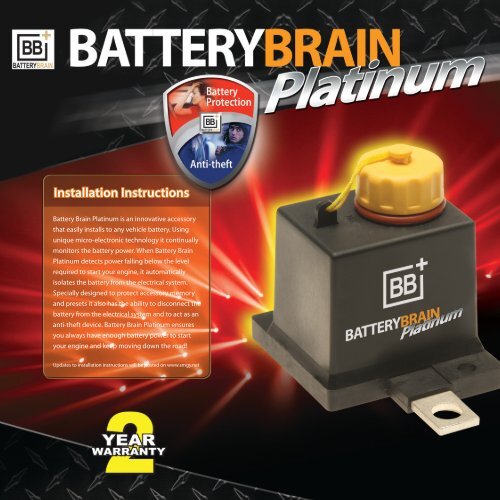
<strong>Installation</strong> Instructions<br />
<strong>Battery</strong> <strong>Brain</strong> <strong>Platinum</strong> is an innovative accessory<br />
that easily installs to any vehicle battery. Using<br />
unique micro-electronic technology it continually<br />
monitors the battery power. When <strong>Battery</strong> <strong>Brain</strong><br />
<strong>Platinum</strong> detects power falling below the level<br />
required to start your engine, it automatically<br />
isolates the battery from the electrical system.<br />
Specially designed to protect accessory memory<br />
and presets it also has the ability to disconnect the<br />
battery from the electrical system and to act as an<br />
anti-theft device. <strong>Battery</strong> <strong>Brain</strong> <strong>Platinum</strong> ensures<br />
you always have enough battery power to start<br />
your engine and keep moving down the road!<br />
Updates to installation instructions will be posted on www.smgy.net
Technical Specifications<br />
DIMENSIONS<br />
Base 1 5/8” (4cm) x 2 1/4” (5.5cm), Height (including<br />
removable protective cap) 2 1/2” (6cm), Brackets 1 1/4”<br />
(3.5cm) x 5/8” (1.5cm) x 1/8” (3mm).<br />
WEIGHT<br />
<strong>Battery</strong> <strong>Brain</strong> <strong>Platinum</strong> 175gm, Accessories 280gm, Packaging<br />
3gm; Total weight 408gm (1lb).<br />
CURRENT SPECIFICATIONS<br />
Operational Current Consumption: 4 Milliamps.<br />
Disconnect Current Connection: 4 Milliamps.<br />
Maximum Peak Amperage: 1100 Amps for 15 continuous<br />
seconds.<br />
Continuous Amperage Capacity: 250 Amps.<br />
Disconnect Voltage Threshold: 11.9V.<br />
OPERATIONAL TEMPERATURE RANGE<br />
-60°F (-51°C) to 200°F (90°C).<br />
<strong>Battery</strong> <strong>Brain</strong> is made of non-<strong>com</strong>bustible materials.<br />
<strong>Battery</strong> Safety Warning!<br />
When working with lead acid batteries and accessories, caution<br />
must be employed:<br />
• Shield eyes. Do not open vent caps or puncture battery<br />
casing in any way.<br />
• Sulfuric acid can cause blindness and severe burns.<br />
• Rinse hands and fl ush eyes with water immediately.<br />
• Avoid sparks, fl ames and smoking.<br />
Proposition 65 Warning<br />
<strong>Battery</strong> posts, terminals, and related accessories contain<br />
lead and lead <strong>com</strong>pounds. Chemicals known to the State of<br />
California to cause cancer and reproductive harm. Wash hands<br />
after handling.<br />
<strong>Battery</strong> <strong>Brain</strong> <strong>Platinum</strong><br />
GENERAL<br />
The <strong>Battery</strong> <strong>Brain</strong> <strong>Platinum</strong> is installed on the positive (+) battery<br />
post with the post clamp provided. The clip end of the black ground<br />
wire is fastened to the negative (–) post clamp bolt. If you wish<br />
to install unit on the chassis an extention cable (not provided) is<br />
needed to route the power from the battery to the positive side of<br />
the <strong>Battery</strong> <strong>Brain</strong> <strong>Platinum</strong> and the original positive (red) cable to<br />
be connected to the other side of the <strong>Battery</strong> <strong>Brain</strong> <strong>Platinum</strong>.<br />
HELPFUL HINT<br />
The side of the <strong>Battery</strong> <strong>Brain</strong> <strong>Platinum</strong> with 12V+ printed is always<br />
connected to the positive post of the battery<br />
TOOLS REQUIRED<br />
Tools required may vary based on your vehicle. The most <strong>com</strong>mon<br />
tools are; Open-end 5/16”, 9/16”, 10mm, 12mm,14mm, or<br />
adjustable wrench. Standard and Phillips screwdrivers.<br />
REMOTE CONTROL USERS<br />
Save a copy of the identification number on the back of your<br />
remote control. You will need it to order a replacement if lost.<br />
IMPORTANT NOTE: Before beginning installation, be sure<br />
your battery is holding the proper charge. If your battery<br />
does not hold a minimum charge, it may be at the end of its<br />
lifecycle. The <strong>Battery</strong> <strong>Brain</strong> <strong>Platinum</strong> is designed to protect a<br />
properly functioning or new battery. It cannot restore or repair<br />
a damaged battery. If your vehicles battery shows any signs of<br />
physical damage such as swelling, leaking or cracking, replace<br />
the battery prior to installing <strong>Battery</strong> <strong>Brain</strong> <strong>Platinum</strong>.<br />
IMPORTANT NOTE: Unless you are fully familiar with your<br />
vehicles electrical system it is re<strong>com</strong>mended that installation of<br />
this product is performed by a certifi ed technician.<br />
IMPORTANT NOTE: This product is not intended for Marine<br />
use and should not be submerged in water. Units specifi cally<br />
designed for Marine use are available, see<br />
www.smgy.net/batterybrain for more information.
<strong>Battery</strong> <strong>Brain</strong> <strong>Platinum</strong> Kit includes:<br />
BATTERY BRAIN PLATINUM UNIT<br />
1. Positive (+) side of <strong>Battery</strong> <strong>Brain</strong> <strong>Platinum</strong> (side with 12V+ printed)<br />
2. Black Ground Wire, attached to unit<br />
3. White Antenna Wire, attached to unit<br />
4. Buzzer with connection leads<br />
5. Manual Reset Control Knob under removable screw cap<br />
REMOTE CONTROL UNIT (X2)<br />
NOTE: The batteries are already installed.
ACCESSORY KIT<br />
Aluminum Female Positive Post with Butterfl y Connector<br />
with Bolt and Lock Washer<br />
L-Bracket & Straight Mounting Brackets<br />
Aluminum Positive Post with Bolt and Lock Washer<br />
Vibration Sensor<br />
Side Mount Bolt<br />
2 Cable Ties<br />
Chassis Mounting Spacers
<strong>Installation</strong> Instructions<br />
NOTE: <strong>Battery</strong> location and position differ in vehicles. With the<br />
supplied accessories you can mount the <strong>Battery</strong> <strong>Brain</strong> <strong>Platinum</strong><br />
on virtually any vehicle using the Top Mount, Side Mount or<br />
Chassis Mount positions.<br />
NOTE: After installation ensure all connections are tight.<br />
NOTE: Instruction stickers have been added to several key<br />
connection points in order to assist with installation.<br />
CONFIGURATION OPTIONS<br />
Top Mounting Options<br />
Side Mounting Options<br />
Chassis Mounting Option
STEP 1:<br />
Disconnecting <strong>Battery</strong> Cables:<br />
A. Disconnect the black/negative (–) cable from the negative (–)<br />
battery post/bolt on the battery.<br />
B. Disconnect the red/positive (+) cable from the positive (+)<br />
battery post/bolt on the battery.<br />
STEP 2:<br />
Connecting <strong>Battery</strong> <strong>Brain</strong> <strong>Platinum</strong>:<br />
A. Unscrew removable protective cap on the top off the unit<br />
and turn the ON/OFF Reset switch to the ON position.<br />
B. Connect the positive (+) clamp and the butterfl y connector to<br />
the positive (+) side (side with 12V+ printed) of the <strong>Battery</strong><br />
<strong>Brain</strong>.<br />
C. Connect the positive (+) clamp to the positive (+) post of the<br />
battery.<br />
D. TOP MOUNT ONLY - Connect the aluminum male post to the<br />
<strong>Battery</strong> <strong>Brain</strong> <strong>Platinum</strong> side without 12V+ printed.<br />
STEP 3:<br />
Connecting <strong>Battery</strong> Cables and Ground:<br />
A. Connect the red/positive (+) battery cable to the copper<br />
Aluminum post (or Side Mount bolt) on the outer bracket of<br />
the <strong>Battery</strong> <strong>Brain</strong>.<br />
B. Connect the black/negative (–) battery cable to the negative<br />
(–) post/bolt on the battery.<br />
C. Connect the clip end of the black ground wire to the clamp<br />
bolt on the negative (–) battery post/nut or ground to chassis<br />
with a metal screw.<br />
NOTE: Press the manual reset button to establish the power<br />
connection.
CHASSIS MOUNTING OPTION<br />
A. Connect the positive (+) side of the <strong>Battery</strong> <strong>Brain</strong> <strong>Platinum</strong><br />
to the positive (+) side of the battery with the red extension<br />
cable (purchase separately).<br />
B. Connect the original positive (+) cable of the car to other<br />
side of the <strong>Battery</strong> <strong>Brain</strong> <strong>Platinum</strong>.<br />
C. Connect the black ground wire of the <strong>Battery</strong> <strong>Brain</strong> <strong>Platinum</strong><br />
to the chassis.<br />
STEP 4:<br />
Installing the vibration sensor:<br />
A. Connect the blue accessory wire from the sensor to the pin<br />
on the <strong>Battery</strong> <strong>Brain</strong> <strong>Platinum</strong> that is marked ACC.<br />
B. Connect the red wire from the sensor to the butterfly clip on the<br />
positive clamp that is attached to the <strong>Battery</strong> <strong>Brain</strong> <strong>Platinum</strong>. In<br />
the case of a side mount battery, insert the provided side mount<br />
screw into the butterfly clip and then connect the red positive<br />
cable to the positive side of the battery and the red wire from<br />
the vibration sensor to the butterfly clip.<br />
C. Connect the black ground wire to the point where the main<br />
ground wire is connected.<br />
D. Mount the sensor in an area where there is vibration (the air<br />
cleaner cover or top plastic cover of the engine. Mounting the<br />
sensor on a metallic <strong>com</strong>ponent that gets hot with engine<br />
operation or on a body panel is not re<strong>com</strong>mended). Before<br />
mounting the vibration sensor, clean the selected area with<br />
an alcohol wipe (not provided) in order to ensure maximum<br />
adhesion.<br />
E. Mount the vibration sensor using 2-sided tape, pressing it<br />
fi rmly in place, or using a screw (not provided). Secure the<br />
wire with the provided cable ties.<br />
NOTE: Press the manual reset button to establish the power<br />
connection.
STEP 5:<br />
Mounting the buzzer:<br />
NOTE: The <strong>Battery</strong> <strong>Brain</strong> <strong>Platinum</strong> is equipped with a buzzer to<br />
test that the unit is armed.<br />
A. Buzzer should be installed using the zip tie supplied. The zip B. The buzzer is attached to unit using male/female connection<br />
tie should be attached close to the buzzer and tightened to pins (as illustrated).<br />
a wire in the area. This will ensure the buzzer will work at<br />
maximum effi ciency. Make sure that excess wire is secured.
Remote Control Instructions<br />
NOTE: Save the identifi cation number that is printed on the<br />
back of the remote control. If the original unit is lost, you will<br />
need the identifi cation number to order a replacement unit.<br />
NOTE: The batteries are already installed. To replace remote<br />
control batteries, turn the remote control unit over, unscrew<br />
the three screws, take out the old battery and insert the new<br />
battery, ensuring that the + and - ends are in the proper<br />
locations. Replace the back cover and tighten the three screws.<br />
FRONT OF THE REMOTE CONTROL UNIT<br />
NOTE: It is re<strong>com</strong>mended that the unit be armed when the<br />
vehicle is left unattended. Remember to disarm the unit before<br />
starting the engine. If an attempt is made to start the engine<br />
while the unit is armed, the engine will not start, and a clicking<br />
sound will be heard. If more than one attempt is made to start<br />
the engine while the unit is armed, the engine will not start,<br />
and the settings will be erased. If this happens, press the arm<br />
button and then the reset button and start the engine<br />
NOTE: If the unit detects that the battery voltage is less than<br />
11.9V it will <strong>com</strong>pletely disconnect the power, and the settings<br />
will be lost. If this happens, press the reset button and then<br />
turn the ignition key.<br />
A. Lock symbol button – Arm. Press and release this button in<br />
order to arm the unit. The unit then be<strong>com</strong>es an anti-theft<br />
device.<br />
B. Unlock symbol button – Disarm / Connect. Press and release<br />
the reset button in order to disarm the unit and start the<br />
vehicle.<br />
C. Electrical fl ash symbol button – Disconnect. Press this<br />
button in order to <strong>com</strong>pletely disconnect the unit and isolate<br />
the battery.<br />
D. Bell symbol button – Buzzer Test. Press this button to verify<br />
whether the unit is armed. If the unit is armed, the buzzer<br />
will sound twice. The buzzer will sound once when the unit<br />
is reset. If the unit is not armed, the buzzer will not sound.<br />
E. Chain
Testing & Operating<br />
Instructions<br />
1. TO TEST FOR SUCCESSFUL INSTALLATION:<br />
Press and release the reset button on the remote control unit.<br />
Start the engine after installation is <strong>com</strong>plete. If the engine<br />
starts properly proceed to the next step. If not, review the<br />
installation instruction or consult a qualifi ed technician.<br />
2. TO TEST BATTERY BRAIN OPERATION:<br />
With the <strong>Battery</strong> <strong>Brain</strong> <strong>Platinum</strong> in the “ON” position (or using<br />
the reset button on the remote) turn the engine off and turn on<br />
as many electrical accessories (i.e. lights, radio,) as possible<br />
and leave them on. The <strong>Battery</strong> <strong>Brain</strong> <strong>Platinum</strong> will cut power<br />
from the battery automatically – confi rming the <strong>Battery</strong> <strong>Brain</strong><br />
<strong>Platinum</strong> is working. This may take some time, depending on<br />
the battery’s age and state of charge.<br />
3. TO TEST THE ANTI-THEFT FUNCTION:<br />
To arm the anti-theft function when leaving the vehicle<br />
unattended, press and release the arm button on the remote<br />
control unit. The vehicle cannot be started when the anti-theft<br />
function is armed, because the battery is isolated from the<br />
vehicle’s electrical system. However, all electronic settings in<br />
the vehicle will be maintained (e.g.: radio presets, clock, etc.).<br />
To verify whether the unit is armed, press the buzzer button.<br />
The buzzer will sound twice, which confi rms that the unit is<br />
armed. If the buzzer does not sound, this signifi es that the unit<br />
is not armed.<br />
4. TO START THE VEHICLE & DISARM THE<br />
ANTI-THEFT FUNCTION:<br />
Press and release the reset button on the remote control unit in<br />
order to start the vehicle.<br />
NOTE: The engine cannot be started when the <strong>Battery</strong> <strong>Brain</strong><br />
<strong>Platinum</strong> is armed, but all electrical settings function normally.<br />
If the <strong>Battery</strong> <strong>Brain</strong> <strong>Platinum</strong> detects that the power in the<br />
battery is at the minimum level required in order to start the<br />
vehicle, it will isolate the battery in order to conserve enough<br />
power to start the vehicle. When this occurs, all electrical<br />
settings (radio presets, clock, etc.) will need to be reset when<br />
the power is reconnected. Any in-dash alerts that were present<br />
(check engine, check oil, etc.) may be reset.<br />
In such a case, it is re<strong>com</strong>mended to turn the key to the<br />
first position (accessory) and wait 30 seconds before<br />
starting the engine.<br />
5. TO COMPLETELY DISCONNECT THE<br />
BATTERY:<br />
Press the disconnect button on the remote control unit in order<br />
to <strong>com</strong>pletely disconnect the battery. This may be desirable in<br />
situations such as long-term parking, storage, etc. When the<br />
battery is <strong>com</strong>pletely disconnected, there will be no electrical<br />
power fl owing to the vehicle. All electrical settings (radio<br />
presets, clock, etc.) will need to be reset when the power is<br />
reconnected.<br />
In such a case, it is re<strong>com</strong>mended to turn the key to the<br />
first position (accessory) and wait 30 seconds before<br />
starting the engine.<br />
6. TO RECONNECT THE BATTERY:<br />
Press and release the Disarm / Connect button on the remote<br />
control unit in order to reconnect the battery.<br />
7. TO MANUALLY OPERATE THE ON BUTTON:<br />
The <strong>Battery</strong> <strong>Brain</strong> <strong>Platinum</strong> is equipped with a manual button<br />
on the top of the unit under the removable protective cap<br />
that can be used if the remote control unit is not available to<br />
reconnect power.<br />
To Reconnect: Press down the button (on the ON position)and<br />
hold until the power is reconnected. The unit will be disarmed,<br />
and the vehicle can be started.<br />
To Disconnect: Remote control must be used to disconnect the unit.<br />
In such a case, it is re<strong>com</strong>mended to turn the key to the<br />
first position (accessory) and wait 30 seconds before<br />
starting the engine.
IMPORTANT:<br />
The <strong>Battery</strong> <strong>Brain</strong> <strong>Platinum</strong> is in sleep mode while the engine<br />
is running, and will not react to any change in battery power.<br />
When the vehicle is running, the vibration sensor will sense<br />
the engine vibration, and the <strong>Battery</strong> <strong>Brain</strong> <strong>Platinum</strong> will not<br />
disconnect the battery, even if the battery power level falls<br />
below the minimum required in order to start the vehicle (as a<br />
result of the alternator not working). In order for this feature to<br />
be active, the vibration sensor must be connected (see Step 4<br />
of the installation instructions).<br />
IMPORTANT:<br />
The vehicle settings will remain active as long as the battery<br />
is in good operating condition. If the battery’s power levels fall<br />
below the minimum required in order to start the vehicle, the<br />
<strong>Battery</strong> <strong>Brain</strong> <strong>Platinum</strong> will disconnect the battery from the<br />
entire electrical system in order to conserve enough power to<br />
start the vehicle.<br />
If problems occur with any of the testing or operating<br />
procedures, please refer to Trouble Shooting Instructions<br />
or consult <strong>Battery</strong> <strong>Brain</strong> technical support.<br />
MULTI BATTERY INSTALLATION<br />
If your vehicle has a multi-battery confi guration, determine<br />
whether the batteries are connected in a series or parallel.<br />
<strong>Battery</strong> <strong>Brain</strong> can be mounted to any battery confi guration.<br />
However, any primary live positive battery post must have its<br />
own <strong>Battery</strong> <strong>Brain</strong>. Consult a certifi ed technician if you require<br />
assistance.<br />
If the two or more batteries are connected in series then only<br />
one <strong>Battery</strong> <strong>Brain</strong> is required. Follow the installation instructions<br />
as previously stated. If two or more batteries are connected in<br />
parallel, then you will require two <strong>Battery</strong> <strong>Brain</strong>s, to ensure that<br />
the batteries are effectively isolated from the electrical system<br />
once the activation threshold is reached. Mount both <strong>Battery</strong><br />
<strong>Brain</strong>s at the primary positive posts connected to the Starter,<br />
Alternator, ECM or any accessory device that requires electrical<br />
power.<br />
<strong>Installation</strong> Tip: Remote Location: If you wish to mount the<br />
<strong>Battery</strong> <strong>Brain</strong> in a remote location due to space limitations, or<br />
if desired, use proper battery cable either gauge 4/0 or 2/0.<br />
(Additional cable not supplied)<br />
Sample Configuration Options<br />
Series confi guration options shown for example purposes only.
INSTALLATION COMPLETE<br />
The manual reset control knob on the battery <strong>Brain</strong> unit under<br />
the removable protective cap should be turned to the “on”<br />
position. Then press down on the manual reset control knob to<br />
establish contact.<br />
NOTE: If there is a need to bypass the <strong>Battery</strong> <strong>Brain</strong> <strong>Platinum</strong><br />
so that it will not function when the engine is OFF turn the<br />
manual reset button under the removable protective cap to the<br />
OFF position.<br />
TROUBLE SHOOTING<br />
After installation, the battery brain platinum doesn’t<br />
seem to Be working.<br />
What to do:<br />
1. Be sure your battery is holding the proper charge.<br />
2. Make sure the positive side of the <strong>Battery</strong> <strong>Brain</strong> <strong>Platinum</strong><br />
(the side with 12V+ printed) is attached to the positive (+)<br />
post of the battery.<br />
3. Check that the Manual Reset Control Knob under the<br />
removable protective cap is pointing to the “ON” position.<br />
Check that the black ground wire is securely attached to the<br />
negative (-) post on the battery.<br />
After the battery brain has disconnected power, the<br />
remote control does not reset the power.<br />
What to do:<br />
1. Press and release the arm button on the remote control unit<br />
in order to activate the <strong>Battery</strong> <strong>Brain</strong> <strong>Platinum</strong>.<br />
2. Hold the Remote Control button down for fi ve seconds to<br />
activate <strong>Battery</strong> <strong>Brain</strong> <strong>Platinum</strong>.<br />
3. Turn the Manual Reset Control Knob under the removable<br />
protective cap to “ON” and push down to reset.<br />
4. Check that the black ground wire is securely attached to the<br />
negative (-) post on the battery.
<strong>Battery</strong> brain platinum is frequently disconnecting<br />
power for no apparent reason.<br />
What to do:<br />
1. Your battery may be near the end of its life cycle or damaged<br />
and not be able to maintain a safe level of charge. The<br />
battery should be tested and replaced if necessary.<br />
2. Your vehicles charging system may have a malfunction and<br />
not be able to fully charge the battery. Consult a qualifi ed<br />
technician.<br />
3. Disconnect all accessory electronics (radio, phone charger,<br />
DVD player, etc.) and check to see if any other accessories<br />
were accidentally left on or malfunctioning (glove box lights,<br />
trunk lights, power antennas, etc) and test again.<br />
You cannot determine a battery brain installation<br />
configuration for your vehicle or locate battery<br />
connections.<br />
What to do:<br />
Consult a qualifi ed technician.<br />
IMPORTANT NOTE:<br />
If a warning light for NO CHARGE or BATTERY WARNING<br />
illuminates on your dashboard, stop your vehicle at a safe area<br />
and TURN THE MANUAL RESET CONTROL KNOB (located under<br />
the removable protective cap on the <strong>Battery</strong> <strong>Brain</strong> <strong>Platinum</strong><br />
unit itself) TO THE “OFF” POSITION. Your vehicle will experience<br />
a <strong>com</strong>plete loss of power unless the “No Charge” problem is<br />
repaired immediately! This problem is unrelated to the <strong>Battery</strong><br />
<strong>Brain</strong> <strong>Platinum</strong> and requires assistance from a qualifi ed<br />
technician.
Limited Warranty<br />
Your <strong>Battery</strong> <strong>Brain</strong> <strong>Platinum</strong> is covered by a conditional, limited warranty to the original purchaser.<br />
This unit is guaranteed to the original retail purchaser against defects in quality or workmanship for a period of two years from the<br />
date of original purchase. If this unit fails because of a manufacturing defect within 30 days of purchase, return the unit, with your<br />
receipt, to the retailer. After 30 days of purchase, but within the warranty period, if the unit was purchased within the continental<br />
United States, return it, freight prepaid, to Smart Energy Solutions Inc. for repair or replacement. If the unit was purchased outside the<br />
continental United States, return the unit to the place of purchase.<br />
This warranty does not cover damage due to operation other than the use of the correct <strong>Battery</strong> <strong>Brain</strong> <strong>Platinum</strong> model on the specifi ed<br />
battery voltage. This warranty does not extend to any defect, malfunction, or failure caused by accidents, misuse, abuse, improper<br />
installation (including disassembly of <strong>Battery</strong> <strong>Brain</strong> <strong>Platinum</strong>, use of the product with equipment for which it was not intended, or<br />
unauthorized alterations or repairs.<br />
All implied warranties are hereby limited in duration to the period of two years from the date of original retail purchase. Incidental<br />
or consequential damages arising from a breach of either express or implied warranties are hereby disclaimed and excluded. Some<br />
states do not allow the exclusion of limitation of incidental or consequential damages, so this limitation or exclusion may not apply to<br />
you.<br />
Neither Smart Energy Solutions Inc. nor retailers selling <strong>Battery</strong> <strong>Brain</strong> <strong>Platinum</strong> are responsible for indirect, incidental, special, punitive<br />
or consequential damages arising from improper installation, the use of or inability to use <strong>Battery</strong> <strong>Brain</strong> <strong>Platinum</strong>. Except for this<br />
limited warranty, Smart Energy Solutions Inc. has not made, and specifi cally disclaims any warranty or representation of any kind,<br />
express or implied, direct or indirect, of product fi tness for a particular purpose.<br />
Assembled in China for Smart Energy Solutions, Inc.
<strong>Battery</strong> <strong>Brain</strong> <strong>Platinum</strong> is an innovative accessory that easily<br />
installs to any vehicle battery. Using unique micro-electronic<br />
technology it continually monitors the battery power. When<br />
<strong>Battery</strong> <strong>Brain</strong> <strong>Platinum</strong> detects power falling below the level<br />
required to start your engine, it automatically isolates the<br />
battery from the electrical system. Specially designed to<br />
protect accessory memory and presets it also has the ability to<br />
disconnect the battery from the electrical system to act as an<br />
anti-theft device. <strong>Battery</strong> <strong>Brain</strong> <strong>Platinum</strong> ensures you always<br />
have enough batterypower to start your engine and keep<br />
moving down the road!<br />
Smart Energy Solutions, Inc.<br />
210 West Parkway, Unit #7<br />
Pompton Plains, NJ 07444 USA<br />
Telephone: 973-248-8008<br />
Fax: 973-248-8088<br />
Technical Support: 1-877-247-5993<br />
sales@smgy.net<br />
www.smgy.net<br />
NASDAQ OTCBB:SMGY.OB<br />
For more information and other products go to<br />
www.smgy.net/batterybrain/<br />
version:200701


