

TrailSeal Total Bed Seal Installation Instructions - RealTruck.com
TrailSeal Total Bed Seal Installation Instructions - RealTruck.com
TrailSeal Total Bed Seal Installation Instructions - RealTruck.com

You also want an ePaper? Increase the reach of your titles
YUMPU automatically turns print PDFs into web optimized ePapers that Google loves.
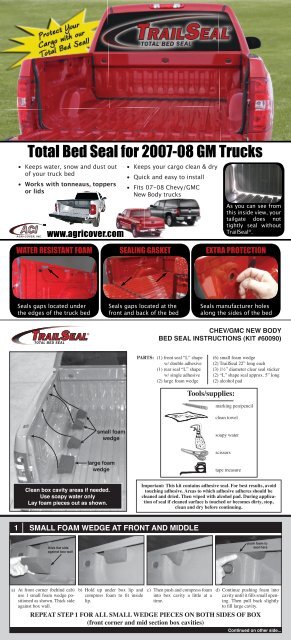
<strong>Total</strong> <strong>Bed</strong> <strong>Seal</strong> for 2007-08 GM Trucks<br />
• Keeps water, snow and dust out<br />
of your truck bed<br />
• Works with tonneaus, toppers<br />
or lids<br />
• Keeps your cargo clean & dry<br />
• Quick and easy to install<br />
• Fits 07-08 Chevy/GMC<br />
New Body trucks<br />
www.agricover.<strong>com</strong><br />
As you can see from<br />
this inside view, your<br />
tailgate does not<br />
tightly seal without<br />
<strong>Trail<strong>Seal</strong></strong> ® .<br />
WATER RESISTANT FOAM<br />
SEALING GASKET<br />
EXTRA PROTECTION<br />
<strong>Seal</strong>s gaps located under<br />
the edges of the truck bed<br />
<strong>Seal</strong>s gaps located at the<br />
front and back of the bed<br />
<strong>Seal</strong>s manufacturer holes<br />
along the sides of the bed<br />
CHEV/GMC NEW BODY<br />
BED SEAL INSTRUCTIONS (KIT #60090)<br />
PARTS: (1) front seal “L” shape<br />
w/ double adhesive<br />
(1) rear seal “L” shape<br />
w/ single adhesive<br />
(2) large foam wedge<br />
(6) small foam wedge<br />
(2) <strong>Trail<strong>Seal</strong></strong> 22” long each<br />
(3) 1½” diameter clear seal sticker<br />
(2) “L” shape seal approx. 5” long<br />
(2) alcohol pad<br />
Tools/supplies:<br />
marking pen/pencil<br />
clean towel<br />
small foam<br />
wedge<br />
soapy water<br />
scissors<br />
large foam<br />
wedge<br />
tape measure<br />
Clean box cavity areas if needed.<br />
Use soapy water only<br />
Lay foam pieces out as shown.<br />
Important: This kit contains adhesive seal. For best results, avoid<br />
touching adhesive. Areas to which adhesive adheres should be<br />
cleaned and dried. Then wiped with alcohol pad. During application<br />
of seal if cleaned surface is touched or be<strong>com</strong>es dirty, stop,<br />
clean and dry before continuing.<br />
1 SMALL FOAM WEDGE AT FRONT AND MIDDLE<br />
thick flat side<br />
against box wall<br />
push foam to<br />
seal here<br />
a) At front corner (behind cab)<br />
use 1 small foam wedge positioned<br />
as shown. Thick side<br />
against box wall.<br />
b) Hold up under box lip and<br />
<strong>com</strong>press foam to fit inside<br />
lip.<br />
c) Then push and <strong>com</strong>press foam<br />
into box cavity a little at a<br />
time.<br />
d) Continue pushing foam into<br />
cavity until it fills small opening.<br />
Then pull back slightly<br />
to fill large cavity.<br />
REPEAT STEP 1 FOR ALL SMALL WEDGE PIECES ON BOTH SIDES OF BOX<br />
(front corner and mid section box cavities)<br />
Continued on other side...
2 LARGE FOAM WEDGE AT REAR<br />
PUSH<br />
Foam sealing<br />
small opening<br />
1 st Push foam, working it until<br />
this opening is sealed<br />
spray surface area<br />
with soapy water<br />
Sometimes, foam<br />
gets caught here.<br />
Push when needed.<br />
Now gently pull back<br />
and work foam to<br />
expand and fill large<br />
cavity<br />
a) At rear of box, spray with<br />
soapy water for easier installation.<br />
Place long foam<br />
up under box lip. (thick side<br />
against box wall)<br />
b) Compress foam and push<br />
while guiding lead end into<br />
cavity.<br />
c) Push until leading end fills<br />
small opening nearest tailgate.<br />
d) Then gently pull on back of<br />
foam until it expands to fill<br />
the large cavity. Repeat step<br />
2 for other side.<br />
3 “L” SEAL DOUBLE SIDE ADHESIVE AT FRONT<br />
Apply extra firm pressure at<br />
each inside corner of every<br />
rib and along entire seal<br />
Wash-towel dry<br />
wipe with<br />
alcohol pad<br />
a) Thoroughly clean inside<br />
area of box (where seal adheres)<br />
with mild soapy water.<br />
Towel dry. Wipe with alcohol<br />
pad (save 2nd alcohol pad<br />
for later). See above.<br />
½” wide<br />
“V”-cut<br />
6”<br />
b) Behind cab begin with “L”<br />
seal having adhesive on both<br />
legs. Make V-cut 6 inches<br />
down in leg adjacent to side<br />
of box as shown.<br />
Push here firmly<br />
to ensure seal<br />
conforms to box<br />
contour<br />
c) Peel adhesive protector as<br />
needed from both legs. Begin<br />
adhering seal to inside corner<br />
where box walls meet. Push<br />
firmly in center of seal following<br />
contour of box down<br />
to floor.<br />
d) Continue around corner . At<br />
floor, leave protective backing to<br />
wall side. Work across floor with<br />
firm pressure up and down<br />
each rib. Then peel backing off<br />
wall side and apply pressure to<br />
it. Next continue with both seals<br />
up box. Stop at box contour near<br />
top. Leave adhesive protectors<br />
on- mark and cut seal to length<br />
for top and V-cut - as at top of<br />
other side -then finish adhering.<br />
4 “L” SEAL SINGLE SIDE ADHESIVE AT REAR<br />
19½”<br />
Align adhesive<br />
to this lip<br />
Start / Stop<br />
a) At tailgate, measure from top<br />
of box down to 19½” and<br />
make small mark. Repeat on<br />
other side.<br />
b) Note: Make sure this area is<br />
still clean. Use “L” seal with<br />
adhesive on one leg. Align<br />
seal with mark and adhere<br />
along round corner as shown.<br />
c) Continue applying seal to lip<br />
along bed floor following up<br />
and down the ribs. Use firm<br />
pressure. Continue on stopping<br />
at mark on opposite side.<br />
d) <strong>Seal</strong> at rear should resemble<br />
image above when done.<br />
5 TRAILSEAL ® AT REAR<br />
Apply extra<br />
pressure to<br />
seal this gap<br />
a) At top of box by tailgate<br />
(make sure area is still clean)<br />
start applying <strong>Trail<strong>Seal</strong></strong> as<br />
shown above.<br />
b) Follow contour of ridge and<br />
continue down toward box<br />
floor.<br />
c) At the bottom, curve trailseal<br />
under the “L” seal as shown.<br />
d) When done, corner should<br />
look like above. Apply firm<br />
pressure up and down entire<br />
trailseal. Repeat step 5 on<br />
opposite side.<br />
6 CLEAR SEAL STICKER AND 5” “L” SEAL<br />
Clear seal sticker<br />
Wipe here<br />
“L” seal<br />
Clear seal sticker<br />
a) At tailgate end locate round<br />
hole. Wipe with alcohol pad.<br />
Apply a clear seal sticker<br />
over hole. Repeat for hole on<br />
opposite side.<br />
b) Locate oblong hole on box<br />
floor behind cab. Wipe with<br />
alcohol. Apply clear seal<br />
sticker over hole.<br />
c) On tailgate, wipe area shown<br />
above with alcohol pad-both<br />
sides of tailgate. Then apply<br />
short piece of “L” seal to<br />
tailgate.<br />
d) When done seal should look<br />
like above at both sides of<br />
tailgate. Apply firm pressure<br />
to adhesive on both seals.<br />
NOTE:<br />
Manufacturing standards for truck boxes are not leak proof and may not be <strong>com</strong>pletely sealed with this kit. This is not<br />
a defect of the box nor a defect of this seal kit. If maximum protection is desired, locate and apply clear silicon to any<br />
areas of concern. See below for examples. (Silicon is not included with seal kit)<br />
Water drainage holes<br />
Remove plastic<br />
plugs silicon around<br />
and reinstall<br />
This hole sometimes may<br />
not be <strong>com</strong>pletely sealed<br />
Caulking sometimes<br />
stops too short to seal<br />
a) Water drainage holes on floor behind cab.<br />
<strong>Seal</strong> with silicon if desired.<br />
b) Black nylon wall plugs. <strong>Seal</strong> if desired<br />
by removing each one applying silicon<br />
around perimeter and reinstalling.<br />
c) Sometimes hole is not sealed on floor and<br />
OEM caulking sometimes stops short at<br />
end of box. <strong>Seal</strong> with silicon if desired.<br />
50347INIT ©Copyright 2008 Agri-Cover, Inc. All Rights Reserved 021108


