

PowertraxONE Instruction Supplement - Retrax
PowertraxONE Instruction Supplement - Retrax
PowertraxONE Instruction Supplement - Retrax

You also want an ePaper? Increase the reach of your titles
YUMPU automatically turns print PDFs into web optimized ePapers that Google loves.
#2011 Install <strong>Instruction</strong>s <strong>Supplement</strong><br />
IMPORTANT: Follow these instructions BEFORE installing the <strong>Retrax</strong> cover<br />
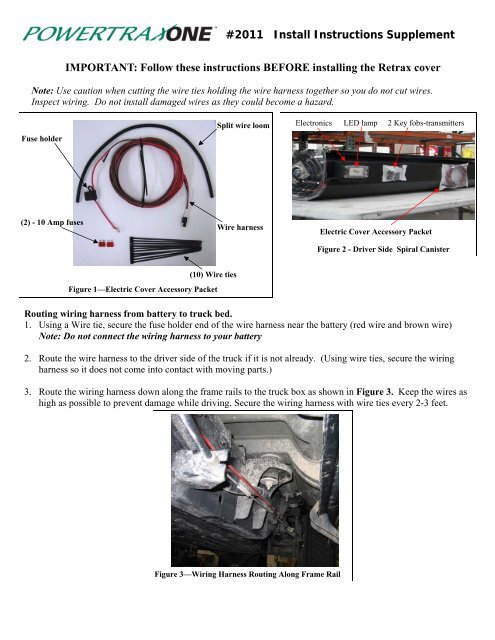
Note: Use caution when cutting the wire ties holding the wire harness together so you do not cut wires.<br />
Inspect wiring. Do not install damaged wires as they could become a hazard.<br />
Split wire loom<br />
Electronics<br />
LED lamp<br />
2 Key fobs-transmitters<br />
Fuse holder<br />
(2) - 10 Amp fuses<br />
Wire harness<br />
Electric Cover Accessory Packet<br />
Figure 2 - Driver Side Spiral Canister<br />
(10) Wire ties<br />
Figure 1—Electric Cover Accessory Packet<br />
Routing wiring harness from battery to truck bed.<br />
1. Using a Wire tie, secure the fuse holder end of the wire harness near the battery (red wire and brown wire)<br />
Note: Do not connect the wiring harness to your battery<br />
2. Route the wire harness to the driver side of the truck if it is not already. (Using wire ties, secure the wiring<br />
harness so it does not come into contact with moving parts.)<br />
3. Route the wiring harness down along the frame rails to the truck box as shown in Figure 3. Keep the wires as<br />
high as possible to prevent damage while driving. Secure the wiring harness with wire ties every 2-3 feet.<br />
Figure 3—Wiring Harness Routing Along Frame Rail
#2011 Install <strong>Instruction</strong>s <strong>Supplement</strong><br />
4. Two options for routing the wire harness into<br />
the truck box are shown below in Figure 4.<br />
OPTION 1: Through drain tube holes<br />
(Step12 of the <strong>Retrax</strong> Installation <strong>Instruction</strong>s).<br />
Push 24” of wire through the holes. Use split<br />
wire loom to wrap around the wires as a barrier<br />
between the wires and the drain tube hole.<br />
(NOTE: this may require a larger hole than<br />
normal to allow for wires.)<br />
OPTION 2: Route the wiring in the gap<br />
between the cab and truck bed (leave about 24” in<br />
truck bed). The wires will be hidden under the<br />
front weather-stripping of the <strong>Retrax</strong> cover.<br />
Figure 4—Wiring options in Bed of Truck<br />
Installing the POWERTRAXONE on the truck<br />
Proceed with the RETRAX Assembly and Installation <strong>Instruction</strong>s Steps 1-10<br />
NOTE: Disregard all references to “Lock.” Not applicable for POWERTRAXONE.<br />
Connect the wiring harness to electronics box<br />
and battery<br />
A. There is a white label wrapped with the letter<br />
“P” on it to ensure proper connections are made<br />
(Figures 5). Ensure the connectors labeled P are<br />
securely connected. (Connectors labeled “M” will<br />
come attached.)<br />
Motor – M<br />
Power – P<br />
B. Connect the wires to the battery and install a<br />
fuse in the fuse holder. The RED wire (with the<br />
fuse holder) to the POSITIVE post, and the<br />
BROWN wire will connect to the NEGATIVE<br />
post.<br />
Figure 5<br />
C. Continue with Step #11 of the RETRAX<br />
Installation <strong>Instruction</strong>s.<br />
Note: For proper cover operation, ensure rails<br />
are positioned correctly (see Fig. 7 below).<br />
These surfaces must be level<br />
Hold to open<br />
Press once to illuminate<br />
light (3 minutes)<br />
Hold to close<br />
Figure 6 — Operation of the POWERTRAX<br />
Figure 7—Ensure rails are level


