Download User manual here - Firstbeat
Download User manual here - Firstbeat
Download User manual here - Firstbeat

You also want an ePaper? Increase the reach of your titles
YUMPU automatically turns print PDFs into web optimized ePapers that Google loves.
Distributed by<br />
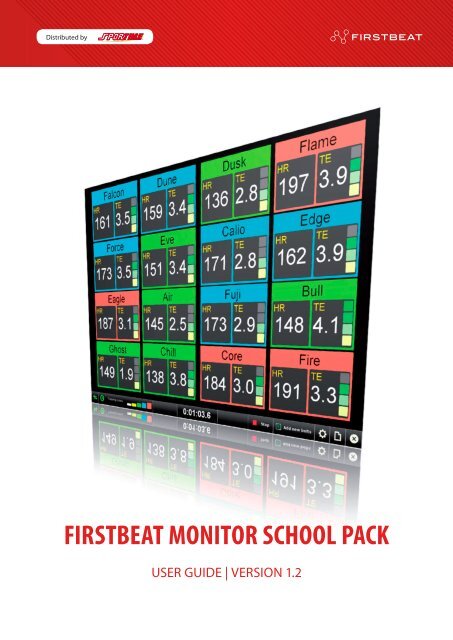
<strong>Firstbeat</strong> Monitor School Pack<br />
<strong>User</strong> Guide | Version 1.2
Introduction<br />
Table of Contents<br />
1 <strong>Firstbeat</strong> monitor 3<br />
1.1 System Requirements 3<br />
1.2 Terms and abbreviations 3<br />
2 Installation 4<br />
2.1 Install <strong>Firstbeat</strong> Monitor 4<br />
3 Using the monitor 6<br />
3.1 Login 6<br />
3.2 Getting started 6<br />
3.2.1 Product registration 7<br />
3.2.2 Set-up wizard steps 7<br />
3.2.3 Configuration tool 8<br />
3.3 Monitoring session 10<br />
3.3.1 Start monitoring session 10<br />
3.3.2 End monitoring session 10<br />
3.3.3 Modifying settings during the workout 11<br />
3.4 Settings 11<br />
3.4.1 Display settings 11<br />
3.4.2 Training zones 12<br />
3.4.3 Communication settings 12<br />
3.4.4 Other settings 13<br />
2<br />
Copyright © <strong>Firstbeat</strong> Technologies Oy www.firstbeat.fi
Distributed by<br />
1 <strong>Firstbeat</strong> monitor<br />
<strong>Firstbeat</strong> Monitor School pack is High performance monitoring<br />
system for indoor and outdoor monitoring of heart rate and<br />
Training Effect of Physical Education classes. Real time monitoring<br />
and feedback reporting of meaningful physiological information<br />
makes physical education fun and efficient.<br />
The system consists of monitoring hardware (receiver and heart<br />
rate belts) and <strong>Firstbeat</strong> Monitor software. Online internet<br />
access is recommended to exploit all the features in the software,<br />
but the system can be used in offline mode as well.<br />
1.1 System Requirements<br />
Operates in Windows Vista, XP and 7<br />
– RAM at least 512 MB<br />
– Processor at least 1 GHz<br />
– Minimum of 50 MB of free hard disk drive space<br />
– Screen resolution at least 1024x768 and 16-bit colors<br />
– Software: Adobe Acrobat Reader 5.0 or later<br />
– Compatible measurement devices:<br />
Suunto TEAM Pod and <strong>Firstbeat</strong> team receiver<br />
1.2 Terms and abbreviations<br />
%HRmax<br />
Heart rate expressed as percent (%) of one’s maximum heart<br />
rate.<br />
MVPA<br />
MVPA (Moderate to Vigorous Physical Activity) is the intensity<br />
level w<strong>here</strong> fitness activities are the most efficient for improving<br />
cardiovascular fitness in physical education. According to<br />
Healthy People 2010 (HP2010) objective 22-10, students must<br />
spend 50 percent or more of their activity time in MVPA. In<br />
<strong>Firstbeat</strong> School Monitor the MVPA zone is set to heart rate level<br />
from 135bpm to 185bpm and the proportional (%) time spent<br />
within the zone can be monitored in real time during the group<br />
workout.<br />
Activity Class (AC)<br />
Activity Class represents an evaluation of the current fitness<br />
level of the student. The chosen Activity Class affects how<br />
quickly Training Effect parameter accumulates during exercise.<br />
Student profile<br />
Each student needs to have profile in <strong>Firstbeat</strong> Monitor. Profile<br />
is used for individual analysis and it provides personalized realtime<br />
information on each student during the PE class.<br />
Class<br />
Class represents group of Students in <strong>Firstbeat</strong> Monitor. Name<br />
and select Students to Classes for quick and easy start of PE class<br />
session.<br />
Copyright © <strong>Firstbeat</strong> Technologies Oy www.firstbeat.fi 3
software Installation<br />
2 Installation<br />
Please find the <strong>Firstbeat</strong> Monitor installation package in the<br />
memory stick in <strong>Firstbeat</strong> Monitor School Pack.<br />
2.1 Install <strong>Firstbeat</strong> Monitor<br />
Plug-in the memory stick to PC’s USB port and open the content.<br />
Double click <strong>Firstbeat</strong> Monitor School Pack icon.<br />
Wait for software installation wizard to open.<br />
4<br />
Copyright © <strong>Firstbeat</strong> Technologies Oy www.firstbeat.fi
Distributed by<br />
The wizard will guide you through the program installation process.<br />
Please follow Wizard’s instructions.<br />
After the program is installed then you must install the device<br />
drivers for the Team Receiver. Select the correct driver: For new<br />
School Pack users select <strong>Firstbeat</strong> receiver USB driver (for <strong>Firstbeat</strong><br />
Team Receiver). For Suunto hardware users (if you have<br />
Suunto HR belts and Suunto Team POD Receiver from earlier<br />
purchase) then you must select Suunto Pod USB driver (for<br />
Suunto Team Pod Receiver).<br />
USB driver setup Wizard will guide you through the driver setup<br />
process. Follow the Wizard instructions.<br />
Copyright © <strong>Firstbeat</strong> Technologies Oy www.firstbeat.fi 5
Setting up and using the monitor<br />
3 Using the monitor<br />
3.1 Login<br />
For full functionality <strong>Firstbeat</strong> Monitor must be connected to<br />
the server through internet. <strong>Firstbeat</strong> Monitor asks for username<br />
and password for safe server connection each time it is started.<br />
Search the document <strong>User</strong> Names and Passwords in the School<br />
Pack for the Teacher credentials. Enter username and password<br />
and click OK.<br />
<strong>Firstbeat</strong> Monitor can be used without internet connection<br />
with limited functionality. Clicking Offline mode in Login screen<br />
bypasses the login and server connection. During server connection<br />
<strong>Firstbeat</strong> Monitor collects class and student profile<br />
information from the server. T<strong>here</strong>fore the offline mode causes<br />
some limitations to the monitoring:<br />
Without connection to <strong>Firstbeat</strong> Server and student<br />
profile information the display information is limited<br />
Heart rate (bpm) and MVPA can still be shown on the<br />
monitoring screen when offline.<br />
However in offline mode you cannot SAVE heart rate<br />
data and automatic e-mailing is also disabled.<br />
Hint! For full Monitor functionality in area without internet<br />
connectivity you can try the following:<br />
1. Start up the <strong>Firstbeat</strong> Monitor in place with internet connection<br />
(such as in teachers’ office) and login to the program/<br />
server t<strong>here</strong>. Select the class to be monitored and<br />
click ok.<br />
2. Then move PC to the PE class area and continue session as<br />
normal. Now all detailed monitoring information is shown<br />
on screen based on student profiles.<br />
3. After stopping the session you can get back online and the<br />
monitored data will be automatically sent to server. Also<br />
the automatic reporting will work correctly.<br />
3.2 Getting started<br />
Each Teacher must accept the EULA (End <strong>User</strong> License Agreement)<br />
before the first login. Accept the EULA and click OK.<br />
During the first use the Set-up Wizard will help you get started.<br />
Click Set-up Wizard to begin.<br />
6<br />
Copyright © <strong>Firstbeat</strong> Technologies Oy www.firstbeat.fi
Distributed by<br />
3.2.1 Product registration<br />
Registering the product will allow <strong>Firstbeat</strong> to support your<br />
needs better. Enter the appropriate contact information and<br />
select your time zone. Click Next.<br />
3.2.2 Set-up wizard steps<br />
Setup wizard walks you through entering belt IDs, classes and<br />
student profiles. This information is necessary to allow for<br />
detailed real-time monitoring and reporting. The configuration<br />
can be modified later using Configuration tool.<br />
Enter HR belt information<br />
Enter all HR belt IDs and corresponding profile nicknames in the<br />
table. <strong>Firstbeat</strong> Monitor needs this information to associate the<br />
HR belt data with a nickname shown on the screen. Students<br />
wearing HR belts must know their belt nickname which is written<br />
on a sticker or label on front of HR belt.<br />
Alternatively, click Load from CSV file… and import the list of HR<br />
belt IDs and corresponding pre-set profile nicknames from the<br />
memory stick provided (File name is belt-information.csv).<br />
Copyright © <strong>Firstbeat</strong> Technologies Oy www.firstbeat.fi 7
Setting up and using the monitor<br />
Enter Class names<br />
Enter the names of classes you want to set up for heart rate<br />
monitoring. Select class name in the list and click Edit to change<br />
the class name.<br />
Hint: For fast editing: Type the class name, press Enter and<br />
repeat the process as long as all classes are entered.<br />
3.2.3 Configuration tool<br />
Configuration tool provides access to the same information<br />
as the Setup Wizard. While Setup Wizard focuses on getting<br />
started easily, Configuration tool shows the current set up and<br />
allows s changes to it. Open Configuration tool in Main menu on<br />
bottom right of main screen.<br />
Edit HR belt information<br />
See the instructions Enter HR belt information in previous chapter.<br />
Edit Classes<br />
Click on class name in the list of classes to see the students at<br />
right. Click Add students to add un-assigned students to the<br />
selected class. Drag & drop students to move between classes.<br />
Removing students moves them to class [Not set]. Click Add class<br />
to add new classes. Select class and click Delete to remove it.<br />
Enter students<br />
Each student needs to have a profile in <strong>Firstbeat</strong> Monitor for<br />
detailed analysis, monitoring and reporting. Enter profile information<br />
for students then select class and belt assignments. The<br />
red star (*) indicates required information.<br />
The class and HR belt assignments can be also be done later in<br />
configuration tool. The assignments are required for monitoring<br />
the student.<br />
Entering the student’s or parent’s e-mail address enables e-mailing<br />
the student PDF report for each PE session.<br />
8<br />
Copyright © <strong>Firstbeat</strong> Technologies Oy www.firstbeat.fi
Distributed by<br />
Edit Students<br />
Edit student profiles and select class and HR belt assignments by<br />
clicking button on appropriate cell in the table. Click Add new<br />
to add new student profiles. Click on Student’s name and click<br />
Delete to remove student profile.<br />
My account<br />
Here you can change your own account information. Click edit<br />
to change account information. When you are ready click save<br />
to confirm changes. By clicking Cancel the program returns back<br />
without saving.<br />
Teacher accounts<br />
Here you can manage all the teacher accounts in the system.<br />
You can create new accounts by clicking Add teacher account<br />
and delete old ones by clicking Delete. New teacher account<br />
requires an e-mail address w<strong>here</strong> credentials are being sent.<br />
Copyright © <strong>Firstbeat</strong> Technologies Oy www.firstbeat.fi 9
Setting up and using the monitor<br />
3.3 Monitoring session<br />
3.3.1 Start monitoring session<br />
Click Start session on bottom bar. Timer starts to run and <strong>Firstbeat</strong><br />
Monitor shows each student on the screen.<br />
Connect Group Receiver to PC’s USB port. After login Select class<br />
for monitoring and click OK.<br />
3.3.2 End monitoring session<br />
Click End session when PE class is ended. Class summary with<br />
Class Average Training Effect, MVPA and Class Average Heart<br />
Rate appears on screen.<br />
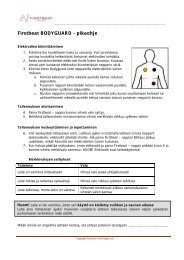
Give HR belts to students and make sure they wear them<br />
correctly:<br />
1. Moisten the electrode surfaces on the back of the belt.<br />
2. Attach the belt firmly on bare skin around the chest just<br />
below pectoral muscles (see the picture).<br />
3. Make sure that the manufacturer logo is facing up.<br />
<strong>Firstbeat</strong> Monitor will automatically start searching for the<br />
receiver and heart rate belts within range. The belts appear to<br />
the screen as they are found.<br />
Close the Class summary to see the individual results. See the<br />
Training Effect, Average Heart Rate, Energy expenditure (Kcal)<br />
and percentage total time in MVPA zone (%) for each student.<br />
Clicking Close summary triggers automatic emailing of reports<br />
and moves to the start phase for the next monitoring session.<br />
10<br />
Copyright © <strong>Firstbeat</strong> Technologies Oy www.firstbeat.fi
Distributed by<br />
3.3.3 Modifying settings during the workout<br />
<strong>Firstbeat</strong> Monitor enables temporary changes to settings during<br />
the workout. The changes will apply only to the ongoing session<br />
and the default settings are not affected. Click Manage view in<br />
Menu on right of bottom bar to modify the settings.<br />
In case of non-working HR belt, give another belt to the student<br />
and change the HR belt assignment under the Students tab in<br />
the Manage view tool.<br />
3.4 Settings<br />
Changes to Settings affects the <strong>Firstbeat</strong> Monitor behavior and<br />
appearance. You can choose which information and which colors<br />
are shown on the Monitor screen and change the automatic<br />
reporting all in settings. Click Settings in the Login window or in<br />
Menu.<br />
3.4.1 Display settings<br />
Use Display settings to select Information to be shown on the<br />
Monitor screen.<br />
Change the information shown in monitor under the Information<br />
tab.<br />
You may select a background image to be displayed in monitor<br />
main view screen by choosing the Background image tab. The<br />
image will be stretched to fill the screen. It is recommended to<br />
use darker images that are approximately the size of the screen.<br />
Copyright © <strong>Firstbeat</strong> Technologies Oy www.firstbeat.fi 11
Setting up and using the monitor<br />
3.4.2 Training zones<br />
Use Training Zone settings to select Zone Limits and Colors for<br />
Training Zones for %HRmax monitoring or for colors if using<br />
MVPA Zone monitoring.<br />
3.4.3 Communication settings<br />
Use Communication settings to setup the automatic emailing<br />
and server connection parameters.<br />
E-mails: Choose the e-mailed Reports that teachers and students/parents<br />
will receive automatically after each monitored<br />
PE class.<br />
Server: Define the Server address for server connection.<br />
NOTE: The default server address should work and this<br />
value should not be changed without <strong>Firstbeat</strong> Support<br />
consultation.<br />
Choose whether to get notification when t<strong>here</strong> are measurements<br />
waiting to be sent to server. This occurs when t<strong>here</strong> is no<br />
internet connection available when monitoring session ends.<br />
12<br />
Copyright © <strong>Firstbeat</strong> Technologies Oy www.firstbeat.fi
Distributed by<br />
Advanced: Set the proxy server settings under Advanced tab.<br />
Contact your IT department for proxy server settings.<br />
3.4.4 Other settings<br />
Use Other Settings to be able to change the order of the student<br />
data tiles in monitor view. You can choose to arrange the student<br />
data tiles in alphabetical order or to keep them arranged<br />
in the order in which they appear when first detected. <strong>Firstbeat</strong><br />
files root folder defines the place in your hard disc w<strong>here</strong> all the<br />
measurement files are stored for backup. You can also edit time<br />
zone information.<br />
Copyright © <strong>Firstbeat</strong> Technologies Oy www.firstbeat.fi 13
YOUR NOTES<br />
14<br />
Copyright © <strong>Firstbeat</strong> Technologies Oy www.firstbeat.fi
Distributed by<br />
Copyright © <strong>Firstbeat</strong> Technologies Oy www.firstbeat.fi 15
Copyright © <strong>Firstbeat</strong> Technologies Oy www.firstbeat.fi