How to: Petersham Ribbon Waistband - BurdaStyle.com
How to: Petersham Ribbon Waistband - BurdaStyle.com
How to: Petersham Ribbon Waistband - BurdaStyle.com

Create successful ePaper yourself
Turn your PDF publications into a flip-book with our unique Google optimized e-Paper software.
<strong>How</strong> <strong>to</strong>: <strong>Petersham</strong> <strong>Ribbon</strong> <strong>Waistband</strong><br />
By: sunnilj9<br />
http://www.burdastyle.<strong>com</strong>/techniques/how-<strong>to</strong>-petersham-ribbon-w<br />
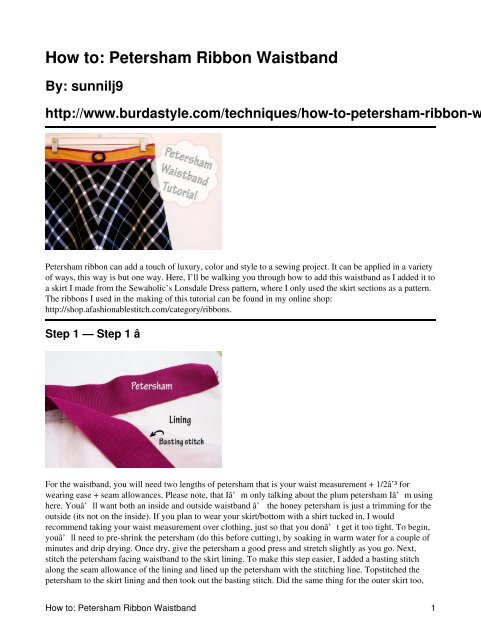
<strong>Petersham</strong> ribbon can add a <strong>to</strong>uch of luxury, color and style <strong>to</strong> a sewing project. It can be applied in a variety<br />
of ways, this way is but one way. Here, I’ll be walking you through how <strong>to</strong> add this waistband as I added it <strong>to</strong><br />
a skirt I made from the Sewaholic’s Lonsdale Dress pattern, where I only used the skirt sections as a pattern.<br />
The ribbons I used in the making of this tu<strong>to</strong>rial can be found in my online shop:<br />
http://shop.afashionablestitch.<strong>com</strong>/category/ribbons.<br />
Step 1 — Step 1 â<br />
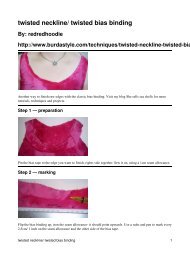
For the waistband, you will need two lengths of petersham that is your waist measurement + 1/2â’³ for<br />
wearing ease + seam allowances. Please note, that Iâ’m only talking about the plum petersham Iâ’m using<br />
here. Youâ’ll want both an inside and outside waistband â’ the honey petersham is just a trimming for the<br />
outside (its not on the inside). If you plan <strong>to</strong> wear your skirt/bot<strong>to</strong>m with a shirt tucked in, I would<br />
re<strong>com</strong>mend taking your waist measurement over clothing, just so that you donâ’t get it <strong>to</strong>o tight. To begin,<br />
youâ’ll need <strong>to</strong> pre-shrink the petersham (do this before cutting), by soaking in warm water for a couple of<br />
minutes and drip drying. Once dry, give the petersham a good press and stretch slightly as you go. Next,<br />
stitch the petersham facing waistband <strong>to</strong> the skirt lining. To make this step easier, I added a basting stitch<br />
along the seam allowance of the lining and lined up the petersham with the stitching line. Topstitched the<br />
petersham <strong>to</strong> the skirt lining and then <strong>to</strong>ok out the basting stitch. Did the same thing for the outer skirt <strong>to</strong>o,<br />
<strong>How</strong> <strong>to</strong>: <strong>Petersham</strong> <strong>Ribbon</strong> <strong>Waistband</strong> 1
ut added the covered belt buckle and honey petersham beforehand. Bonus Tip â You can also hand baste<br />
before stitching with your machine <strong>to</strong> make things even easier. I did that for the honey petersham as I applied<br />
it <strong>to</strong> the outside waistband. After youâ’ve applied the petersham, give your seam allowance (skirt fabrics<br />
only) a good trim <strong>to</strong> 1/4â’³. Makes for alot less bulk when wearing. Easy as pie right?<br />
Step 2 — Step 2 â<br />
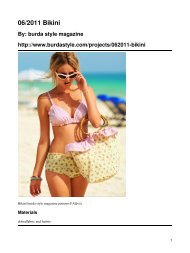
Now, its time <strong>to</strong> add your zipper <strong>to</strong> the lining. Keep in mind that Iâ’m using a trusty standard metal zipper<br />
(a lovely Riri number from New York, no less). To insert, stitch the zipper tape <strong>to</strong> the lining with the<br />
zipperâ’s wrong side pinned <strong>to</strong> the liningâ’s right side. In other words, if you were <strong>to</strong> put the lining on at<br />
this point, the zipper would be facing outward from the body. Hopefully that gives you an idea, because it<br />
tends <strong>to</strong> feel a little backwards. Oh and do make sure that youâ’ve changed over <strong>to</strong> your zipper foot â’ that<br />
will make this a whole bunch easier.<br />
Step 3 — Step 3 â<br />
Time <strong>to</strong> add the skirt lining with the zipper <strong>to</strong> the outer skirt. To do this, youâ’ll do the same thing you did<br />
with the skirt lining <strong>to</strong> the outer skirt, but this time, youâ’ll attach the right side of the zipper <strong>to</strong> the right<br />
side of the outer skirt. Youâ’ll end up with the zipper inserted and the fabric from the skirt folding away<br />
from the zipper. Now its time <strong>to</strong> tack that down. I did this part by hand with a prickstitch, but you can also do<br />
it by machine.<br />
Step 1 — Step 1 â 2
Step 4 — Step 4 â<br />
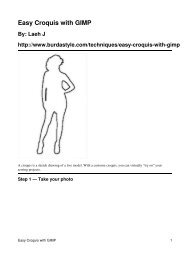
Once done with the zipper, all thatâ’s left is <strong>to</strong> stitch the waistband facing <strong>to</strong> the outer waistband along the<br />
<strong>to</strong>p edge and then stitch in the ditch just below the lower edge of the petersham. To stitch in the ditch refers<br />
<strong>to</strong> stitching through all layers, in the area just below the seam allowance where the waistband and skirt<br />
sections meet. Stitch from the right side of the skirt and go slowly, using a thread that matches your skirt for<br />
added invisibility. And from there, youâ’ll have a lovely petersham waistband and a beautifully inserted<br />
zipper <strong>to</strong> boot. xoxo, Sunni<br />
<strong>How</strong> <strong>to</strong>: <strong>Petersham</strong> <strong>Ribbon</strong> <strong>Waistband</strong><br />
Step 4 — Step 4 â 3