External Device Control with Adobe Premiere PRO - FutureVideo
External Device Control with Adobe Premiere PRO - FutureVideo
External Device Control with Adobe Premiere PRO - FutureVideo

You also want an ePaper? Increase the reach of your titles
YUMPU automatically turns print PDFs into web optimized ePapers that Google loves.
<strong>External</strong> <strong>Device</strong> <strong>Control</strong> <strong>with</strong> <strong>Adobe</strong> <strong>Premiere</strong> <strong>PRO</strong><br />
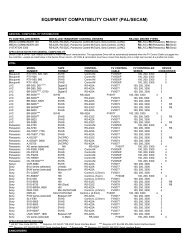
The MC-20<strong>PRO</strong> may be connected to one or several <strong>FutureVideo</strong> MC-100 <strong>Device</strong><br />
controllers, allowing direct control of up to 16 external VTRs and ATRs (See<br />
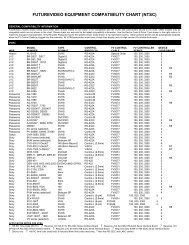
<strong>FutureVideo</strong> Equipment Compatibility Chart). This direct hardware connection provides<br />
for more responsive and precise control of the external “decks” than usually can be<br />
provided by software only control of external devices, or where such control is not<br />
provided in the application software program. With the MC-100 Editlink option used, the<br />
MC-20<strong>PRO</strong> keys and jog/shuttle may be assigned to control the transport functions of<br />
these “decks”. These include selecting the “deck” to be controlled, and various transport<br />
control commands such as Stop, Play, FF, RW, Jog, Shuttle, Record, etc. (see the pulldown<br />
list of commands when choosing MC-100 device control in the KeyAssigner<br />
software).<br />
An ideal application for this is to be able to capture video and audio from multiple<br />
sources <strong>with</strong> appropriate capture hardware. In many applications, a transcoder (analog to<br />
firewire converter) may be used to bring analog video into your NLE’s capture software<br />
program and the device control is done by the MC-20<strong>PRO</strong> Editlink to the MC-100’s. In<br />
decks which have both firewire output and RS-422A, LANC, <strong>Control</strong>-M, or RS-232C<br />
control, a transcoder would not be necessary. We will show a typical application of a<br />
setup in section 7.2 using <strong>Adobe</strong>’s <strong>Premiere</strong>’s <strong>PRO</strong> 2 NLE capture mode.<br />
Other uses for external device control may include synchronizing of multiple tapes for<br />
playback and recording by using the “Group” function in the MC-100 device controller<br />
command.<br />
Included on the KeyAssigner CD are several NLE keymap files (.jst) and templates<br />
(.dot), in which the MC-100 device control commands have been pre-defined for the<br />
Log/Capture mode. Selecting the “Shifted” key set (a.k.a. VTR A/B select button) will<br />
enable this mode. The MC-20<strong>PRO</strong> Shift key is the round button directly above the<br />
Jog/shuttle dials. When the shifted key set is used, the red LED above the Jog/Shuttle dial<br />
will turn on. This means the transport command keys (the five large buttons and the left<br />
and right round buttons) now may control the external device – depending on how the<br />
mapping has been defined.<br />
Connecting the MC-20<strong>PRO</strong> to the MC-100 <strong>Device</strong> <strong>Control</strong>ler<br />
In order to operate and control the external devices, connect the MC-20<strong>PRO</strong> Editlink ®<br />
port to the MC-100’s RS-232C input using the FV0072 cable (supplied <strong>with</strong> the MC-<br />
100) as follows:
When using the MC-100 controller, ensure the “Slave” mode switch that is behind the<br />
panel of the MC-100 is set towards the right. MC-100 units that have a ”Slave” label on<br />
the bottom (that were ordered as “slave” units) have this switch pre-set to this position by<br />
the factory.<br />
Note: Apply power to the MC-100 units before plugging the FV0072 cable into the MC-<br />
20<strong>PRO</strong> Editlink port.<br />
Application <strong>with</strong> <strong>Adobe</strong> <strong>Premiere</strong> <strong>PRO</strong> 2<br />
With the purchase of the MC-100, a device control plug-in is provided to interface <strong>with</strong><br />
<strong>Premiere</strong> <strong>PRO</strong>’s Capture and Output to Tape (print-to-tape) modes. This allows for<br />
capture and control of the external devices via the MC-20<strong>PRO</strong>.<br />
Installation Setup<br />
1. Copy X-fvdrvx.prm found on the MC-100 Installation CD/Disk to<br />
the “program files\<strong>Adobe</strong>\<strong>Premiere</strong> Pro\plug-ins” directory.<br />
2. Ensure <strong>FutureVideo</strong> KeyAssigner software program is not<br />
running.<br />
3. Ensure the MC-20<strong>PRO</strong> is plugged into the computer’s USB port &<br />
is powered.<br />
4. Ensure the MC-100 is plugged into the MC-20<strong>PRO</strong> Editlink port &<br />
is powered.<br />
5. Ensure the VTR is plugged into the MC-100 and is in remote mode & is<br />
powered.<br />
6. Start <strong>Adobe</strong> <strong>Premiere</strong> Pro 2 and bring up Capture Window (use F5<br />
or press<br />
the Log/Capture button on the MC-20<strong>PRO</strong>)
8. Select the Settings tab in the Capture window:<br />
for<br />
9. Under <strong>Device</strong> <strong>Control</strong>, click on <strong>Device</strong> list box and a choice<br />
"<strong>FutureVideo</strong> Media Commander" should appear. (If it does not,<br />
please check that the “x-fvdrvx.prm” file was copied to the<br />
<strong>Premiere</strong> plug-ins directory). The device control will now be set<br />
to <strong>FutureVideo</strong> Media Commander as shown below when properly<br />
configured:
10. Set the Preroll Time to 5 seconds and the Timecode Offset to<br />
–4 frames.
11. Click on Options… to bring up the following window (values<br />
may be different for your setup):<br />
• Choose the COM port that keyAssigner uses by checking under<br />
Windows’s <strong>Device</strong> Manager “LPT & COM ports” to see which one<br />
has been assigned if you don’t recall.<br />
• Select System Frame rate appropriate to the system in use<br />
• Select Transport 1. If using multiple MC-100’s select desired<br />
one.<br />
• Set <strong>Device</strong> Code and <strong>Device</strong> Driver according the <strong>FutureVideo</strong><br />
Equipment Compatibility Chart provided <strong>with</strong> the MC-100. (If<br />
the VTR does not have an RS-232C control interface, then it<br />
does not matter which device driver is used. Otherwise<br />
enter in just the numeric value of the Driver leaving out<br />
the “R”.)<br />
• Choose Time Code On or AUTO if time coded SMPTE tape<br />
otherwise set to OFF<br />
• Set Capture preroll to 5 seconds<br />
Click Connect and ensure the Green light on the MC-100 lights and<br />
the Version # appears in the Version field as MTC1.04LRxx.
12. Click OK. If everything is working, you will see the following message and press<br />
the Continue<br />
button:<br />
Press the Mode button on the MC-20<strong>PRO</strong> labeled as Log/Capture and press the VTR A/B Select<br />
button to enable operation of the external deck (Shift LED is on).<br />
In certain key maps (such as VCR<strong>Control</strong>.jst), a full set of deck controls have been defined including<br />
the Jog/Shuttle assignments in the “DECK” mode.<br />
Export to Tape <strong>with</strong> <strong>Device</strong> <strong>Control</strong> Setup<br />
When you click on the File… Export…Export to Tape, the following window will<br />
appear:<br />
Check the box “Activate Recording <strong>Device</strong>” and set the Preroll to 30 frames (you<br />
may have to experiment <strong>with</strong> this value depending on the equipment you are using).