Power Supply Removal and Installation - Megatouch
Power Supply Removal and Installation - Megatouch
Power Supply Removal and Installation - Megatouch

You also want an ePaper? Increase the reach of your titles
YUMPU automatically turns print PDFs into web optimized ePapers that Google loves.
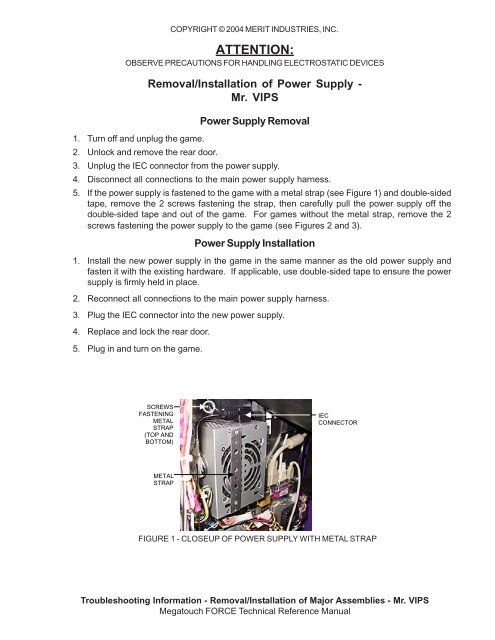
COPYRIGHT © 2004 MERIT INDUSTRIES, INC.<br />
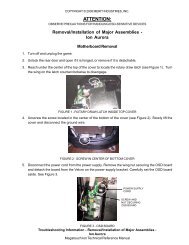
ATTENTION:<br />
OBSERVE PRECAUTIONS FOR HANDLING ELECTROSTATIC DEVICES<br />
<strong>Power</strong> <strong>Supply</strong> <strong>Removal</strong><br />
1. Turn off <strong>and</strong> unplug the game.<br />
2. Unlock <strong>and</strong> remove the rear door.<br />
3. Unplug the IEC connector from the power supply.<br />
4. Disconnect all connections to the main power supply harness.<br />
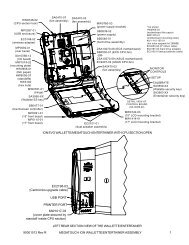
5. If the power supply is fastened to the game with a metal strap (see Figure 1) <strong>and</strong> double-sided<br />
tape, remove the 2 screws fastening the strap, then carefully pull the power supply off the<br />
double-sided tape <strong>and</strong> out of the game. For games without the metal strap, remove the 2<br />
screws fastening the power supply to the game (see Figures 2 <strong>and</strong> 3).<br />
<strong>Power</strong> <strong>Supply</strong> <strong>Installation</strong><br />
1. Install the new power supply in the game in the same manner as the old power supply <strong>and</strong><br />
fasten it with the existing hardware. If applicable, use double-sided tape to ensure the power<br />
supply is firmly held in place.<br />
2. Reconnect all connections to the main power supply harness.<br />
3. Plug the IEC connector into the new power supply.<br />
4. Replace <strong>and</strong> lock the rear door.<br />
5. Plug in <strong>and</strong> turn on the game.<br />
<strong>Removal</strong>/<strong>Installation</strong> of <strong>Power</strong> <strong>Supply</strong> -<br />
Mr. VIPS<br />
SCREWS<br />
FASTENING<br />
METAL<br />
STRAP<br />
(TOP AND<br />
BOTTOM)<br />
IEC<br />
CONNECTOR<br />
METAL<br />
STRAP<br />
FIGURE 1 - CLOSEUP OF POWER SUPPLY WITH METAL STRAP<br />
Troubleshooting Information - <strong>Removal</strong>/<strong>Installation</strong> of Major Assemblies - Mr. VIPS<br />
<strong>Megatouch</strong> FORCE Technical Reference Manual
COPYRIGHT © 2004 MERIT INDUSTRIES, INC.<br />
RIGHT FRONT SCREWS<br />
ARE LOCATED HERE,<br />
UNDER THE WIRES<br />
FIGURE 2 - CLOSEUP OF POWER SUPPLY WITHOUT METAL STRAP<br />
SCREWS TO<br />
REMOVE<br />
FIGURE 3 - CLOSEUP OF LEFT REAR BRACKET AND SCREWS<br />
RIGHT FRONT SCREWS ARE LOCATED DIAGONALLY (SEE FIGURE 2)