Manual - Alphatech
Manual - Alphatech
Manual - Alphatech

Create successful ePaper yourself
Turn your PDF publications into a flip-book with our unique Google optimized e-Paper software.
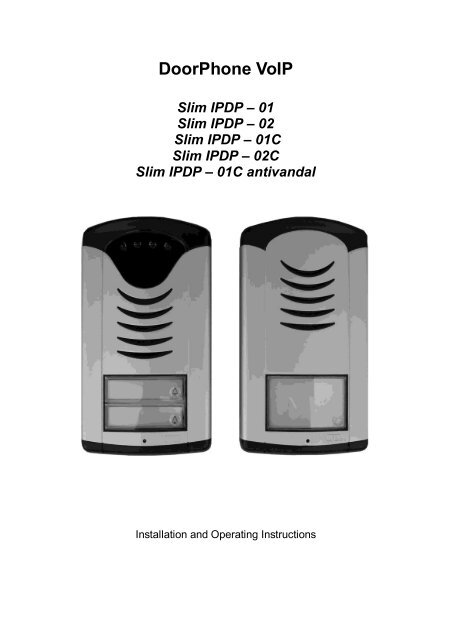
DoorPhone VoIP<br />
Slim IPDP – 01<br />
Slim IPDP – 02<br />
Slim IPDP – 01C<br />
Slim IPDP – 02C<br />
Slim IPDP – 01C antivandal<br />
Installation and Operating Instructions
Welcome<br />
We congratulate you on purchase of “Slim IP Door phone -VoIP” (VoIP<br />
= Voice over IP), which is the improved version of successful “New DoorPhone”<br />
(NUDV). This DoorPhone VoIP will widely manage to satisfy your needs of<br />
communication with persons at the building front door or your company entry,<br />
or family house doorway. The universality lies in possibility to connect this<br />
guard to an Ethernet network or VoIP exchange or directly to SIP server<br />
through internet conection.<br />
The basic DoorPhone VoIP module Slim IPDP-01 is supplied with 1<br />
button, Slim IPDP-02 is supplied with 2 buttons The next version of basic VoIP<br />
modules (Slim IPDP-01C and Slim IPDP-02C or Slim IPDP-01C antivandal)<br />
is with integrated colour camera.<br />
The Doorphone is supplied from AC/DC powersupply 12V or receives<br />
power through the PoE (Power over Ethernet) technology. No additional<br />
cabling fot power is therefore necessary.The basic features include the<br />
possibility to open up to two doors by means of connected electrical locks (the<br />
buttons can be used for door code opening). IPDP is configured over an<br />
integrated web server, which can be controlled from any web browser, e.g., IE,<br />
Mozilla Firefox.<br />
The manufacturer continuously improves the product firmware. The<br />
technology used allows you to upload to IPDP the latest version of the<br />
firmware any time using a standard computer. The latest version of the<br />
firmware is available at<br />
http://www.alphatech.cz/ipdp-firmware/e_firmware.htm<br />
You will find the necessary on page 29 of this manual. We recommend<br />
that you use the latest version of the firmware, which brings new functions<br />
and patches. At http://www.alphatech.cz/engl/e_ipdp-slim.htm you will<br />
also find the latest version of the user documentation.<br />
<strong>Manual</strong> version V6.1 30-8-2011<br />
Version of firmware V1.64 and V6.1<br />
<strong>Alphatech</strong> spol. s r.o.<br />
Jeremenkova 88<br />
140 00 Praha 4<br />
Tel/fax: 272103334<br />
www.alphatech.cz / info@alphatech.cz
Table of Contents<br />
DOORPHONE VOIP ............................................................................................................ 1<br />
1 BASIC DESCRIPTION ................................................................................................ 5<br />
1.1 FEATURES .............................................................................................................. 5<br />
1.2 TERMINOLOGY ....................................................................................................... 6<br />
1.3 MODULE ASSEMBLY ............................................................................................... 7<br />
1.4 MODULE FEATURES ................................................................................................ 7<br />
1.4.1 Slim IPDP Basic Module .................................................................................. 7<br />
1.5 INSTALLATION OF DOORPHONE VOIP ASSEMBLY.................................................... 12<br />
1.5.1 Open and close the cover of Slim IPDP .......................................................... 12<br />
1.5.2 Dismounting lighting of nameplate .................................................................. 13<br />
1.5.3 Assembly Slim IPDP on the wall ...................................................................... 13<br />
1.5.4 Return lighting name plate after mounting on the wall. .................................... 14<br />
1.5.5 Change of nameplates ..................................................................................... 14<br />
2 DOORPHONE VOIP OPERATION .......................................................................... 15<br />
2.1 SIGNALING OVERVIEW .......................................................................................... 15<br />
2.2 VISITOR AT DOOR ................................................................................................. 15<br />
2.3 PERSON INSIDE OBJECT ......................................................................................... 16<br />
2.3.1 Outgoing Call ................................................................................................. 16<br />
2.3.2 Incoming Call ................................................................................................. 16<br />
3 PROGRAMMING OF PARAMETERS .................................................................... 17<br />
3.1 BASIC VOIP SETTINGS........................................................................................... 17<br />
3.1.1 Choosing a mode and login ............................................................................. 17<br />
3.1.2 Language option ............................................................................................. 19<br />
3.1.3 Network settings ............................................................................................. 20<br />
3.1.4 Peer to peer or SIP server connection .............................................................. 22<br />
3.1.5 Audio codec setting ......................................................................................... 24<br />
3.1.6 Setting video ................................................................................................... 25<br />
3.1.7 Viewing the video (programme PopUp) ........................................................... 26<br />
3.1.8 Day intervals .................................................................................................. 27<br />
3.1.9 User interface ................................................................................................. 28<br />
3.1.10 Service settings .......................................................................................... 29<br />
3.1.11 Restart ....................................................................................................... 31<br />
3.1.12 Preparation style, language support ........................................................... 32<br />
3.2 SETTING DOORPHONE PARAMETERS ....................................................................... 33<br />
3.2.1 Basic Parameters ............................................................................................ 33<br />
3.2.2 Sensors of open the doors ............................................................................... 34<br />
3.2.3 All about relays .............................................................................................. 35<br />
3.2.4 Time Parameters............................................................................................. 37<br />
3.2.5 Direct Dialing – Memories .............................................................................. 38<br />
4 TECHNICAL PARAMETERS .................................................................................. 39<br />
4.1 ELECTRICAL PARAMETERS .................................................................................... 39<br />
4.2 MECHANICAL DIMENSIONS .................................................................................... 39<br />
4.3 PARAMETERS OF VIDEO, ACCESS ............................................................................ 40<br />
4<br />
IPDP - installation and operating instructions
1 Basic Description<br />
1.1 Features<br />
‣ Voice communication is supplied only from telephone line<br />
‣ Two 25digit numbers (IP adress) with each button<br />
‣ Commands can be used for a doophone two or a single digit (command<br />
55 is reduced to 5 so that we save * 5 instead of the original 55)<br />
‣ Day/night switching - automatic week program<br />
‣ Possibility of the call extension by * or # choice<br />
‣ Possible to connect two independent locks for door opening<br />
‣ Possible use of 5 switch modes (e.g. camera, lighting, gradual<br />
opening)<br />
‣ Two codes for hanging up the doorphone from telephone<br />
‣ Two codes for door opening from telephone<br />
‣ Six code locks (password from buttons at the door)<br />
‣ two inputs for door sensors (open / close door)<br />
‣ Power supply 12V AC/DC, 500mA max or PoE technology<br />
(IEEE802.3af Altern. A+B)<br />
‣ White LED for automatic ligting for camera<br />
‣ Permanent lighting through visiting cards<br />
‣ Included color camera (autofocus)<br />
‣ Ethernet – 10/100Mb with standard 10BaseT a 100BaseTx<br />
‣ Web server for remote configuration – BOA<br />
‣ Operating system – Linux 2.6<br />
‣ USB for connection internal camera – USB guest 1.1, software<br />
GSPCA software for video transmission to the browsers in PC –<br />
W3CAM(J-PEG, RTSP Streem) and stream H.263, H.264<br />
‣ SIP connection P2P or PBX network system<br />
‣ WEB – firmware upgradeable<br />
‣ WEB – interface for control and setup parameters<br />
IPDP - installation and operating instructions 5
1.2 Terminology<br />
Ethernet is a family of frame-based computer networking technologies for local area<br />
networks (LANs).<br />
A local area network (LAN) is a computer network covering a small physical area,<br />
like a home, office, or small group of buildings, such as a school, or an airport<br />
10BASE-T runs over four wires (two twisted pairs) on a Category 3 or Category 5<br />
cable.<br />
100BASE-TX Uses two pairs, but requires Category 5 cable (FastEthernet)<br />
Twisted pair cabling is a form of wiring in which two conductors (the forward and<br />
return conductors of a single circuit) are twisted together for the purposes of<br />
canceling out electromagnetic interference (EMI) from external sources.<br />
UTP (unshielded twisted pair) cable is not surrounded by any shielding.<br />
STP (shielded twisted pair) cables are often shielded in attempt to prevent<br />
electromagnetic interference.<br />
The World Wide Web (commonly abbreviated as the "Web") is a system of<br />
interlinked hypertext documents accessed via the Internet.<br />
Hypertext Transfer Protocol (HTTP) is an application-level protocol for distributed,<br />
collaborative, hypermedia information systems.<br />
Universal Serial Bus (USB) is a serial bus standard to connect devices to a host<br />
computer.<br />
A video codec is a device or software that enables video compression and/or<br />
decompression for digital video. H.264 is a standard for video compression, and is<br />
equivalent to MPEG-4 AVC. H.263 is a video codec standard originally designed as<br />
a low-bitrate compressed format for videoconferencing. MPEG-4 is collection of<br />
methods defining compression of audio and visual (AV) digital data.<br />
JPEG is a commonly used method of compression for photographic images.<br />
Voice over Internet Protocol (VoIP) is a general term for a family of transmission<br />
technologies for delivery of voice communications over IP networks such as the<br />
Internet.<br />
The Internet Protocol Suite (commonly known as TCP/IP) is the set of<br />
communications protocols used for the Internet<br />
An Internet Protocol (IP) address is a numerical identification and logical address<br />
that is assigned to devices participating in a computer network utilizing the Internet<br />
Protocol for communication between its nodes.<br />
Dynamic Host Configuration Protocol (DHCP) is a network application protocol<br />
used by devices (DHCP clients) to obtain configuration information for operation in<br />
an Internet Protocol network.<br />
The Internet is a global system of interconnected computer networks that use the<br />
standardized Internet Protocol Suite (TCP/IP).<br />
An intranet is a private computer network that uses Internet technologies<br />
Power over Ethernet or PoE technology describes a system to transfer electrical<br />
power, along with data, to remote devices over standard twisted-pair cable in an<br />
Ethernet network (we use only PoE standard IEEE802.3af Altern. A+B)<br />
Network Time Protocol (NTP), a means of synchronizing clocks over a computer<br />
network.<br />
6<br />
IPDP - installation and operating instructions
1.3 Module Assembly<br />
The Slim IPDP are the basic modules with color camera Slim<br />
IPDP-01/02C or without camera Slim IPDP-01/02. Antivandal panel is very<br />
strong metal cover for increased endurance against vandalism.<br />
Slim IPDP-01 Slim IPDP-02 Slim IPDP-01C Slim IPDP-02C<br />
(Slim IPDP-01C antivandal)<br />
1.4 Module Features<br />
1.4.1 Slim IPDP Basic Module<br />
The Slim IPDP basic module is assembling from modules IP, PoE<br />
mudul, camera module and motherboard. Positioning setting elements and<br />
connectors are on picture 1.<br />
For Slim IPDP is necessary used PoE power from switch or the AC<br />
voltage of min. 11Vst - max. 15Vst or DC voltage of min. 12Vss to max. 18Vss<br />
must be energized to “12V” terminal. This source loading depends on number<br />
of modules, since it simultaneously serves feeding of lighting through visiting<br />
cards – at max. number of connected modules the demand will not exceed<br />
300mA. This source can be also used for feeding of lock(s), and then it is<br />
necessary to consider the electrical lock demand. In practice the alternating<br />
feeder 12V/1A mostly meets these demands.<br />
IPDP receives power through the PoE (Power over Ethernet - IEEE802.3af<br />
Altern. A+B) technology. No additional cabling is necessary. If your Ethernet is<br />
not equipped with the PoE technology it is possible to use a PoE adaptor. If<br />
you use electric lock for opening door, so you must for supply of the lock use<br />
power supply (only in circuit with relay - contact), or use low power lock and for<br />
supply of the lock use connector on visiting - card (back lighting buttons) and at<br />
supply by PoE is here 12V/350mA to disposal. Picture 4.<br />
IPDP - installation and operating instructions 7
Picture 1 Basic module - motherboard<br />
The connection of relay contact terminals is shown on pict. 2. The “NO”<br />
designation means an idle-disconnected contact, “COM” means a pin contact<br />
(middle) and “NC” means an idle-connected contact. The contacts of both<br />
switches are galvanically isolated each other and from other guard circuits. The<br />
variants of connection are shown on picture. 3 and 4.<br />
The camera is mounted so that it can be tilted in the vertical direction (updown)<br />
so that optimal image occupy space in front of, or granted for the<br />
installation of disabled people.<br />
8<br />
IPDP - installation and operating instructions
Picture 2. Connect Slim IPDP<br />
IPDP - installation and operating instructions 9
Picture 3 Examples of relays connections<br />
Picture 4 Examples of relays connections powered by PoE<br />
ATTENTION - lock is must be low power consumption, max 350mA.<br />
10<br />
IPDP - installation and operating instructions
In newer versions available Slim IPDP function door sensor.<br />
Refer. page 34.<br />
Setting voice communication –<br />
position trimmers are presetting<br />
from manufacture and in majority<br />
case agree with, therefore<br />
changes setting altering only in<br />
necessary case. Basic position<br />
of trimmers, sense of rotation<br />
and meaning trimmers are<br />
illustration on picture 5.<br />
Level of echo canceler adjust<br />
silence of the microphone, to<br />
make smaller acoustic feedback<br />
and remove the echo<br />
Picture 5 Setting of trimmers<br />
setting sensitivity of sensor<br />
ambient lighting determine at what decrease ambient light will be automatically<br />
switching lighting LED for camera. This function is accesible only if is activated<br />
IPDP (by talking).<br />
On picture 1. is two inputs for sensors in your IPDP. Door sensors are<br />
sensors (eg magnetic contacts or part of electrical lock) to inform the opening /<br />
closing doors. Check this option to display the status of the door to the home<br />
screen video and sends this information to the program UDVguard where it is<br />
displayed. Also information about status of this inputs is displayed on first WEB<br />
site with video in WEB browser.<br />
IPDP - installation and operating instructions 11
DIP switch setting basic operation and default<br />
setting. See on picture 6.<br />
State of DIP switch is reading at start the IPDP, i. e.<br />
after reset. After get started system is necessary DIP<br />
switch 3 and 4 always return to the position "On",<br />
because at next reboot system would be new values<br />
overwriting by default value.<br />
Picture 6 DIP switch settings<br />
1.5 Installation of DoorPhone VoIP Assembly<br />
1.5.1 Open and close the cover of Slim IPDP<br />
12<br />
IPDP - installation and operating instructions
1.5.2 Dismounting lighting of nameplate<br />
1.5.3 Assembly Slim IPDP on the wall<br />
The installation is made by screwing to the wall by means of dowels.<br />
IPDP - installation and operating instructions 13
1.5.4 Return lighting name plate after mounting on the wall.<br />
1.5.5 Change of nameplates<br />
Each button has its separate nameplate hold by means of plastic flag<br />
(see figure). The paper nameplates can be printed from Excel form (to be<br />
downloaded on www.alphatech.cz/engl/basic.htm).<br />
14<br />
IPDP - installation and operating instructions
2 DoorPhone VoIP Operation<br />
2.1 Signaling Overview<br />
The IPDP signals an acoustic conditions they may occur during<br />
operation. Another signaling can be done by means of red LED (placed under<br />
microphone hole). You can listen the signaling samples in Nset setting<br />
program.<br />
Condition Tones Tone frequency LED<br />
Line lifting up –▄–■–▀– 425-850-1275 Light<br />
Line hanging up –▀–■–▄ 1275-850-425 Dark<br />
Report after calling –▄–■–▀– 425-850-1275 Light<br />
Notice about call end –■–■–■– 1275 Light<br />
Parameter confirmation<br />
––█––<br />
Switch on (Reset) –■–▄–■– 1275-850-1275 Blink<br />
Error (anything, if unsuitable) –■–■–■–■–■–■– 425….<br />
Empty memory (no progr. numb.) –█–▄–■–▄–■–▄– 850-1275-1700…<br />
Waiting to talk - - Blinking<br />
Is talk - - light<br />
2.2 Visitor at Door<br />
The IPDP function is influenced by setting of IPDP parameters.<br />
The DoorPhone buttons are provided by nameplates or positions of<br />
persons inside the object. The incoming person will press the corresponding<br />
button, the DoorPhone will lift up the VoIP canale neither immediately (the<br />
button is not the first number from code lock), or with delay and dial the<br />
programmed phone number thru VoIP, but dial number differs by choice mode,<br />
which is set in the DoorPhone :<br />
- Day/night mode = being the DoorPhone in Day mode, so it is always<br />
dialing a number set in table 1, in Night mode, it is always dialing a<br />
number set in table 2. . Switching is possible use manual (two codes)<br />
or automatic (table "Day intervals") and here you can set the switch<br />
to three day intervals for 7 days a week. To facilitate proper function<br />
is to set the IP address of the NTP server and network settings so<br />
that the DoorPhone IPDP should have access to the Internet. In<br />
automatic mode, day / night mode is also possible to use a<br />
temporary manual switch, which cancels the first passage of the next<br />
automatic switching interval.<br />
IPDP - installation and operating instructions 15
- mode two number group = first press – it always dials a number set<br />
in table 1. By repeated press of the same button or detection of busy<br />
tone after dialing the DoorPhone will select the number from the<br />
second group (table 2). The next press of the same button again<br />
selects a number of the first group, etc..……<br />
The switch (code lock) can be controlled by first 1-2 buttons of<br />
DoorPhone. If the visitor at door presses buttons in such combination that meet<br />
the preprogrammed code and the time among presses is not bigger than the<br />
set point, then the DoorPhone will pick up and close the corresponding switch<br />
(if set in m=1 or m=5 modes) to the period given by seting in parameters. Then<br />
it will hang up.<br />
2.3 Person Inside Object<br />
The person inside object is considered a person that is in phone contact<br />
with DoorPhone.<br />
2.3.1 Outgoing Call<br />
The outgoing call is the call from DoorPhone (caused by visitor). After<br />
guard choice the telephone is ringing inside object and the pickuping up will<br />
allow speaking to the visitor at door. The code choice can close the switch, if<br />
set to m=1 or m=5 modes, change over the Day/Night modes and hang up the<br />
DoorPhone. The DoorPhone in 10 seconds before call end will send a notice<br />
about call end and the call may be extended by sign selection (* or #). The<br />
telephone hanging up will end the call.<br />
They are two possible means transmission information of push<br />
buttons (command for opening lock, switch-over day/night, prolongation<br />
conversation, command for hang-up) - by either in "RTP channels" or in<br />
"SIP info", variant "inband DTMF" isn't in IPDP decoding.<br />
2.3.2 Incoming Call<br />
The incoming call is the call to the DoorPhone (caused by person inside<br />
object). After exchange number selection, where the DoorPhone is connected,<br />
the DoorPhone is ringing and when set number of rings is over, the DoorPhone<br />
will pick up and it is possible to speak. The possibilities are the same as with<br />
outgoing call.<br />
16<br />
IPDP - installation and operating instructions
3 Programming of Parameters<br />
3.1 Basic VoIP settings<br />
3.1.1 Choosing a mode and login<br />
It is important to choose a DoorPhone mode<br />
first. The DoorPhone can work in the PeerToPeer<br />
mode or SIP server mode. The mode setting can be<br />
made by a relevant switch (DIP switch see on picture<br />
7). In the SIP server mode is possible to choose SIP<br />
server (external). It can be set in a configuration<br />
interface of the DoorPhone.<br />
Setting values in doorphone to the firm setting<br />
make by DIP switch 3 move to the position off and<br />
reboot doorphone. After reboot system this switch is<br />
necessary return to the position On.<br />
Setting of basic IP address<br />
192.168.1.250 make by DIP switch 4<br />
move to the position off and reboot<br />
Picture 7 DIP switch setting<br />
doorphone. After reboot system this switch is necessary return to the position<br />
On.<br />
Reboot doorphone it is possible make by double ways – partly turn it off<br />
and on again, or clicks on „Restart", in WEB site is at the entry service.<br />
IP address of doorphone is from the manufacturer (as well as default)<br />
setting on 192.168.1.250. If you are at installation in other numbering nets (=<br />
NOT BEGINING 192.168.1.xxx) so is necessary setting in feature of protocol<br />
TCP/IP in your PC IP address either temporarily or like alternative configuration<br />
e.g . 192.168.1.245 . Then it is possible setting parameters of doorphone<br />
including new IP address and after reboot VoIP module in doorphone you can<br />
attach to WEB sites of the doorphone already on new IP address.<br />
ATTENTION: DIP switch 3 and 4 must be in position "On", otherwise new IP<br />
address after reboot module is re-write back on starting IP address =<br />
192.168.1.250.<br />
IPDP - installation and operating instructions 17
In your web browser enter IP address of the DoorPhone, default is<br />
192.168.1.250. See picture 8.<br />
Picture 8 First site - video from camera<br />
Enter user name and password. User name is „admin“, default password<br />
is „1234“. See picture 9.<br />
Picture 9 Login to setup<br />
18<br />
IPDP - installation and operating instructions
3.1.2 Language option<br />
Language setting can be made in a menu on the left panel. Adding language is<br />
description on page 29<br />
IPDP - installation and operating instructions 19
3.1.3 Network settings<br />
Network settings are located in the Network seting menu item. It is possible to<br />
use DHCP service (1) or you can enter IP addresses manually.<br />
<strong>Manual</strong> configuration:<br />
After making changes click on a save and restart button.<br />
1. Hostname – name of doorphone for resolution in nets (e.g . while using<br />
more doorphones – more entrance)<br />
2. Enable/disable ethernet settings via DHCP<br />
3. Setting IP address, mask, eventually next network parameters, in case<br />
obscurity contact his IT manager<br />
4. Display actual mode of IPDP – day / night<br />
5. Return on introductory WEB site with display videos from cameras IPDP<br />
6. short help for quick assistance in setting the parameters1 –<br />
7. Default value – presetings to the firm settings. After making changes click<br />
on a save and restart button (display screen - see page 31).<br />
20<br />
IPDP - installation and operating instructions
DHCP configuration:<br />
After making changes click on a save and restart button.<br />
1. Hostname – name of doorphone for resolution in nets (e.g . while using<br />
more doorphones – more entrance)<br />
2. Enable/disable ethernet settings via DHCP<br />
3. DHCP client ID is name, which using for assigning two IP address to only<br />
thing the MAC address (in IPDP porter has meaning as far as will be<br />
including internal SIP server)<br />
4. display parameters automatically assign by DHCP - IP address and next<br />
setting<br />
5. Default value – presetings to the firm settings. After making changes click<br />
on a save and restart button (display screen - see page 31).<br />
Important: if you use setup via DHCP, then it‘s assigning IP address to<br />
DoorPhone automatically and network administrator must tell you actual<br />
address, to was possibility display video in web browser. Because assigning IP<br />
adress can change after e.g . failure power supply in object, so they<br />
recommended enjoy DoorPhone with fixed IP address.<br />
IPDP - installation and operating instructions 21
3.1.4 Peer to peer or SIP server connection<br />
The DoorPhone can be set to the peer to peer (P2P) mode or to the SIP<br />
server mode by DIP switch (page 17). In P2P mode DoorPhone calling IP<br />
adress – in memory buttons (page 38).<br />
After making changes use the save changes button.<br />
1. choice signalling of incomming call by default Ringing, possible change on<br />
Session progress - added for some SIP proxy servers that the it require<br />
2. Symmetrical RTP - added for some SIP proxy servers that the it require<br />
3. Possibility to change the sending of DTMF DoorPhone (inband is not<br />
supported)<br />
4. Default value – presetings to the firm settings. After making changes use<br />
the save changes button.<br />
22<br />
IPDP - installation and operating instructions
If you setting SIP server mode by DIP switch, so change site of SIP<br />
parameters<br />
After making changes use the save changes button.<br />
1. SIP proxy server IP address or SIP server name and port (usually<br />
5060/5061) - via the server connection is made<br />
2. SIP registrar server IP address or SIP server name and port (usually<br />
5060/5061) - on this site registration is made, if you do not, so registration is<br />
done at the SIP proxy server<br />
3. Registering data to SIP proxy server (aren't obligatory)<br />
4. Name of the participant, usually a phone number to DoorPhone (the line to<br />
which is attached)<br />
5. Expiration is interval of sending requests for re-registration in SIP server<br />
6. choice signalling of incomming call by default Ringing, possible change on<br />
Session progress - added for some SIP proxy servers that the it require<br />
7. Symmetrical RTP - added for some SIP proxy servers that the it require<br />
8. Possibility to change the sending of DTMF DoorPhone (inband is not<br />
supported)<br />
9. Default value – presetings to the firm settings. After making changes use<br />
the save changes button<br />
IPDP - installation and operating instructions 23
3.1.5 Audio codec setting<br />
After making changes use the save changes button.<br />
1. There is choosing only priority using audio codecs, used codec is selection<br />
automatically at make audio connection in SIP protocol.<br />
2. Default value – presetings to the firm settings. After making changes use<br />
the save changes button.<br />
24<br />
IPDP - installation and operating instructions
3.1.6 Setting video<br />
After making changes use the save changes button.<br />
1. Resolution display video<br />
2. Number picture per second (frequency restoring picture)<br />
3. Setting next parameters of camera<br />
4. choice of priorities for the use of codec H.263 / H.264, if not select any<br />
codec, and sends the video call. This option is important for some VoIP<br />
systems, the presence of video call causes the inability to make calls<br />
5. Default value – presetings to the firm settings. After making changes use<br />
the save changes button.<br />
IPDP - installation and operating instructions 25
3.1.7 Viewing the video (programme PopUp)<br />
Video in doorphone IPDP is capture by USB WEB camera. Picture from<br />
camera is sending partly like series JPEG pictures to the environment WEB<br />
browser (first page on IP address IPDP doorphone) and second method is, that<br />
IPDP sending stream video in coding H.263 and in future H.264. This stream<br />
video is possible watch e.g . on telephone Grandstream series GXV3000,<br />
which has big LCD display.<br />
Next interesting way watching videos from IPDP is install PopUp program<br />
UDVGUARD for Windows. This programme also with manual is freely<br />
download on http://www.alphatech.cz/engl/e_ipdp.htm. Programme except<br />
display the video has even this interesting functions:<br />
- at conversation IPDP is program automatically activate from system tray of<br />
Windows to the foreground and display picture from IPDP, after<br />
termination talk again minimalize (function PopUp)<br />
- makes it possible switch on by click both relay in IPDP – opening door<br />
- makes it possible acoustic connection with IPDP – if doorphone call on<br />
address PC with installed and running programme, so it is possible receive<br />
conversation from IPDP through the medium sound card in PC. Click on<br />
button DoorPhone in program it is possible reversely call to IPDP<br />
- programme it is possible install to the max.100 computers in net, if is<br />
active connection with IPDP, so to all computers with running program<br />
maximize window with displayed video. In programme is adjust IP address<br />
of doorphone, thereby it is possible in one nets operate more Slim IPDP<br />
and to which IPDP programme is coresponded individual "Hostname"<br />
setting to page.20 and this Hostname is displays in header of programme<br />
PopUp.<br />
Parameters of video is on page 40<br />
26<br />
IPDP - installation and operating instructions
3.1.8 Day intervals<br />
Display only if you check automatic switch Day/Night mode on Basic parameter<br />
- page 33. Function with firmware V5.8 and higher.<br />
After making changes use the save changes button.<br />
1. Display actual internal time (you must setting in "Service" time server)<br />
2. Table of time interval - interval is meaning where is day, the rest is night.<br />
For example: interval 1 = 08:00-12:00, interval 2 = 14:00-17:00 - from<br />
00:00 to 7:59 is night, from 8:00 to 12:00 is day, from 12:01 to 13:59 is<br />
night, from 14:00 to 17:00 is day and from 17:01 to 23:59 is night.<br />
3. Default value – presetings to the firm settings. After making changes use<br />
the save changes button.<br />
IPDP - installation and operating instructions 27
3.1.9 User interface<br />
After making changes use the save changes button.<br />
1. Possibility switch off displaying videos on start page - safety device<br />
2. Additional security is password protection to secure access to<br />
http://ipaddress/video.jpeg (image from the camera).<br />
ATTENTION: this option has the effect that stops function the program<br />
PopUp and videos on the SNOM phone !<br />
3. Video surveillance (H.264) video is (so far H264) provided by the<br />
communicator (the server) protocol RTSP on port 554. Can a reasonable<br />
player stream video (IP television) (such as Grandstream, MPlayer, VLC,<br />
and surely many others). This video is still independent of the calls in the<br />
future is expected to broadcast over IP multicast to multiple recipients<br />
simultaneously.<br />
Video surveillance checkbox enables RTSP protocol which serves for<br />
video parameters negotiation between video receiver (player) and video<br />
server (VoIP Guard).<br />
This protocol uses TCP port 554. Now is supported video encoded by<br />
H263 and H264 codecs and then transported via network by RTP protocol.<br />
Information about all protocols could be found on www.wikipedia.org.<br />
URL usually needed for player (vlc, mplayer, maybe others) connection is<br />
'rtsp://192.168.1.250'.<br />
In this case default (first priority) codec is used.<br />
To force particular encoder, use:<br />
'rtsp://192.168.1.250/video.263' for H263 encoded video, or<br />
'rtsp://192.168.1.250/video.264' for H264 encoded video.<br />
28<br />
IPDP - installation and operating instructions
In some cases also helps to add parameter about frame rate (for example<br />
for mplayer it is '-fps 5').<br />
Full command line example for mplayer is:<br />
mplayer -fps rtsp://192.168.1.250<br />
4. Push video is the choice for phones SNOM when the script was sent to the<br />
phones provide a video display on this phone<br />
5. Possibility change port from conventional 80 to other<br />
6. Possibility disable / enable access over telnet (name: root, pass: 8765)<br />
7. Default value – presetings to the firm settings. After making changes use<br />
the save changes button..<br />
3.1.10 Service settings<br />
IPDP - installation and operating instructions 29
1. display current version of firmware in module VoIP and in module<br />
doorphone. Button "Basic LOG" or "Extended LOG" displays to the what<br />
state LOG switch, it means you see "Extended LOG" so they switch to the<br />
basic LOG and back to, in short switch you have such LOG, which don't see<br />
writing on button.<br />
2. Click on "Download log file" file save to you choice place. File has extension<br />
".BIN", this is necessary rename on ".TAR". To unpacking archive "tar" use<br />
e.g . programme "PowerArchiver". File from file equip extension ".TXT". Last<br />
notice is thereon, that the text file hasn't standard ending rows CR LF but<br />
only LF. To safe display get past e.g . programme "PSPad".<br />
3. Click on "Show call log" will display history of call for SIP - only call<br />
instructions.<br />
Show register log - here’s displayed action registration and result -<br />
successful/unsuccessful<br />
4. Click on "Show VoIP log" start VoIP monitor - log file which is running in<br />
new browser window - online displays events.<br />
5. Time server is IP adress of NTP server with time data (actual time in module<br />
VoIP is displayed in "Day intervals") if doesn't know address of NTP, you<br />
use * and system automatic choose acceptable (to the little window write *<br />
and click on save).<br />
6. Syslog server is IP adress of computer where is running syslog aplication<br />
for collection network events<br />
7. tool for upgrade firmware in module VoIP and in module doorphone,<br />
switching automatic - information is in upload fille. Next in this tool is<br />
possible change environment of WEB sites - colours, fonts, frames…<br />
8. Addition / change language file - upload fille with language assignment<br />
9. Save configuration - save actual setting in IPDP (all features)<br />
10. Restore configuration - restores setting of all IPDP from file previously<br />
storage configuration<br />
11. Change access password, default is 1234<br />
12. Reboot VoIP module.<br />
30<br />
IPDP - installation and operating instructions
3.1.11 Restart<br />
IPDP - installation and operating instructions 31
3.1.12 Preparation style, language support<br />
File of style consist of three files packaged to the archive ".TAR".To unpacking<br />
file "tar" use e.g . programme "PowerArchiver".<br />
First file "upload_fw.sh is header file of style and this please didn't have.<br />
Second file is HTML style in syntax HTML, it is possible change font size, fonts,<br />
colours character and lines, background colour. To reliable display get past e.g<br />
. programme "PSPad".<br />
Third file is picture (logo your firm) sizes to the 200x200px in format GIF, JPG,<br />
prefer GIF with setting transparent background, remove so rectangle around<br />
your logos. Picture then rename on "logo.img"<br />
To compress file use e.g . programme "PowerArchiver", set archive "tar" and<br />
option "tarred".<br />
Basic file for creation translation to the other language. Go out from English or<br />
Czech, translation includes also text of Help. Name of file is name language in<br />
menu, therefore are not using . and extension, for editing use e.g . programme<br />
"PSPad".Translating only terms in quotation mark, preserve markings HTML<br />
formatting. Character set is setting to ISO8859-2.<br />
32<br />
IPDP - installation and operating instructions
3.2 Setting DoorPhone parameters<br />
3.2.1 Basic Parameters<br />
After making changes use the save changes button.<br />
1. Mode of DoorPhone choice selects number per Day/Night DoorPhone<br />
mode or selects numbers of the first and second groups.<br />
2. Sign for call extension * or # (10sec before call end the DoorPhone will send<br />
a notice, then the call may be extended)<br />
3. Two commands in order to hang up the DoorPhone using both switches<br />
[1 or 2 digits]. The advantage is to set the same command both for switch<br />
closing and command to guard hanging up (page 35). Single digit command<br />
is entered as the first character to replace with "star" *. For example, 2-digit<br />
code to shorten it to 55 single-typing * 5 The command is then evaluated<br />
with only one pressing 5 on the phone.<br />
4. Command for DAY / NIGHT mode switching<br />
Note: The switchover to Day/Night mode remains set in IPDP even after<br />
power supply disconnection.<br />
Single digit command is entered as the first character to replace with<br />
"star" *. For example, 2-digit code to shorten it to 11 single-typing * 1 The<br />
command is then evaluated with only one pressing 1 on the phone.<br />
5. Automatic or manual switching Day - Night mode. Automatic switch setting<br />
in "Day interface".<br />
6. hasn't in this design sense, because isn't possible to connect keyboard<br />
IPDP - installation and operating instructions 33
7. hasn't in this design sense, because isn't possible to connect keyboard<br />
8. Possibility to turn off the camera for night illumination<br />
9. Attention this option is required to detect the presence of inputs for sensors<br />
in your IPDP. Door sensors are sensors (eg magnetic contacts or part of<br />
electrical lock) to inform the opening / closing doors. Check this option to<br />
display the status of the door to the home screen video and sends this<br />
information to the program UDVguard where it is displayed.<br />
10. Default value – presetings to the firm settings. After making changes use<br />
the save changes button.<br />
ATTENTION! This parameters setting will sharply influence whole DoorPhone<br />
function.<br />
3.2.2 Sensors of open the doors<br />
1. On the home screen when checked, the sensor 1 and sensor 2, a key<br />
information, which shows the status of open (open) or closing (close) the<br />
door<br />
Attention: The function is available only for doorphones equipped with inputs<br />
for these sensors The sensor is a contact at the door (eg magnetic contact<br />
security or use the contact is contained in an electric lock, etc.), which is closed<br />
and closed the door open when you open.<br />
34<br />
IPDP - installation and operating instructions
3.2.3 All about relays<br />
After making changes use the save changes button.<br />
1. Relay mode:<br />
=1 switch mode – it will close on command or password for period t1/2<br />
(used for electrical locks, gate opening etc.)<br />
=2 camera mode – it will close by guard pick up and open by hanging up.<br />
=3 lighting mode – it will close by guard pick up and stay closed even for<br />
period t1/2 after guard hanging up.<br />
=4 bell mode – it will close after button pressing and open after period t1/2<br />
(used for e.g. external bell or horn connections).<br />
=5 gradual opening mode – in this mode the only relay 2 will be set<br />
together with relay 1 set to mode 1. The relay 1 is activated for period t1,<br />
then the time t3 is proceeding before relay 2 closing. Then the relay 2 is<br />
activated for t2 period and afterwards the DoorPhone hangs up.<br />
Note: The only relay 1 can be activated from phone and all sequence started.<br />
Besides that the relay 2 can be separately activated from buttons by password.<br />
IPDP - installation and operating instructions 35
2. password for relay closing from buttons or keyboard [2 to 6 digits]. Total 6<br />
passwords, they are controlled by Day/Night; the combination is entered<br />
either by DoorPhone buttons (first 1/2 buttons) or from attached keyboard<br />
(after pressing of key symbol). The relay closing influences the set switch<br />
mode and Day/Night switchover. By setting of choice mode of 2 number<br />
groups the DoorPhone is permanently in DAY mode.<br />
By password choice some rules have to be observed:<br />
• Select passwords in way not to find its combination out from<br />
wear of certain buttons by frequent use.<br />
• Select the first password button from frequentless button for<br />
direct dialing (-extends choice time)(-not valid for keyboard).<br />
• Pay attention to congruity of password numbers when one<br />
password includes other one, e.g. relay 1 has 1212 and relay 2<br />
has 12121. Then after second pressing button 2 the only relay<br />
1 is called, but password choice 212 for relay 2 can call both<br />
relays after secon pressing button 2.<br />
3. Command from phone after relay closing [2 digits]. The same command<br />
can be set for both relays, then they are activated at the same time. The<br />
advantage is to set the same command both for relay closing and<br />
command to DoorPhone hanging up (page 33).<br />
Single digit command is entered as the first character to replace with<br />
"star" *. For example, 2-digit code to shorten it to 55 single-typing * 5 The<br />
command is then evaluated with only one pressing 5 on the phone.<br />
4. Duration of relay closing in second [2 digits 01-99]<br />
5. To prohibit the control during incoming call is important e.g. when using<br />
relay 2 in mode 1 for control of garage gate opening, when the electronics<br />
opens the gate and the gate is closed by car passage. Then the control<br />
from phone could undesirably cause the permanent gate opening (not<br />
closed – no car passage).<br />
6. time in second between close relays 1 and 2 by mode setting of relay 2 is 5<br />
(gradual opening) [2 digits 01-99]<br />
7. Default value – presetings to the firm settings. After making changes use<br />
the save changes button.<br />
36<br />
IPDP - installation and operating instructions
3.2.4 Time Parameters<br />
After making changes use the save changes button.<br />
1. max. time, for which the DoorPhone is hanging up, this time can be<br />
extended during call by sign choice from telephone (* or #) – see page 33.<br />
2. Number of incoming call rings, the DoorPhone pick up after preseted<br />
number of rings. After detection first ring – LED on front panel blinking. The<br />
number can be set from 1 to 9.<br />
3. max. time [sec] among button presses [range 1-9]<br />
switch closing – if time between two next presses is bigger than w time,<br />
the code is not evaluated correctly.<br />
dialing – if the button, we are pressing, is the first password number for<br />
switch closing, so the choice is delayed by this w time.<br />
4. time [sec] for which the guard will hang up, before repeated dialing (button<br />
pressing during call or dialing, busy tone detection) [range 1-5]<br />
5. after finishing the dialing it calculates time (ringing tones). If the number<br />
exceeds time in second, it will hang up [range 10-99]. The dialing is<br />
repeated in case, when the dialing mode of 2 groups is set.<br />
6. In default is status of DoorPhone signalling acoustically. If signalling makes<br />
problem, so this signalling pick up / hang up prohibited.<br />
7. In default is status of DoorPhone signalling acoustically. If signalling makes<br />
problem, so this signalling others tones prohibited.<br />
8. Default value – presetings to the firm settings. After making changes use<br />
the save changes button.<br />
IPDP - installation and operating instructions 37
3.2.5 Direct Dialing – Memories<br />
After making changes use the save changes button.<br />
1. telephone number up to 16 digits, we want to store. The numbers are the<br />
numbers of the first group or numbers of Day mode. In default setting is<br />
table memoirs empty. While using setting P2P to the memoirs saves IP<br />
address e.g . 192*168*1*250, where „*“ means „.“ , while using SIP proxy<br />
server to the memoirs saves phone number e.g. 117.<br />
2. telephone number up to 16 digits, we want to store. The numbers are the<br />
numbers of the second group or numbers of Night mode. In default setting<br />
is table memoirs empty. While using setting P2P to the memoirs saves IP<br />
address e.g . 192*168*1*250, where „*“ means „.“ , while using SIP proxy<br />
server to the memoirs saves phone number e.g . 117.<br />
Note: The switchover to Day/Night mode remains set in DoorPhone even<br />
after power supply disconnection.<br />
3. Default value – presetings to the firm settings. After making changes use<br />
the save changes button.<br />
38<br />
IPDP - installation and operating instructions
4 Technical Parameters<br />
4.1 Electrical Parameters<br />
Parameter Value Conditions<br />
Communication interface Ethernet 10BaseT, 100BaseTx<br />
VoIP protocol supported<br />
SIP<br />
Audio<br />
G.711u, G.711a, G.726-32b, GSM<br />
Video<br />
série JPEG, MJPG, stream H.263 (CIF),<br />
H.264<br />
Band width<br />
300Hz – 3400 Hz<br />
Power supply - adapter<br />
12Vss ± 2V , 12Vst ± 1V<br />
- or PoE IEEE802.3af Altern. A+B<br />
Max. consumption 300mA 12Vss<br />
Max. voltage of switch contact 48V at I < 1A<br />
Max. current of switch contact 2A at U < 30 V<br />
Operational temperature - 20 to + 70°C<br />
4.2 Mechanical dimensions<br />
Type of item dimensions HxWxD [mm]<br />
Slim IPDP-01 185 x 99 x 40<br />
Slim IPDP-02 185 x 99 x 40<br />
Slim IPDP-01C 185 x 99 x 40<br />
Slim IPDP-02C 185 x 99 x 40<br />
Slim IPDP-01C<br />
185 x 99 x 40<br />
antivandal<br />
Protection against water and insinuation objects of all types doorphones is IP44<br />
IPDP - installation and operating instructions 39
4.3 Parameters of video, access<br />
Video for WEB:<br />
InternetExplorer - (batch JPEG pictures - port 80) is used over and over<br />
again repeated http request ADRESA/video.jpg<br />
Mozilla, opera, Firefox … and programme PopUp (UDVguard) - (MJPEG<br />
stream - port 80) is used http request ADRESA/video.mjpg (sometimes it<br />
is necessary reload than it start up).This video is continuous and has<br />
smaller load nets.<br />
Stream video for IP phones:<br />
H.263 - IPDPvrátný and videophone settling over SIP/SDP protocol on<br />
standard SIP port and video (also sound) then runs by RTP protocol on<br />
ports settle over SIP (usually 9078).<br />
Parameters of video:<br />
JPG pictures creates in camera and for all transport protocol are same<br />
Size (resolution) of video selects in "Setting video" on WEB<br />
Maximum size is given by type USB camera and mostly is 640x480<br />
Stream H.263 knows only CIF resolution (352x288), so that bigger<br />
JPEG is cuts and smaller will frame<br />
Frequency (1 5obr./sec) JPG pictures selects in "Setting video" on WEB<br />
Frequency MJPG and Stream H.263 comes from camera, will use every<br />
second and result is moves among 7- 12 fig./sec<br />
Ports:<br />
Port 80 for http (WEB pages and JPG (MJPG) video on them)<br />
Port 5060 for SIP<br />
Ports RTP with adverse party reason with over SIP, usually suggests<br />
port 7078 for audio and port 9078 for video<br />
Video port 554 not (yet H264) provided by doorphone (server) protocol<br />
RTSP<br />
Telnet: name: root / password:876<br />
Setup: Default IP address 192.168.1.250<br />
name: admin / password: 1234
Guarantee conditions:<br />
The product was shop-checked. The producer guarantees that this product will<br />
keep the features described in these operating instructions in the course of<br />
guarantee provided that the user will be handled with it as described in the<br />
operating manual. The guarantee will be extended by period of possible<br />
guarantee repair.<br />
When claiming in guarantee period please contact your dealer. The producer<br />
only will make the guarantee repairs. Attach the description of claim reason,<br />
proof of purchase and your exact address to the product.<br />
The guarantee does not include:<br />
mechanical, thermal, chemical and other damages caused by user’s<br />
activities<br />
defects caused by natural disasters<br />
defects caused by repair or changes carried out by user or other<br />
unauthorized person<br />
willful damage of product<br />
incorrect use of product caused by other use than specified in<br />
operating manual (e.g. installation, programming)<br />
damages caused during product transport to customer and from<br />
supplier<br />
Producer:<br />
Dealer:<br />
Date of sale:
© JR 2008-11 version V6.1 VIII/11