EV8582 Series â Quick Installation Guide - Etrovision
EV8582 Series â Quick Installation Guide - Etrovision
EV8582 Series â Quick Installation Guide - Etrovision

You also want an ePaper? Increase the reach of your titles
YUMPU automatically turns print PDFs into web optimized ePapers that Google loves.
<strong>EV8582</strong> <strong>Series</strong> – <strong>Quick</strong> <strong>Installation</strong> <strong>Guide</strong><br />
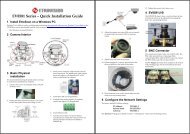
1 Install EtroScan on a Windows PC<br />
EtroScan is a utility is used to configure network settings for cameras & video servers. EtroScan is available on the<br />
CD-ROM or can be downloaded from the Tools section at http://www.etrovision.com/Download_list.aspx?no=5.<br />
Run Setup.exe to install EtroScan.<br />
2 Physical installation<br />
Please review the steps before starting. The steps<br />
outlined below are the suggested installation path, but<br />
certain steps may need to be switched depending on<br />
the installation environment.<br />
1. Remove the cover from the camera. Leave the<br />
plastic covering on the lens cover until installation<br />
complete.<br />
2. Mount the camera to the surface with 4 screws in<br />
the holes highlighted below. Drill pilot holes if<br />
necessary.<br />
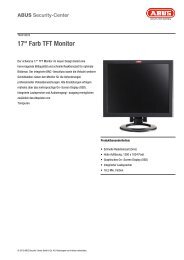
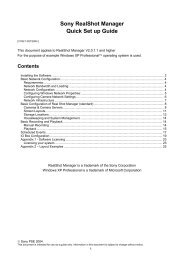
5. Power can be connected directly to the power<br />
terminal block (12V DC) or via the DC power<br />
adapter included with the camera.<br />
If using the power adapter, then connect the<br />
adapter plug (see below) to the power terminal<br />
block.<br />
WARNING: Be careful to connect positive &<br />
negative terminals correctly to avoid damage to the<br />
camera and potentially hazardous conditions.<br />
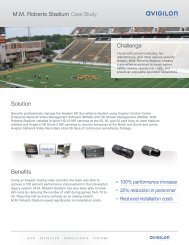
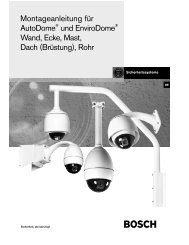
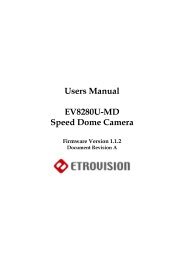
3. If using DI and/or DO, then run cabling and<br />
connect to the DI/DO block terminal.<br />
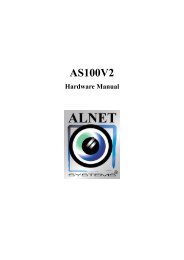
6. To adjust the lens, loosen the lens mount.<br />
4. Connect network and audio in/out cables.
7. Replace the camera cover and remove the plastic<br />
from the lens cover.<br />
3 Configure the Network Settings<br />
The factory default IP address settings:<br />
IP Address 192.168.1.2<br />
Subnet Mask 255.255.255.0<br />
Gateway 192.168.1.1<br />
Run EtroScan (program available via Start -> All Programs -> <strong>Etrovision</strong> Technology menu)<br />
4 Access IP Camera Web Interface<br />
When accessing an IP camera using the web interface for the first time (or when the IP address changes), some<br />
configuration for ActiveX controls are required.<br />
1. Open an IE browser<br />
2. Type in the IP address in the URL: http:// (e.g. http://10.1.21.53)<br />
Pop-up windows and messages for download/run Active X controls (examples below) will likely be displayed. Select<br />
Install or Run to all such messages.
Click on the add-on message, and choose Run Add-on<br />
Repeat the above until all ActiveX controls have been initiated. Once the process is complete, the Live View will be<br />
displayed in IE.<br />
5 Restoring Factory Default Settings<br />
There are 2 methods for restoring the factory default settings:<br />
1. Power on the camera, push and hold down the reset button for 6 seconds. The camera will revert to factory<br />
default settings (e.g. IP will reset to 192.168.1.2).<br />
2. The web UI Setup (System -> Factory Default) ; network and user account data can be saved if desired. Please<br />
refer to the User’s Manual for more information on the web UI Factory Default functionality.

![Cover [IP8161]_Outline.ai](https://img.yumpu.com/39386743/1/185x260/cover-ip8161-outlineai.jpg?quality=85)