Using Focus student data to create a custom ... - PCSB Newsroom
Using Focus student data to create a custom ... - PCSB Newsroom
Using Focus student data to create a custom ... - PCSB Newsroom

Create successful ePaper yourself
Turn your PDF publications into a flip-book with our unique Google optimized e-Paper software.
Pinellas County School District<br />
TECHNICAL TIP SHEET SERIES: WHAT EDUCATORS NEED TO KNOW<br />
page 4 of 17<br />
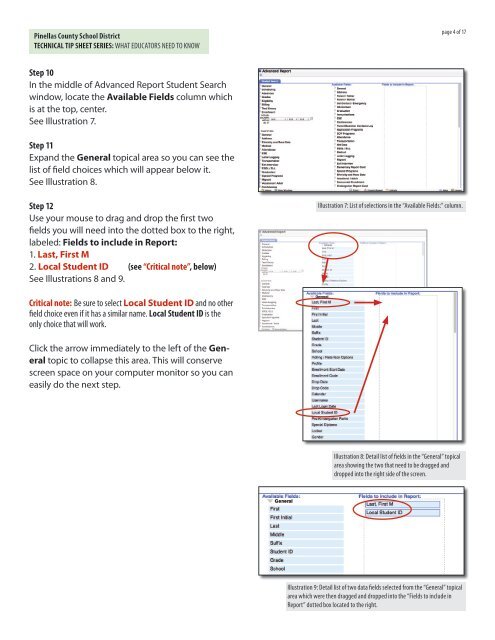
Step 10<br />
In the middle of Advanced Report Student Search<br />
window, locate the Available Fields column which<br />
is at the <strong>to</strong>p, center.<br />
See Illustration 7.<br />
Step 11<br />
Expand the General <strong>to</strong>pical area so you can see the<br />
list of field choices which will appear below it.<br />
See Illustration 8.<br />
Step 12<br />
Use your mouse <strong>to</strong> drag and drop the first two<br />
fields you will need in<strong>to</strong> the dotted box <strong>to</strong> the right,<br />
labeled: Fields <strong>to</strong> include in Report:<br />
1. Last, First M<br />
2. Local Student ID (see “Critical note”, below)<br />
See Illustrations 8 and 9.<br />
Illustration 7: List of selections in the “Available Fields:” column.<br />
Critical note: Be sure <strong>to</strong> select Local Student ID and no other<br />
field choice even if it has a similar name. Local Student ID is the<br />
only choice that will work.<br />
Click the arrow immediately <strong>to</strong> the left of the General<br />
<strong>to</strong>pic <strong>to</strong> collapse this area. This will conserve<br />
screen space on your computer moni<strong>to</strong>r so you can<br />
easily do the next step.<br />
Illustration 8: Detail list of fields in the “General” <strong>to</strong>pical<br />
area showing the two that need <strong>to</strong> be dragged and<br />
dropped in<strong>to</strong> the right side of the screen.<br />
Illustration 9: Detail list of two <strong>data</strong> fields selected from the “General” <strong>to</strong>pical<br />
area which were then dragged and dropped in<strong>to</strong> the “Fields <strong>to</strong> include in<br />
Report” dotted box located <strong>to</strong> the right.