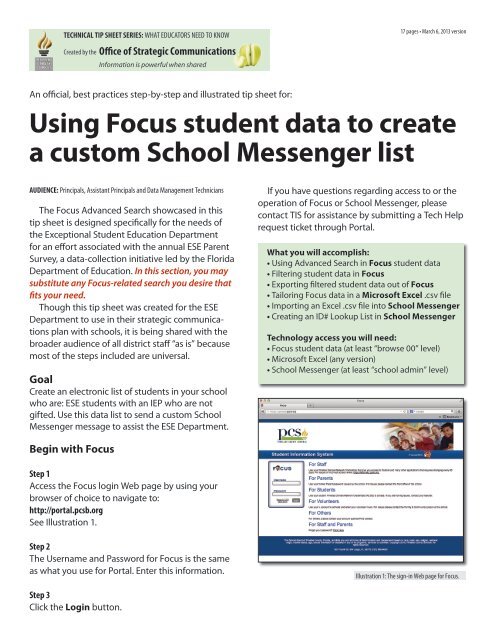
Using Focus student data to create a custom ... - PCSB Newsroom
Using Focus student data to create a custom ... - PCSB Newsroom
Using Focus student data to create a custom ... - PCSB Newsroom

Create successful ePaper yourself
Turn your PDF publications into a flip-book with our unique Google optimized e-Paper software.
TECHNICAL TIP SHEET SERIES: WHAT EDUCATORS NEED TO KNOW<br />
Created by the Office of Strategic Communications<br />
Information is powerful when shared<br />
17 pages • March 6, 2013 version<br />
An official, best practices step-by-step and illustrated tip sheet for:<br />
<strong>Using</strong> <strong>Focus</strong> <strong>student</strong> <strong>data</strong> <strong>to</strong> <strong>create</strong><br />
a cus<strong>to</strong>m School Messenger list<br />
AUDIENCE: Principals, Assistant Principals and Data Management Technicians<br />
The <strong>Focus</strong> Advanced Search showcased in this<br />
tip sheet is designed specifically for the needs of<br />
the Exceptional Student Education Department<br />
for an effort associated with the annual ESE Parent<br />
Survey, a <strong>data</strong>-collection initiative led by the Florida<br />
Department of Education. In this section, you may<br />
substitute any <strong>Focus</strong>-related search you desire that<br />
fits your need.<br />
Though this tip sheet was <strong>create</strong>d for the ESE<br />
Department <strong>to</strong> use in their strategic communications<br />
plan with schools, it is being shared with the<br />
broader audience of all district staff “as is” because<br />
most of the steps included are universal.<br />
Goal<br />
Create an electronic list of <strong>student</strong>s in your school<br />
who are: ESE <strong>student</strong>s with an IEP who are not<br />
gifted. Use this <strong>data</strong> list <strong>to</strong> send a cus<strong>to</strong>m School<br />
Messenger message <strong>to</strong> assist the ESE Department.<br />
If you have questions regarding access <strong>to</strong> or the<br />
operation of <strong>Focus</strong> or School Messenger, please<br />
contact TIS for assistance by submitting a Tech Help<br />
request ticket through Portal.<br />
What you will accomplish:<br />
• <strong>Using</strong> Advanced Search in <strong>Focus</strong> <strong>student</strong> <strong>data</strong><br />
• Filtering <strong>student</strong> <strong>data</strong> in <strong>Focus</strong><br />
• Exporting filtered <strong>student</strong> <strong>data</strong> out of <strong>Focus</strong><br />
• Tailoring <strong>Focus</strong> <strong>data</strong> in a Microsoft Excel .csv file<br />
• Importing an Excel .csv file in<strong>to</strong> School Messenger<br />
• Creating an ID# Lookup List in School Messenger<br />
Technology access you will need:<br />
• <strong>Focus</strong> <strong>student</strong> <strong>data</strong> (at least “browse 00” level)<br />
• Microsoft Excel (any version)<br />
• School Messenger (at least “school admin” level)<br />
Begin with <strong>Focus</strong><br />
Step 1<br />
Access the <strong>Focus</strong> login Web page by using your<br />
browser of choice <strong>to</strong> navigate <strong>to</strong>:<br />
http://portal.pcsb.org<br />
See Illustration 1.<br />
Step 2<br />
The Username and Password for <strong>Focus</strong> is the same<br />
as what you use for Portal. Enter this information.<br />
Illustration 1: The sign-in Web page for <strong>Focus</strong>.<br />
Step 3<br />
Click the Login but<strong>to</strong>n.
Pinellas County School District<br />
TECHNICAL TIP SHEET SERIES: WHAT EDUCATORS NEED TO KNOW<br />
page 2 of 17<br />
Step 4<br />
In the upper right corner of your <strong>Focus</strong> screen,<br />
depending on your access level (school vs district),<br />
you may have the ability <strong>to</strong> select a school name.<br />
You will see the school year and Marking Period<br />
boxes. Make choices by clicking the small downarrow<br />
in the right side of each box.<br />
See Illustration 2.<br />
Illustration 2: Three selection boxes for school name, school year and marking period.<br />
Note: A period of time known as a Marking Period represents a<br />
grading period that is six weeks in length. Each of three Marking<br />
Periods during a school year corresponds <strong>to</strong> the 1st report card, the<br />
2nd report card, the 3rd report card, etc. Elementary schools have<br />
three makring periods while middle and high schools have six.<br />
Choose the current marking period.<br />
Step 5<br />
In the horizontal menu bar at the <strong>to</strong>p of the <strong>Focus</strong><br />
screen, click Students.<br />
See Illustration 3.<br />
Step 6<br />
In the Students drop-down menu, click Advanced<br />
Report.<br />
See Illustration 3.<br />
Illustration 3: Above, the drop-down menu for “Students”<br />
showing the “Advanced Report” choice.<br />
Step 7<br />
In a few moments, the Advanced Report window<br />
will appear.<br />
See Illustration 4.<br />
Step 8<br />
In the upper left corner of the Advanced Report<br />
window and inside the Student Search tab, locate<br />
then click the following phrase:<br />
More Search Options<br />
See Illustration 5.<br />
Illustration 4: Above, the “Advanced Report” choice page, background, showing a detail<br />
view, foreground, of the “More Search Options” selection located in the upper left corner.<br />
When you click More Search Options, new choices<br />
will appear.<br />
See Illustration 6, next. page.<br />
Illustration 5: Above, the “More Search Options” selection.
Pinellas County School District<br />
TECHNICAL TIP SHEET SERIES: WHAT EDUCATORS NEED TO KNOW<br />
page 3 of 17<br />
Step 9<br />
Parts A - D<br />
A.<br />
The <strong>to</strong>pical area labeled General will be au<strong>to</strong>matically<br />
expanded.<br />
See Illustration 6, part A.<br />
A<br />
Note: To expand or collapse a <strong>to</strong>pic, click the arrow located immediately<br />
<strong>to</strong> the left of the <strong>to</strong>pic label.<br />
B.<br />
Locate the ESE <strong>to</strong>pic.<br />
See Illustration 6, part B.<br />
C.<br />
Click the arrow located immediately <strong>to</strong> the left of<br />
the ESE label <strong>to</strong> expand this <strong>to</strong>pic.<br />
See Illustration 6, part C.<br />
B<br />
In this way, you will be able <strong>to</strong> see specific options.<br />
D.<br />
Look for the Instructional Setting options box<br />
and note the small down-arrow located inside the<br />
box <strong>to</strong> the far right. Click the down-arrow in this<br />
box and select the following choice from the dropdown<br />
menu:<br />
Special Ed [SE]<br />
See Illustration 6, part D.<br />
Now, click the arrow immediately <strong>to</strong> the left of the<br />
ESE <strong>to</strong>pic <strong>to</strong> collapse this area. This will conserve<br />
screen space on your computer moni<strong>to</strong>r so you<br />
can easily do the next step. If you like, you may also<br />
collapse the General <strong>to</strong>pic <strong>to</strong> conserve even more<br />
screen space.<br />
C<br />
D<br />
Illustration 6: Details of the “General”, background, and “ESE”, foreground options. Then,<br />
within ESE, the “Instructional Setting” choice area showing the “Special Ed [SE]” selection.
Pinellas County School District<br />
TECHNICAL TIP SHEET SERIES: WHAT EDUCATORS NEED TO KNOW<br />
page 4 of 17<br />
Step 10<br />
In the middle of Advanced Report Student Search<br />
window, locate the Available Fields column which<br />
is at the <strong>to</strong>p, center.<br />
See Illustration 7.<br />
Step 11<br />
Expand the General <strong>to</strong>pical area so you can see the<br />
list of field choices which will appear below it.<br />
See Illustration 8.<br />
Step 12<br />
Use your mouse <strong>to</strong> drag and drop the first two<br />
fields you will need in<strong>to</strong> the dotted box <strong>to</strong> the right,<br />
labeled: Fields <strong>to</strong> include in Report:<br />
1. Last, First M<br />
2. Local Student ID (see “Critical note”, below)<br />
See Illustrations 8 and 9.<br />
Illustration 7: List of selections in the “Available Fields:” column.<br />
Critical note: Be sure <strong>to</strong> select Local Student ID and no other<br />
field choice even if it has a similar name. Local Student ID is the<br />
only choice that will work.<br />
Click the arrow immediately <strong>to</strong> the left of the General<br />
<strong>to</strong>pic <strong>to</strong> collapse this area. This will conserve<br />
screen space on your computer moni<strong>to</strong>r so you can<br />
easily do the next step.<br />
Illustration 8: Detail list of fields in the “General” <strong>to</strong>pical<br />
area showing the two that need <strong>to</strong> be dragged and<br />
dropped in<strong>to</strong> the right side of the screen.<br />
Illustration 9: Detail list of two <strong>data</strong> fields selected from the “General” <strong>to</strong>pical<br />
area which were then dragged and dropped in<strong>to</strong> the “Fields <strong>to</strong> include in<br />
Report” dotted box located <strong>to</strong> the right.
Pinellas County School District<br />
TECHNICAL TIP SHEET SERIES: WHAT EDUCATORS NEED TO KNOW<br />
page 5 of 17<br />
Step 13<br />
Parts A - C<br />
A.<br />
Expand the ESE <strong>to</strong>pical area located under the<br />
Available Fields column header so you can see the<br />
list of field choices which will appear below it.<br />
See Illustration 10, part A.<br />
A<br />
B and C.<br />
Use your mouse <strong>to</strong> drag and drop the third and last<br />
field you will need in<strong>to</strong> the dotted box <strong>to</strong> the right,<br />
labeled: Fields <strong>to</strong> include in Report:<br />
3. Primary Exceptionality<br />
See Illustration 10, parts B and C.<br />
C<br />
Step 14<br />
Now that you have successfully selected the three<br />
fields you need for the special ESE search, scroll <strong>to</strong><br />
the bot<strong>to</strong>m of the Advanced Report Student Search<br />
window and click the Run Report but<strong>to</strong>n.<br />
See Illustration 11.<br />
B<br />
Illustration 10: Detail list of options in the “ESE”<br />
field and list of three selections appearing in the<br />
“Fields <strong>to</strong> include in Report” area.<br />
Illustration 11: Detail of area at the bot<strong>to</strong>m<br />
of the Advanced Report window.
Pinellas County School District<br />
TECHNICAL TIP SHEET SERIES: WHAT EDUCATORS NEED TO KNOW<br />
page 6 of 17<br />
Step 15<br />
In a few moments, initial advanced report results will be displayed on your screen. What you will see is a list of<br />
ESE <strong>student</strong>s in your school who have an IEP. However, this list currently contains both gifted and non-gifted<br />
<strong>student</strong>s. See Illustration 12, part B. By using a filter, you will be able <strong>to</strong> single out the non-gifted <strong>student</strong>s. To<br />
start a filter, click the Filter but<strong>to</strong>n which is located in the upper right corner of the Advanced Report results<br />
screen. See Illustration 12, part A and Illustration 13, part A.<br />
Step 16<br />
In the Filter Rules box, use the small down-arrow in the boxes <strong>to</strong> make the following two selections, in order<br />
from left <strong>to</strong> right: Primary Exceptionality (left box) and Not Equal (center box).<br />
See Illustration 13, parts B and C.<br />
Step 17<br />
In the box on the right, type the following characters exactly as shown with one space on either side of the<br />
single hyphen: L - Gifted<br />
See Illustration 14, part C.<br />
Step 18<br />
Click the Run Filter but<strong>to</strong>n.<br />
See Illustration 14, part D.<br />
Illustration 12: The initial Advanced Report results<br />
screen shows 161 individual ESE <strong>student</strong>s at Plumb<br />
Elementary and their Primary Exceptionality code.<br />
Part A shows the location of the Filter but<strong>to</strong>n. Part B<br />
shows how the Primary Exceptionality field initally<br />
contains the L - Gifted entries.<br />
A<br />
B<br />
A<br />
B<br />
C<br />
Note: Student names and ID numbers have been<br />
changed for all illustrations in this tip sheet <strong>to</strong><br />
preserve <strong>student</strong> privacy.<br />
D<br />
Illustration 13: Detail of Filter Rules <strong>to</strong> eliminate those ESE <strong>student</strong>s at Plumb Elementary coded as “L - Gifted”.
Pinellas County School District<br />
TECHNICAL TIP SHEET SERIES: WHAT EDUCATORS NEED TO KNOW<br />
page 7 of 17<br />
Step 19<br />
In the screen shot examples, 161 <strong>student</strong>s were included in the intial report. By running the filter, the results<br />
now show 105 <strong>student</strong>s. See Illustration 14, part A. After the filter, the Primary Exceptionality column no longer<br />
contains the names of <strong>student</strong>s who are identified with the L - Gifted code. See Illustration 14, part B.<br />
Step 20<br />
Look <strong>to</strong> the right of where the <strong>to</strong>tal number of <strong>student</strong>s is displayed. See Illustration 14, part A and Illustration<br />
15. To save these report results as an Excel spreadsheet file <strong>to</strong> your local hard drive, click the floppy disk icon<br />
so the following pop-up window appears: Opening Advanced Report.xls<br />
Step 21<br />
In the Opening Advanced Report.xls pop-up window, click inside the circle (a.k.a. “radio but<strong>to</strong>n) labeled: Save<br />
File <strong>to</strong> select this choice, then click the OK but<strong>to</strong>n. See Illustration 16.<br />
A<br />
B<br />
Illustration 14, above: Detail of Filter results. Data displayed are<br />
non-gifted, ESE <strong>student</strong>s with an IEP at Plumb Elementary<br />
Illustration 15, above: Detail of icon that triggers the “Save File” option<br />
in the pop-up window entitled “Opening Advanced Report.xls”<br />
Illustration 16, right: Detail of pop-up window entitled “Opening<br />
Advanced Report.xls” and how it should be coded <strong>to</strong> save the<br />
spreadsheet file <strong>to</strong> your local hard drive for the next step in this<br />
work flow. The “Save File” circle (a.k.a. “radio but<strong>to</strong>n”) is selected.
Pinellas County School District<br />
TECHNICAL TIP SHEET SERIES: WHAT EDUCATORS NEED TO KNOW<br />
page 8 of 17<br />
Step 22<br />
The file you saved <strong>to</strong> your local hard drive will<br />
either be on your desk<strong>to</strong>p or in your Downloads<br />
folder. The location of the file depends on how your<br />
computer is set up. Locate the Advanced Report.xls<br />
file in your local computer.<br />
See Illustrations 17 and 18.<br />
Illustration 17: The Downloads pop-up window<br />
showing the “Advanced Report.xls” file name.<br />
Next, Microsoft Excel (spreadsheet)<br />
Step 23<br />
Open the Advanced Report.xls file in Microsft Excel.<br />
See Illustration 19.<br />
Illustration 18: Two views showing the “Advanced<br />
Report.xls” file name as a desk<strong>to</strong>p icon, right, or as a<br />
hard drive folder line item, bot<strong>to</strong>m.<br />
Note 1: If after you save the spreadsheet file <strong>to</strong> your local hard drive<br />
you see a pop-up window that asks if you want <strong>to</strong> open the file now,<br />
choose Yes.<br />
Note 2: Remember that your Excel file will contain real <strong>student</strong> names and Local Student ID numbers. These <strong>data</strong> have been changed in the screen<br />
shots used in this tip sheet <strong>to</strong> preserve <strong>student</strong> privacy.<br />
Illustration 19: Excel file showing the three fields (a.k.a. columns) of <strong>data</strong> exported from <strong>Focus</strong>.
Pinellas County School District<br />
TECHNICAL TIP SHEET SERIES: WHAT EDUCATORS NEED TO KNOW<br />
page 9 of 17<br />
Step 24<br />
Microsoft Excel will be used <strong>to</strong> accomplish two goals: (1) delete two unneeded fields/columns; and, (2) convert<br />
the .xls spreadsheet file <strong>to</strong> a .csv or comma separated value spreadsheet file. Both of these goals are needed<br />
so the remaining <strong>data</strong> is compatible with School Messenger. If you wish <strong>to</strong> proof the contents of the spreadsheet<br />
file against school-based records, now is the time <strong>to</strong> do this while the <strong>student</strong> names are still present.<br />
Note: From this point forward, this tip sheet will use “column” rather than “field”. The term “field” is appropriate for <strong>Focus</strong> which is a <strong>data</strong>base<br />
while “column” is the preferred term in Excel as it is a spreadsheet.<br />
Step 25<br />
In Excel, click on the label for column C so the entire column becomes highlighted (a.k.a. selected).<br />
See Illustration 20, part A.<br />
Step 26<br />
While column C is highlighted, hover your mouse over the highlighted area, then RIGHT-mouse click <strong>to</strong> see a<br />
pop-up menu of choices. LEFT-mouse click Delete.<br />
See Illustration 20, parts A and B.<br />
Note how the content that was in column C has now been deleted.<br />
See Illustration 20, part C.<br />
A<br />
B<br />
Illustration 20: A clockwise sequence of three screen shots showing, above, Excel<br />
column C highlighted (a.k.a. selected), the RIGHT-mouse, pop-up menu showing the<br />
Delete choice, right, then the resulting deletion of <strong>data</strong> from Column C, bot<strong>to</strong>m.<br />
C
Pinellas County School District<br />
TECHNICAL TIP SHEET SERIES: WHAT EDUCATORS NEED TO KNOW<br />
page 10 of 17<br />
Step 27<br />
In Excel, click on the label for column A so the entire column becomes highlighted (a.k.a. selected).<br />
See Illustration 21.<br />
Step 28<br />
While column A is highlighted, hover your mouse over the highlighted area, then RIGHT-mouse click <strong>to</strong> see a<br />
pop-up menu of choices. LEFT-mouse click Delete.<br />
See Illustration 22.<br />
Note how the content that was in column A has been deleted and what was in column B has now<br />
au<strong>to</strong>matically moved <strong>to</strong> the right, in<strong>to</strong> column A.<br />
See Illustration 23.<br />
Step 29<br />
Remove the highlighting from column A by clicking inside any empty cell. (This also works for removing the<br />
highlighting from a row.)<br />
See Illustration 24.<br />
Illustration 21: In Excel, above Column A is highlighted as<br />
part of the work flow for deleting its content.<br />
Illustration 22: The RIGHT-mouse, pop-up<br />
menu showing the Delete choice as part<br />
of the work flow for deleting the content<br />
from Column A, which is highlighted<br />
(a.k.a. selected).<br />
Illustration 23: In Excel, above, after<br />
the initial content from Column A is<br />
deleted -- “Last First M” -- the content<br />
from what was Column B au<strong>to</strong>matically<br />
moves <strong>to</strong> the left and becomes the new<br />
Column A which is now filled with<br />
“Local Student ID” <strong>data</strong>.<br />
Illustration 24: To remove the highlighting from a<br />
column or row, click inside any empty cell.
Pinellas County School District<br />
TECHNICAL TIP SHEET SERIES: WHAT EDUCATORS NEED TO KNOW<br />
page 11 of 17<br />
Step 30<br />
The final step for preparing this <strong>data</strong> set for use in<br />
School Messenger involves deleting the column<br />
header label in column A, which in this case is:<br />
Local Student ID. The label is located in row 1. In<br />
terms of Excel, the specific address of this label is<br />
called “cell A1” where the column letter appears<br />
first followed by the row number.<br />
Note: Many people equate Excel cell address labels <strong>to</strong> the board<br />
game called Battleship or the group game known as Bingo. Others<br />
associate Excel cell address labels with the coordinates on a paper<br />
map.<br />
To do this correctly, the original row 1 must be<br />
deleted so the <strong>data</strong> au<strong>to</strong>matically moves up. In this<br />
way, the <strong>data</strong> will begin in row 1 rather than row 2.<br />
Local Student ID<br />
Illustration 25: The number 1 that is the label for row 1. When the row label is<br />
clicked, the entire row becomes highlighted (a.k.a. selected) from column A all<br />
the way <strong>to</strong> the right-most side of the worksheet, a <strong>to</strong>tal of at least 255 columns.<br />
In the upper left corner of the Excel worksheet,<br />
click the number 1 that has a grey background as<br />
this is the label for all the cells in row 1. After you<br />
click, the horizontal row rather than the vertical<br />
column should be highligted.<br />
See Illustration 25.<br />
Step 31<br />
With all of row 1 highlighted, RIGHT-mouse click <strong>to</strong><br />
see a pop-up menu of choices, then LEFT-mouse<br />
click Delete.<br />
See Illustration 26.<br />
Note how the content -- the <strong>data</strong> -- that did start on<br />
row 2 has au<strong>to</strong>matically moved up and now starts<br />
on row 1.<br />
See Illustration 27.<br />
Step 32<br />
If present, remove the highlighting from row 1 by<br />
clicking inside any empty cell.<br />
See Illustration 28.<br />
0012345678<br />
Illustration 26: The RIGHT-mouse, pop-up<br />
menu showing the Delete choice as part<br />
of the work flow for deleting the content<br />
from Column A, which is highlighted<br />
(a.k.a. selected).<br />
Illustration 27: The <strong>data</strong> now<br />
start on row 1 as opposed<br />
<strong>to</strong> row 2.<br />
Illustration 28: To remove the<br />
highlighting from a row, click<br />
inside any empty cell.
Pinellas County School District<br />
TECHNICAL TIP SHEET SERIES: WHAT EDUCATORS NEED TO KNOW<br />
page 12 of 17<br />
Step 33<br />
To save the edited Excel file and convert it <strong>to</strong> a .csv<br />
formatted file, you must save it as a .csv file through<br />
Excel. The work flow for saving a file varies<br />
depending on your version of Excel.<br />
Variation 1: On the menu bar, click File Save As.<br />
See Illustration 29, <strong>to</strong>p view.<br />
Variation 2: For Excel version 2010 which does not<br />
have a menu bar (i.e. File ... Edit ... View ... Insert ...<br />
Format, etc.), click on what is known as the<br />
Microsoft Office but<strong>to</strong>n (a.k.a. “the bubble”). This<br />
but<strong>to</strong>n is located in the extreme upper left corner<br />
of the Excel window, then in the drop-down menu,<br />
click Save As, then click Other Formats.<br />
See Illustration 29, bot<strong>to</strong>m view.<br />
Step 34<br />
In the next Excel pop-up window, which many<br />
people call the Save As window, locate the<br />
Format: or Save as Type: (Excel version 2007) box.<br />
<strong>Using</strong> the small drop-down arrow, select the<br />
following option:<br />
MS-DOS Comma-Separated (.csv)<br />
Note: Your options may be worded a bit differently such as:<br />
Comma-Separated (MS-DOS) (*.csv). DO select the one that includes<br />
“MS-DOS” rather than “Windows” as the former is more universal.<br />
See Illustrations 30 and 31.<br />
Note: In the Save As window, select the location in your hard drive<br />
where you would like <strong>to</strong> save the .csv file. Suggestion: Desk<strong>to</strong>p. In<br />
this way, it will be easier (i.e. fewer clicks) <strong>to</strong> locate the .csv file that<br />
will be needed for the School Messenger portion of this work flow.<br />
Illustration 30: In Excel, above, the file Format: box<br />
contains many choices. For a sampling of the available<br />
file type selections and a potential trap you need <strong>to</strong><br />
avoid, see Illustration 27, right. Note how the narrative in<br />
the “Description” area explains the file choice selected in<br />
the Format: box. Note: If you see a “Compatibility check<br />
recommended” caution statement, just ignore it.<br />
Illustration 29: Top view, Variation 1 -- To save an Excel file in a different format, from<br />
the menu bar, click the File Save As sequence <strong>to</strong> trigger the pop-up window<br />
shown in Illustration 30, below left, <strong>to</strong> appear. Bot<strong>to</strong>m view, Variation 2 -- Click the<br />
Microsoft Office but<strong>to</strong>n located in the upper left corner of the Excel window, then in the<br />
drop-down menu, click Save As <strong>to</strong> trigger the pop-up window shown in Illustration 30,<br />
below left, <strong>to</strong> appear.<br />
Illustration 31: In Excel, right, the<br />
correct file format selection is<br />
“MS-DOS Comma Separated (.csv)”.<br />
An Excel file formatted with this<br />
choice will allow you <strong>to</strong> <strong>create</strong> a<br />
cus<strong>to</strong>m School Messenger list.<br />
POTENTIAL TRAP: You must<br />
go through these steps in Excel<br />
<strong>to</strong> <strong>create</strong> a true .csv file as this<br />
cannot be done by merely typing<br />
a new extension -- the right-most<br />
characters in a file name after the<br />
DOT separa<strong>to</strong>r. In this case,<br />
changing the extension by typing<br />
new characters does not change<br />
the file’s internal code, it only<br />
changes the way the file name<br />
looks.
Pinellas County School District<br />
TECHNICAL TIP SHEET SERIES: WHAT EDUCATORS NEED TO KNOW<br />
page 13 of 17<br />
Step 35<br />
In the Save As window, locate the Save As: or File<br />
Name: (Excel version 2007) box. Here is where you<br />
can rename the file from the default of Advanced<br />
Report.csv so it matches the type of <strong>data</strong> it<br />
contains. Suggestion: For the example being used<br />
in this tip sheet, the following file name will make<br />
it easier <strong>to</strong> recognize the purpose of the <strong>data</strong> set<br />
without having <strong>to</strong> open the file:<br />
ESE Student List MM_DD_YY<br />
See Illustration 32.<br />
Illustration 32: In Excel, above, when saving a file you<br />
can use the Save As box <strong>to</strong> rename it. Once you have<br />
renamed the file, click the Save but<strong>to</strong>n.<br />
Note: It is best practice <strong>to</strong> run the <strong>Focus</strong> search on the same day<br />
the School Messenger message is planned so the list of <strong>student</strong>s<br />
is current. This is why including the month/day/year (i.e. MM_DD_<br />
YY) in the file name is useful as it will indicate the age of the <strong>Focus</strong><br />
search from your school and by extension the currency of the <strong>data</strong><br />
in your School Messenger list. As you know, the number of enrolled<br />
<strong>student</strong>s can change on a daily basis.<br />
Step 36<br />
In the Save As window, click the Save but<strong>to</strong>n.<br />
See Illustration 32.<br />
Step 37<br />
After clicking the Save but<strong>to</strong>n in step 36, you may<br />
see a pop-up screen like the one in Illustration<br />
33. This work flow does not require the use of any<br />
fancy Excel features nor has it instructed you <strong>to</strong><br />
<strong>create</strong> any. Just choose the affirmative but<strong>to</strong>n<br />
which will be labeled either Continue or Yes <strong>to</strong><br />
move on.<br />
Illustration 33: In Excel, above, when saving a file in the .csv format, you<br />
may see this informational pop-up window.<br />
Step 38<br />
After the Excel file has been saved <strong>to</strong> your<br />
computer’s Desk<strong>to</strong>p, an icon representing the file<br />
will appear.<br />
See Illustration 34.<br />
If you saved the .csv formatted Excel spreadsheet<br />
file <strong>to</strong> a location in your computer other than<br />
Desk<strong>to</strong>p, locate the file in your hard drive. A<br />
common folder in which <strong>to</strong> look is: Documents.<br />
See Illustration 35.<br />
Illustration 34: A computer desk<strong>to</strong>p icon illustrating the following file<br />
name: Advanced Report.csv. Your file name should differ.<br />
Illustration 35: A hard drive folder reference for the following file name:<br />
Advanced Report.csv. Your file name should differ.
Pinellas County School District<br />
TECHNICAL TIP SHEET SERIES: WHAT EDUCATORS NEED TO KNOW<br />
page 14 of 17<br />
Once you have located the cus<strong>to</strong>m .csv formatted<br />
spreadsheet file in your computer that you <strong>create</strong>d<br />
from a <strong>Focus</strong> search, you are now ready for the final<br />
section of this tip sheet -- School Messenger.<br />
The final section, School Messenger<br />
Step 39<br />
Access the School Messenger for Pinellas County<br />
Schools login Web page by using your browser of<br />
choice <strong>to</strong> navigate <strong>to</strong>:<br />
http://asp.schoolmessenger.com/pinellas<br />
See Illustration 36.<br />
Illustration 36: Above, the School Messenger<br />
login Web page for Pinellas County Schools.<br />
Step 40<br />
Once you log in<strong>to</strong> School Messenger, you will see<br />
the Welcome window and it will contain your<br />
name <strong>to</strong> the right of the word “Welcome”.<br />
See Illustration 37.<br />
Step 41<br />
In the Welcome window in the tabs near the <strong>to</strong>p<br />
labeled Start, Broadcasts, Reports and System, click<br />
Broadcasts.<br />
See Illustration 37.<br />
Step 42<br />
Once you select the Broadcasts tab in step 41, you<br />
will see the List Builder window. In the List<br />
Builder window, click the but<strong>to</strong>n located on the<br />
left side labeled Add New List.<br />
See Illustration 38.<br />
Illustration 37: Above, the Welcome window.<br />
Illustration 38: Above, the List Builder window.
Pinellas County School District<br />
TECHNICAL TIP SHEET SERIES: WHAT EDUCATORS NEED TO KNOW<br />
page 15 of 17<br />
Step 43<br />
Once you select the Add New List but<strong>to</strong>n in step<br />
32, you will see the List Edi<strong>to</strong>r window. In the List<br />
Edi<strong>to</strong>r window, type a name in the List Name box<br />
for the cus<strong>to</strong>m cus<strong>to</strong>m School Messenger list you<br />
are creating.<br />
See Illustration 39.<br />
Suggestion: Type a name that reflects the <strong>student</strong>s<br />
the <strong>data</strong> represents. If you like, include the date in<br />
the list name so you can easily identify the currency<br />
of the list.<br />
Illustration 39: Above, the List Edi<strong>to</strong>r window.<br />
Step 44<br />
In the List Edi<strong>to</strong>r window, scroll down until you<br />
locate the section labeled Additional List Tools.<br />
Click the Upload List but<strong>to</strong>n.<br />
See Illustration 40.<br />
Step 45<br />
Once you select the Upload List but<strong>to</strong>n, you will<br />
see the Upload List: window and it will contain<br />
the name you typed in step 33. In this example, the<br />
window is labeled:<br />
Upload List: ESE Parent Survey<br />
See Illustration 41, <strong>to</strong>p and bot<strong>to</strong>m views.<br />
In the section labeled Upload Call List File and the<br />
<strong>to</strong>pic labeled Upload Type:, there are two choices.<br />
Select the ID # lookup: option by clicking inside<br />
the circle (a.k.a radio but<strong>to</strong>n) located <strong>to</strong> the left of<br />
the option’s name.<br />
See Illustration 41, bot<strong>to</strong>m view.<br />
Illustration 40: Above, the Additional List Tools window.<br />
Illustration 41: The Upload List window. The <strong>to</strong>p view shows the entire window<br />
while the bot<strong>to</strong>m view shows the detail of how the ID # lookup: choice has<br />
been selected by clicking inside the circle (a.k.a. radio but<strong>to</strong>n).<br />
Step 46<br />
To the right of the Upload File: box, click the<br />
Browse... but<strong>to</strong>n.<br />
See Illustration 41, bot<strong>to</strong>m view.<br />
Once you select the Browse... but<strong>to</strong>n, you will see<br />
a window that will allow you <strong>to</strong> navigate <strong>to</strong> your<br />
computer’s Desk<strong>to</strong>p (or <strong>to</strong> the location where you<br />
saved the file detailed in step 34). Select the file you<br />
named in step 35, then click the Next but<strong>to</strong>n.
Pinellas County School District<br />
TECHNICAL TIP SHEET SERIES: WHAT EDUCATORS NEED TO KNOW<br />
page 16 of 17<br />
Step 47<br />
Once you click the Next but<strong>to</strong>n, depending on the<br />
version of School Messgenger you are using, you<br />
may see a pop-up window that says: “Please select<br />
a file <strong>to</strong> upload and then click Preview <strong>to</strong> continue.”<br />
If so, click the Preview but<strong>to</strong>n. If not, no worries,<br />
just go directly <strong>to</strong> step 48.<br />
See Illustration 42.<br />
Step 48<br />
In the new Upload List: window, you can inspect<br />
the results of matching Local Student ID numbers<br />
originally found in <strong>Focus</strong> <strong>to</strong> the unique <strong>student</strong><br />
ID numbers found in School Messenger. Click the<br />
Save but<strong>to</strong>n.<br />
See Illustration 43.<br />
Step 49<br />
Once you click the Save but<strong>to</strong>n, a new version of<br />
the List Edi<strong>to</strong>r window appears. Near the <strong>to</strong>p, it<br />
shows the <strong>to</strong>tal number of <strong>student</strong>s contained in<br />
the cus<strong>to</strong>m list you are creating.<br />
See Illustration 44.<br />
Though it is not commonly necessary, if you like<br />
you can now further edit this list. To do so, scroll<br />
down until you see the Additional List Tools<br />
section.<br />
See Illustration 45.<br />
Make any changes you desire by choosing Enter<br />
Contacts or Quick Pick. Follow the prompts.<br />
0012345678<br />
0023456789<br />
0034567891<br />
0045678912<br />
0056789123<br />
0067891234<br />
0078912345<br />
0089123456<br />
1 First Name<br />
2 First Name<br />
3 First Name<br />
3 First Name<br />
4 First Name<br />
5 First Name<br />
6 First Name<br />
7 First Name<br />
1 Last Name<br />
2 Last Name<br />
3 Last Name<br />
3 Last Name<br />
4 Last Name<br />
5 Last Name<br />
6 Last Name<br />
7 Last Name<br />
Illustration 42: Above, the file upload pop-up window.<br />
Illustration 43: Above, the preview window shows how the <strong>Focus</strong> <strong>data</strong> from your .csv<br />
spreadsheet file matches up with school-level <strong>student</strong> <strong>data</strong> contained in School<br />
Messenger.<br />
105<br />
(727) 217-1234<br />
(727) 642-1234<br />
(727) 564-1234<br />
(727) 215-1234<br />
(727) 258-7347<br />
(727) 527-5009<br />
(727) 359-1234<br />
parent@msn.com<br />
parent@aol.com<br />
parent@gmail.com<br />
parent@netzero.com<br />
Illustration 44: Above, the List Edi<strong>to</strong>r window now displays the <strong>to</strong>tal<br />
number of <strong>student</strong>s contained in the cus<strong>to</strong>m list you are creating.<br />
Step 50<br />
At the bot<strong>to</strong>m of the Additional List Tools section,<br />
click the Done but<strong>to</strong>n.<br />
See Illustration 45.<br />
Illustration 45: Above, the List Edi<strong>to</strong>r window now displays the <strong>to</strong>tal<br />
number of <strong>student</strong>s contained in the cus<strong>to</strong>m list you are creating.
Pinellas County School District<br />
TECHNICAL TIP SHEET SERIES: WHAT EDUCATORS NEED TO KNOW<br />
page 17 of 17<br />
Step 51<br />
Once you select the Done but<strong>to</strong>n, you will see a<br />
new version of the List Builder window and it will<br />
display an index of those lists you have saved in<br />
School Messenger. In this example the index area<br />
shows the following list name: ESE Parent Survey.<br />
List names you <strong>create</strong> may even contain the month,<br />
day, and year which would be even better because<br />
the date au<strong>to</strong>matically generated by School<br />
Messenger is when the list was <strong>create</strong>d but does<br />
not reflect the currency of the <strong>data</strong> contained<br />
therein. Ideally, both dates will be the same.<br />
See Illustration 46.<br />
Illustration 46: Above, the new List Builder window showing the list you just <strong>create</strong>d<br />
that is based on a cus<strong>to</strong>m <strong>Focus</strong> search.<br />
Congratulations!<br />
You have just successfully completed creating a list in School Messenger that is based on a cus<strong>to</strong>m <strong>data</strong><br />
search conducted earlier in <strong>Focus</strong>, then modified in Excel.<br />
From here, you can <strong>create</strong> a routine audio School Messenger message that you can then send via telephone<br />
<strong>to</strong> the parents of the <strong>student</strong>s contained in the list.<br />
If you need help with any use of School Messenger, contact School Messenger for additional training support.<br />
They are available 24/7, 365 by<br />
Telephone at: 888-527-5225 or on the<br />
Web at: http://www.schoolmessenger.com/support/<br />
Tip sheet origination and how <strong>to</strong> submit a correction or clarification<br />
Though every effort has been made <strong>to</strong> ensure accuracy, if you find any error in or would like <strong>to</strong> request a<br />
clarification <strong>to</strong> this tip sheet, please e-mail your details <strong>to</strong>: wolfed@pcsb.org. It takes a village. To check for<br />
any updates <strong>to</strong> this tip sheet, look here: http://newsroom.pcsb.org/?page_id=12800. Thank you.<br />
-- Author: Debbie Wolfe, Assistant Direc<strong>to</strong>r, Strategic Communications, Pinellas County Schools<br />
Special thanks goes out <strong>to</strong> the following PCS people for assisting in the creation of this tip sheet:<br />
• Rita Farlow, Communications Coordina<strong>to</strong>r, Office of Strategic Communications -- for assisting with<br />
proofreading<br />
• Cynthia Hearn, Technology Specialist, Northeast High School -- beta tester for all tip sheet <strong>to</strong>pics<br />
• Kevin Hendrick, Principal, Northeast High School -- for recommending Ms. Hearn<br />
• Melissa Kegler, Senior Account Clerk, ESE Department -- for assisting with the <strong>Focus</strong> search strategy<br />
• Melanie Marquez Parra, Public Information Officer, Office of Strategic Communications -- for assisting<br />
with beta testing the <strong>Focus</strong> search example through School Messenger<br />
• Stephanie Miller, Coordina<strong>to</strong>r, ESE Department and IDEA Grant Manager -- for assisting with the <strong>Focus</strong><br />
search strategy<br />
• Paula Nelson, Supervisor Florida Diagnostic & Learning Resources System -- for assisting with proofreading<br />
and recommending the folks at Northeast High School for beta testing