BigIR-Mark-IV-Manual.. - SteppIR
BigIR-Mark-IV-Manual.. - SteppIR
BigIR-Mark-IV-Manual.. - SteppIR

You also want an ePaper? Increase the reach of your titles
YUMPU automatically turns print PDFs into web optimized ePapers that Google loves.
Wind reinforcing kit installation instructions (continued)<br />
Follow the instructions for preparing the wiring for the <strong>BigIR</strong> EHU. This step must be done before placing the<br />
lid on the EHU. Refer to figure 8.14 on page 10 for more detail on wiring the EHU.<br />
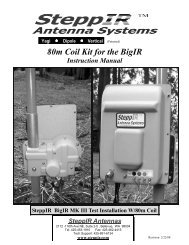
The reinforcing plate has a short side and a long side, as shown in figure 8.1. It is critical that the reinforcing<br />
plate be mounted as shown in figure 8.14, or the saddles will not align properly.<br />
Place the EHU and the EHU gasket on top of the lid as shown in figure 8.2. Use the PN 60-0071 #10 x 1”<br />
screws to attach the reinforcing plate to the EHU, gasket and lid. Each screw will have a PN 60-0018 #10 flat<br />
washer underneath the head of the screw and also underneath the Nylock nut as shown in figure 8.4 . Figure<br />
8.1 shows screw placement. For the 5 bolts that connect the reinforcing plate to the EHU you will only use<br />
a washer on the plastic EHU housing. Use the PN 60-0017 #10 x 3/4” screws to attach the rest of the lid to the<br />
EHU.<br />
Note: If you are installing with the 80m coil option, be sure to read the instructions on page 14 before installing<br />
the reinforcing plate as there are different instructions at this juncture.<br />
Figure 8.1<br />
#10 x 3/4” Pan head<br />
screw PN 60-0017<br />
#10 x 1” Pan head<br />
screw PN 60-0071<br />
LONG SIDE OF REINFORCING PLATE<br />
SHORT SIDE OF REINFORCING PLATE<br />
Figure 8.2<br />
Figure 8.4<br />
2112 116TH AVE NE SUITE 1-5, BELLEVUE WA, 98004 WWW.STEPPIR.COM TEL: (425)-453-1910 FAX: (425)-462-4415<br />
13