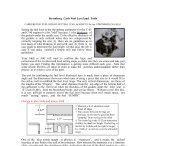
Stromberg Carburetor Assembly and Adjustment - The Fly Baby ...
Stromberg Carburetor Assembly and Adjustment - The Fly Baby ...
Stromberg Carburetor Assembly and Adjustment - The Fly Baby ...

Create successful ePaper yourself
Turn your PDF publications into a flip-book with our unique Google optimized e-Paper software.
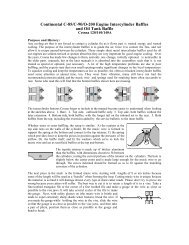
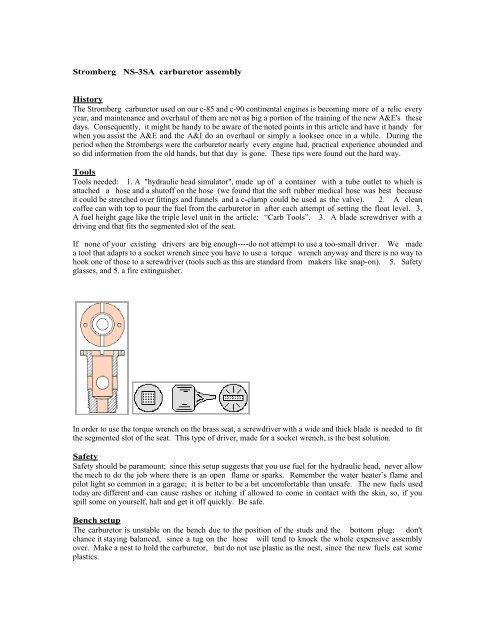
<strong>Stromberg</strong> NS-3SA carburetor assembly<br />
History<br />
<strong>The</strong> <strong>Stromberg</strong> carburetor used on our c-85 <strong>and</strong> c-90 continental engines is becoming more of a relic every<br />
year, <strong>and</strong> maintenance <strong>and</strong> overhaul of them are not as big a portion of the training of the new A&E's these<br />
days. Consequently, it might be h<strong>and</strong>y to be aware of the noted points in this article <strong>and</strong> have it h<strong>and</strong>y for<br />
when you assist the A&E <strong>and</strong> the A&I do an overhaul or simply a looksee once in a while. During the<br />
period when the <strong>Stromberg</strong>s were the carburetor nearly every engine had, practical experience abounded <strong>and</strong><br />
so did information from the old h<strong>and</strong>s, but that day is gone. <strong>The</strong>se tips were found out the hard way.<br />
Tools<br />
Tools needed: 1. A "hydraulic head simulator", made up of a container with a tube outlet to which is<br />
attached a hose <strong>and</strong> a shutoff on the hose (we found that the soft rubber medical hose was best because<br />
it could be stretched over fittings <strong>and</strong> funnels <strong>and</strong> a c-clamp could be used as the valve). 2. A clean<br />
coffee can with top to pour the fuel from the carburetor in after each attempt of setting the float level. 3.<br />
A fuel height gage like the triple level unit in the article: “Carb Tools”. 3. A blade screwdriver with a<br />
driving end that fits the segmented slot of the seat.<br />
If none of your existing drivers are big enough----do not attempt to use a too-small driver. We made<br />
a tool that adapts to a socket wrench since you have to use a torque wrench anyway <strong>and</strong> there is no way to<br />
hook one of those to a screwdriver (tools such as this are st<strong>and</strong>ard from makers like snap-on). 5. Safety<br />
glasses, <strong>and</strong> 5. a fire extinguisher.<br />
In order to use the torque wrench on the brass seat, a screwdriver with a wide <strong>and</strong> thick blade is needed to fit<br />
the segmented slot of the seat. This type of driver, made for a socket wrench, is the best solution.<br />
Safety<br />
Safety should be paramount; since this setup suggests that you use fuel for the hydraulic head, never allow<br />
the mech to do the job where there is an open flame or sparks. Remember the water heater’s flame <strong>and</strong><br />
pilot light so common in a garage; it is better to be a bit uncomfortable than unsafe. <strong>The</strong> new fuels used<br />
today are different <strong>and</strong> can cause rashes or itching if allowed to come in contact with the skin, so, if you<br />
spill some on yourself, halt <strong>and</strong> get it off quickly. Be safe.<br />
Bench setup<br />
<strong>The</strong> carburetor is unstable on the bench due to the position of the studs <strong>and</strong> the bottom plug; don't<br />
chance it staying balanced, since a tug on the hose will tend to knock the whole expensive assembly<br />
over. Make a nest to hold the carburetor, but do not use plastic as the nest, since the new fuels eat some<br />
plastics.
2<br />
You want the carburetor level. after you have set the level observe it over a span of, say, fifteen<br />
minutes <strong>and</strong> make sure that it is not overflowing via the main nozzle.<br />
If it does overflow via the main nozzle, you will have to readjust the float level to be a tad lower----but<br />
first, make sure that the drips are coming from the main nozzle or a hole in the side of the venturi-----as<br />
stromberg notes in their manual <strong>and</strong> in one of the service letters, some carburetors had their idle air<br />
openings positioned too low, <strong>and</strong> these can "leak" if the fuel level is higher than they are. <strong>The</strong> cure, also<br />
in the book <strong>and</strong> the service letter, was to plug the offending hole <strong>and</strong> re-drill another that was higher,<br />
opening above the fuel level. <strong>The</strong> important thing is to look before “correcting” the wrong thing. Don’t<br />
assume your plane has the original or assigned carburetor, either; we have had so many interchanged<br />
carburetors noted to us that one cannot be too careful. <strong>Stromberg</strong> tells how to compare the part numbers<br />
with the engines, so check it!! That comment is true about the main jet, too, since it was common “in the<br />
old days” to change the main jet if one were to be flying from high airports or simply because the engine<br />
ran better—but no one bothered to make a not e in the log books, so check <strong>and</strong> check again.<br />
Safetying the components<br />
Safety the main fuel nozzle? Yes, though the manual is not explicit, but does say that all "internal"<br />
safetying should be done, except for the seat, before the level adjustments are made. <strong>The</strong>re is a hole in<br />
the nozzle hex for a safety wire, so----safety it as well, even though not stated in the manual.<br />
<strong>The</strong> 0.023 dia safety wire called out in the manual is certainly the most desirable because it is so easy to<br />
work in tight spaces but hard to find. If you have none of that size, then the next larger can be<br />
substituted, though 0.023 is a lot easier to manipulate within the body, <strong>and</strong> it gets out of the way<br />
better than does the heavier wire, an especially important item when considering the lack of<br />
clearances <strong>and</strong> possibilities of interferences of the bowl, needle, <strong>and</strong> float assembly. Use the smaller<br />
diameter wire, brass or steel, if you have it.<br />
hyd head of 0.5 when setting level...40 inches is about 1 psi<br />
Setting the float level:<br />
For reasons that will never be revealed to we earthlings, the gasoline that we treat so cavalierly is<br />
amazingly forgiving of our sloppiness-----but-----gasoline is astoundingly dangerous <strong>and</strong> don't ever forget<br />
it. Set up the operation with that in mind----doors open, no smoking, no gas-fired water heaters<br />
around, no clothes dryers or washers being used........And have the fire extinguisher at your elbow at all<br />
times. Gasoline can bite <strong>and</strong> it won't ask permission first!!! <strong>The</strong> greatest fear many of us have is to<br />
be hurt with fire; the "tank" we are talking about for these experiments are above us to give the<br />
hydraulic head necessary to simulate the pressure of fuel from tanks; take no chances that the fuel can<br />
spill on you. Just having fuel on your skin will cause the skin to itch <strong>and</strong>, perhaps, hurt. Spilling<br />
fuel that is then ignited would ruin all our days. Think it through first, do the safety things first, or<br />
don't even attempt to do the job!!!<br />
First, underst<strong>and</strong> that the level will not be exactly 13/32cds, as specified. <strong>The</strong>re are discrete steps<br />
of fuel level brought about by the thicknesses of the gaskets. According to the book, the difference<br />
in level caused by a 1/64th change in total gasket thickness causes a 5/64ths change in fuel level.<br />
<strong>The</strong> manual notes the allowable tolerances, <strong>and</strong> the conclusion from them is that the level, if it can’t<br />
be the desired 13/32cds, is better higher than lower.<br />
You can never!!!!, Almost never.....Achieve a tolerance of plus or minus 1/64th!!!!! <strong>The</strong> manual says<br />
that a 1/64th change in gasket thickness will make a 5/64ths difference in fuel height. So, assume<br />
that the fuel level is 2/64ths high or low; when you increase or decrease the gasket thickness to<br />
accommodate, then you are changing the height by 5/64ths, which means that you are now 3/64ths<br />
low or high. <strong>The</strong> manual notes that the maximum number of gaskets to be used together is two.
3<br />
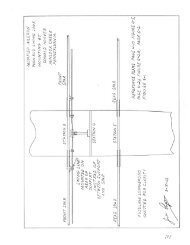
Hydraulic head to simulate the fuel pressure in the plane<br />
Use a funnel <strong>and</strong> hose or use the coffee can <strong>and</strong> tube <strong>and</strong> shutoff as the<br />
"tank", placing the can as high as it will go with the tube----a previous<br />
member measured <strong>and</strong> established that a head of 42" is about right, but it is<br />
not critical. Surgical hose works well since it is easier to force over the<br />
fittings or the funnel end, but be aware that the next time you look at it, it<br />
will be all cracked <strong>and</strong> hard; for a onetime use, it is the best.<br />
One psi per 40 inches of head. <strong>Stromberg</strong> requires 0.5 psi for the head for setting the level.<br />
Make sure the fuel holder is secure from accidental tugs or swipes----don't take a chance of getting in on<br />
you, especially in your eyes!!! Having spilled some of the new fuel on the bench stool i was sitting on<br />
during a session with a carburetor, i can attest that the new fuel will rigorously attack any sensitive<br />
skin!!!-<br />
Use the same fuel as you intend to use in the plane. Use fresh fuel. Expect the adjustment session to<br />
take about thirty minutes the first time, based on needing to twice change the gasket <strong>and</strong> check the level.<br />
If the duration is much longer, change the fuel before the final confirmation. Underst<strong>and</strong> that the<br />
new fuels react differently than we are accustomed to---they eat paints that used to be non-affected, <strong>and</strong><br />
will cause an intense itch very rapidly if spilled on the skin. If you spill any on the seat of the chair,<br />
as i did, stop the experiment there <strong>and</strong> shower asap, or regret it for hours!! Start with any gasket<br />
thickness under the seat, <strong>and</strong> snug the seat. Let in the fuel <strong>and</strong> see which way you have to go, either<br />
needing to add or decrease the gasket stack thickness.<br />
Install the needle, tenderly, then the float, <strong>and</strong> then the float shaft (we found that a good magnet, like<br />
those on the end of magnets made for mechanics to retrieve dropped tools, works readily to start the float<br />
shaft out of it nest each time), but don't bother to install the float shaft retainer setscrew or the shaft hole<br />
plug during the setting session. With a dry bowl, release the fuel shutoff clamp/valve slowly, because<br />
the first fuel into the bowl will vigorously bubble <strong>and</strong> jet----right toward you or something that you<br />
did not want splashed with the fuel. Do not turn on the fuel <strong>and</strong> walk away, because the first gasket<br />
thickness might be such as to permit overflow. When you are close to having the correct thickness of<br />
gasket, let the fuel in, <strong>and</strong> let it creep to the final level over a span of, say, five minutes.<br />
Remember that the rate of fuel entering is not constant---0nce the fuel level is near the maximum with<br />
the particular gasket, the rate of fuel entry is very!! Slow. Don't hurry the "seep/creep". A little<br />
vibration of the bowl will assist getting to the final level a little sooner, <strong>and</strong> simulates the vibration<br />
of the engine.-<br />
When you have established the correct gasket thickness, make sure that the seat is torqued as noted in the<br />
manual, (that step is important, too) then safety it, being careful to ensure that the safety wire does not<br />
interfere with the float or the needle. Install the float shaft retainer <strong>and</strong> the shaft hole plug, reconfirm<br />
that there is no safety wire interference, <strong>and</strong> then do the final "proof" test to confirm the correct level.<br />
<strong>The</strong> 13/32cd gage needs to have the dip portion away from the wall of the casting; the fuel,<br />
especially in a clean carburetor, establishes a quite significant meniscus at the wall. You need to be<br />
sampling for level out in the "flat" portion of the fuel.<br />
Trying to determine how close the dip portion of the gage is to the clear, invisible fuel (i used auto nonleaded,<br />
which has a very faint tinge of blue) is very difficult, since the slightest contact of the gage to<br />
the fuel will have a meniscus form instantly at the interface. It takes a little playing to move the<br />
gage tip toward the fuel slowly, <strong>and</strong> note how close it is to being all the way down when the fuel<br />
"jumps" up on it.<br />
Remember. After you are "done" <strong>and</strong> have torqued the needle valve, let the system st<strong>and</strong> for an hour<br />
with the head of fuel attached to see if there is any seep.
4<br />
Note: the c-90 float level is supposed to be 7/32", per a cessna bulletin <strong>and</strong> cessna notes, but not per the<br />
stromberg manual. No one I know has ever used this dimension, <strong>and</strong> it seems suspect!!! Until<br />
more research has turned up the "why"----just realize that there is another mystery. Now that pacific<br />
airmotive has the licenses for the strombergs, ask them if there are any questions that cannnot be anssered<br />
by referring to the manuals.<br />
One of the newest manuals we found notes that the minimum float travel is 0.048. That dimension is not<br />
on any of the bulletins, as far as I know, but seems a reasonable thing to check, too, since too-small a<br />
movement would limit the rate at which the fuel of the bowl could be replaced.<br />
Neal<br />
<strong>Stromberg</strong> carb adjust<br />
Neal F. Wright<br />
1542 South Wolfe Rd.<br />
Sunnyvale CA 94087<br />
cougarnfw@aol.com<br />
sixth revision