Instruction Manual - Kellyco Metal Detectors
Instruction Manual - Kellyco Metal Detectors
Instruction Manual - Kellyco Metal Detectors

You also want an ePaper? Increase the reach of your titles
YUMPU automatically turns print PDFs into web optimized ePapers that Google loves.
SILVER µMax OPERATOR INSTRUCTION MANUAL<br />
CONGRATULATIONS!<br />
Your new Tesoro Silver µMAX metal detector is part of a new series of detectors designed to<br />
provide you with many happy hours of enjoyment in the most rewarding hobby I can think of—<br />
treasure hunting. Ahead of you lie fascinating and exciting experiences as you step into the<br />
past—uncovering artifacts lost by past generations, or as you take pleasure in the great outdoors<br />
with family and friends searching for precious metals. I wish we could share these experiences<br />
with you, and all of us at Tesoro wish you the best of success.<br />
Your Tesoro detector is capable of meeting your needs in a wide range of treasure hunting<br />
situations. As with any other metal detector, familiarity with this instrument is probably the<br />
limiting factor in determining how successful you can be. I recommend that you read this manual<br />
and fully understand how to operate this detector before attempting to use it in the field. As you<br />
become more familiar with your detector through practice, your rate of success will increase<br />
dramatically.<br />
The Silver µMAX is a precision electronic instrument that will last for years if properly cared<br />
for. Treat it right and it won’t let you down.<br />
Good Hunting! Jack Gifford<br />
GETTING STARTED - UNPACKING THE BOX<br />
Your Silver µMax was shipped with these parts:<br />
1 Upper Pole Assembly<br />
Fully assembled, including upper pole stem with handle grip, padded arm bracket and control<br />
housing.
1 Middle Pole Assembly With Pole Lock<br />
1 ABS Lower Pole Assembly<br />
Fully assembled, complete with two friction washers, mounting screw, and thumb nut.<br />
1 8" Round Concentric Searchcoil With 3’ Cable<br />
1 9 Volt Alkaline Battery<br />
1 Operator <strong>Instruction</strong> <strong>Manual</strong><br />
1 Tesoro Warranty Card<br />
If any of these items are missing, contact the Tesoro Authorized Dealer where you purchased<br />
your detector immediately.<br />
Assembly of the Silver µMax is simple and requires no special tools. Just install the battery,<br />
mount the searchcoil on the lower pole assembly, connect the pole assemblies together, wrap the<br />
excess cable around the pole and plug the cable into the control housing. Finally, adjust the pole<br />
length and searchcoil angle and you're ready!<br />
INSTALLING THE BATTERY<br />
Your Silver µMAX is equipped with an automatic battery test circuit so that you can always be<br />
sure you are getting top performance. The battery should be checked after the detector has been<br />
on for about 10 minutes and then periodically when used for long durations.
To install or replace the battery, first make sure the SENSITIVITY control is set to POWER<br />
OFF—turned completely counterclockwise past the “click.” Remove the battery door from the<br />
back of the control housing. Do this by pressing your thumb firmly on the louvered square—at<br />
the bottom of the battery door—and sliding the battery door upward in the direction of the arrow.<br />
Check the polarity on the battery and on the diagram inside the battery compartment. Make sure<br />
that they match and simply drop a fresh 9 volt alkaline battery into the compartment.<br />
Replace the battery door by sliding it into place making sure the upper mount slots are in line and<br />
the lock tongue is snapped in place.<br />
(Above photo depicts the Eldorado model; however, battery installation is the same for the<br />
Silver µMax.)<br />
ASSEMBLING YOUR DETECTOR<br />
1. On the lower pole assembly, remove the mounting screw and thumb nut from the black<br />
nylon pole tip.<br />
2. Insert the pole tip between the mounting ears of the searchcoil and align the holes of the<br />
pole tip and washers with those of the mounting ears.<br />
Note: The pole tip should fit very snugly into the mounting ears.
3. Insert the mounting screw through the holes in the mounting ears and pole tip—entering<br />
from the side opposite the cable connection.<br />
4. Install the thumb nut on the mounting screw and tighten by hand.<br />
Note: Do not overtighten the thumb nut. It should be snug but not too difficult to<br />
loosen up.<br />
5. On the middle pole assembly, depress the two spring buttons and slide the middle pole<br />
assembly into the upper pole assembly until the spring buttons click into the holes, thus<br />
locking the two assemblies into place. Tighten the pole lock to secure the two assemblies<br />
together.<br />
6. Slide lower pole into middle pole until spring buttons click into the first set of adjustment<br />
holes. Turn pole lock to tighten, thus locking the assembly into place.<br />
7. Wrap the cable around the pole leaving enough slack near the searchcoil to permit<br />
searchcoil adjustment. Note: Do not allow the cable to flop loosely over the searchcoil.<br />
Since the detector is sensitive enough to “see” the tiny wires in the cable, a floppy cable<br />
can cause false signals as the searchcoil senses the moving wires.<br />
8. Plug the male cable end into the female connector on the control housing and tighten the<br />
cable thumb nut. You are finished!<br />
Note: You will want to adjust the pole length and the searchcoil angle to your<br />
preference.
(Above photos are shown using the Eldorado model; however, assembly procedures are<br />
the same for the Silver µMax.)<br />
ADJUSTING THE POLE & SEARCHCOIL<br />
The pole length should be adjusted so that the detector does not<br />
become uncomfortable or tiring after long periods of use. The<br />
detector grip should rest in your hand with your arm relaxed, your<br />
elbow straight but not locked, and with the pole extending out in front<br />
of you at the approximate angle shown in the photo.<br />
You should be able to swing the detector back and forth in front of<br />
you—using relaxed shoulder movement—while keeping the<br />
searchcoil as close to the ground as possible. This swinging<br />
movement is often called a “sweep.”<br />
The searchcoil should not touch the ground during your sweep. The<br />
pole length should be adjusted to allow this without having to lift the<br />
detector with your elbow or shoulder. The searchcoil should rest<br />
about one inch above the ground while you are standing erect. The<br />
angle of the searchcoil should allow the bottom to be parallel to the<br />
ground.<br />
The pole length is adjusted by depressing the spring buttons and extending or shortening the pole<br />
until the spring buttons click into the set of holes that give you the most comfortable pole length.<br />
To adjust the searchcoil angle, simply loosen the searchcoil thumb nut slightly and move the<br />
searchcoil into the desired position. Tighten the searchcoil thumb nut by hand so that the<br />
searchcoil will hold in place.<br />
QUICKSTART
The Quickstart is designed to teach you how to use your new Silver µMax. It provides a quick<br />
and easy means of learning your detector and the concepts behind all of the functions.<br />
You will need the following items:<br />
1. Your fully assembled Silver µMax.<br />
2. An iron target (a small nail or screw will do), a nickel, a quarter and a couple of different<br />
pull tabs.<br />
3. A nonmetal table top or counter.<br />
Here’s what you will do:<br />
1. Perform Audio Battery Test<br />
2. Adjust the SENSITIVITY<br />
3. Perform Air Test in DISC Mode<br />
4. Perform Air Test in ALL METAL Mode<br />
Prepare for the Quickstart<br />
Place your assembled Silver µMax on the nonmetal surface. Make sure that there are no metal<br />
objects near the coil and remove any jewelry from your hands and wrists.<br />
Start with the controls like this:<br />
1. SENSITIVITY and DISCRIMINATE LEVEL knobs turned completely<br />
counterclockwise.<br />
2. MODE switch in the center position.<br />
Perform Audio Battery Test<br />
Turn the SENSITIVITY knob from OFF to about 7 or 8. You will hear a quick double beep tone.<br />
This is the detector letting you know that it is turned on and ready to go. Push the MODE switch<br />
to the left and release. The switch is spring loaded and will pop back into the center position. If<br />
the battery is fully charged, you will hear 6 or 7 beeps.<br />
When you hear only 1 or 2 beeps, it will be time to replace your battery. This test can be<br />
performed at any time while the detector is turned on.<br />
Adjust the SENSITIVITY
The Silver µMax uses two channels or sets of circuits for all of its detecting modes. The two<br />
channels are amplified, processed and compared before the detector can make the appropriate<br />
response. In the ALL METAL Mode, the detector compares the signals and discriminates out<br />
most of the noise from changes in the ground mineralization. This allows hunting all metal<br />
without a lot of annoying ground chatter. The DISC Mode compares the two channels and will<br />
filter “good” targets from unwanted targets depending on the setting of the DISCRIMINATE<br />
LEVEL knob. The SENSITIVITY knob will change the sensitivity and gain settings for both the<br />
All <strong>Metal</strong> and Discriminate Modes on your Silver µMax.<br />
The SENSITIVITY knob is used to raise or lower the power to the operational amplifiers, which<br />
changes the gain. Gain is a measurement of how much a signal is amplified. The higher the gain<br />
the more depth and sensitivity to small objects a detector has. Unfortunately, any small<br />
interference that is amplified can cause the detector to become erratic. The SENSITIVITY<br />
control is used to find the best gain setting in any location without letting the detector become<br />
unstable.<br />
The SENSITIVITY knob is numbered from MIN to 10 and then has an orange area called the<br />
Max Boost Zone. For normal hunting, anywhere in the numbered zone will work very well.<br />
However, the Max Boost will allow you to increase the power to the operational amplifiers to the<br />
point of overload.<br />
This may cause your detector to become unstable and force you to turn the SENSITIVITY knob<br />
to a lower setting. An overload situation will not hurt your detector, but it will maximize the gain<br />
that is used by your detector. This can, in certain conditions such as low mineralization in the<br />
soil, cause your detector to penetrate deeper into the ground and become more sensitive to small<br />
targets.<br />
Take some time to try waving targets in front of the coil with different sensitivity settings and in<br />
either mode. Notice that the higher the sensitivity setting, the farther away from the coil that a<br />
target can be and still respond with an audio signal.<br />
Perform Air Test in DISC Mode<br />
As discussed before, the Discriminate Mode is used to filter unwanted targets from good targets.<br />
The principle behind this is pretty simple. The detector sends out a signal and then receives it<br />
back creating a small electronic field. As metal passes through the field that the detector<br />
generates, it causes a change in the received signal.<br />
The amount of change that each type of metal causes is fairly constant; therefore, we can tune<br />
our detectors to miss targets that we don’t want to find. The change is based on the type of<br />
conductivity that each target has. The general list of conductive targets is as follows: iron, foil,<br />
nickels, gold jewelry, pull tabs, screw tabs, pennies and silver coins starting with dimes and<br />
working up to silver dollars. This list is meant to be a guide only. There is a point that some pull<br />
tabs, nickels and gold jewelry overlap. Also the depth of the target and its orientation in the<br />
ground can change the received signal. A coin that is flat to the coil will produce a better signal<br />
than a coin that is on edge. Take some time to try different combinations of depths and<br />
orientation of your targets and find out how your detector responds.
We are now ready to discriminate targets from each other. We will start with the<br />
DISCRIMINATE LEVEL at MIN and the MODE switch in the center or DISC position. Please<br />
notice that the DISCRIMINATE LEVEL knob has words that correspond to the items that are<br />
discriminated out.<br />
All four targets (the iron, nickel, pull tabs and quarter) will respond with a good audio signal at<br />
the MIN setting. Next, we will turn the DISCRIMINATE LEVEL up to IRON. This should be<br />
high enough to knock out the iron target and still get a positive response on the nickel, pull tabs<br />
and quarter. When you are done with the IRON level, turn the DISCRIMINATE LEVEL to the<br />
5¢ setting. This level is high enough to knock out the nickel.<br />
At this time the iron target and the nickel should give no response, while most of the pull tabs<br />
and the quarter will give a solid response. Next, turn the DISCRIMINATE LEVEL knob just<br />
past the TAB marking. At this time most or all of the pull tabs should not give any audio signal.<br />
Only the quarter should give a strong signal. Now roll the DISCRIMINATE LEVEL all the way<br />
to MAX. Notice that the quarter is still responding. The discrimination will not go high enough<br />
to lose most of the silver coins.<br />
This Air Test was designed to show you quickly how your Discriminate Mode works. Each<br />
machine may be a little different from all of the others, so you may want to take some time and<br />
try different targets to find responses of your machine. At a later date, you may want to build a<br />
test garden to test your detector in the field.<br />
Perform Air Test in ALL METAL Mode<br />
Push the MODE switch all the way to the right. It will lock into the ALL METAL position.<br />
Check all of your targets and you will get a positive response from all of them. You may also<br />
want to set the DISCRIMINATE LEVEL knob at various settings and notice that the detector<br />
will still give a positive response. In the ALL METAL Mode, the DISCRIMINATE LEVEL<br />
knob does not change any target signals. Take some time to try all of your targets.<br />
Conclusion<br />
Congratulations, you have just finished the Quickstart for your new Silver µMax detector and in<br />
the process have learned quite a lot about your detector. But experience is the best teacher. I<br />
would recommend that you get out and practice with your detector as much as possible. Any<br />
time spent using your detector will give you valuable experience.<br />
OPERATING TECHNIQUES - FIELD USE<br />
Handling Your Detector<br />
The detector should be held in a position that is comfortable for you as shown in the "Adjusting<br />
the Pole & Searchcoil" section in "Getting Started." Swing the detector from side to side in<br />
about a three foot arc, overlapping succeeding strokes well. This motion is called a “sweep.” The
Silver µMax was designed to get maximum depth without the frantic pace required of earlier<br />
motion detectors, so go at a pace that is comfortable for you. In fact, trying to hunt too fast may<br />
even cause a loss of depth in heavily mineralized locations.<br />
Regardless of which mode you are using, try to keep your searchcoil height constant and close to<br />
the ground. Most people tend to raise the coil at the end of a sweep—much like a pendulum—<br />
especially if in a hurry. Try to avoid this, as any increase in height from the ground will cause a<br />
corresponding loss of depth.<br />
In areas with well-kept lawns, the easiest way to maintain a constant searchcoil height is to allow<br />
the coil to rest on the grass as you sweep from side to side. In rough and rocky areas, it is best<br />
not to “scrub” the coil on the ground, as the rocks will act like abrasives and wear away the coil<br />
bottom (an optional coil scuff cover will protect against this). Sweep the coil as close to the<br />
ground as possible without touching. Hitting the ground or rocks may cause a false signal much<br />
like a desired target would. Sweeping the coil too high above the ground results in a loss of<br />
depth.<br />
Planting a Test Garden<br />
To better learn how your detector will perform in the field, it would be helpful to bury some<br />
coins and trash metal items in an area that you know is clear of other metal objects. Check the<br />
area with DISC LEVEL set at MIN to be sure it's clear of trash, then bury the targets at least 1<br />
foot apart and from 2 to 4 inches deep to start. Make a map of the area to be sure you know what<br />
each target is and how deep it is. Practice on these targets to familiarize yourself with your<br />
detector’s target response. This will also help you learn the proper sweep speed for best<br />
operation. This type of practice area is often called a “test garden” or “test bed” and is one of<br />
best tools to help you develop your metal detecting skills.<br />
Recognizing False Signals in Discriminate Mode<br />
When operating in the Discriminate Mode, some “false signals” may be caused by 1) heavy<br />
concentrations of trash metal objects, 2) very large trash metal objects, or 3) electrical<br />
interference. These signals are generally short, choppy sounds and sound different than “good<br />
signals” (good target response sounds).<br />
At the end of your sweep, as you reverse the coil direction, the detector is most susceptible to<br />
trash-induced noise. There are two ways to tell whether these sounds are good deep signals or<br />
trash “noise.” The first is by repeatability. Trash-induced noises will not be regular as you sweep<br />
the coil over the suspected target several times, whereas a good target response will be<br />
repeatable. The second method is to switch to ALL METAL Mode and check the target response<br />
sound. If the response is weak, it may well be a deep, good target. But if the response is very<br />
strong, it is probably trash. Note that a coin close to the surface can give a double beep sound,<br />
but it is regular and repeatable. Raising the coil an inch or two will restore the single beep on<br />
surface targets.<br />
When searching in the Discriminate Mode, it is best not to use a higher DISC LEVEL setting<br />
than necessary. Nickels and most smaller rings are rejected when the DISC LEVEL is set to
eject pull tabs on any metal detector that is a TR Discriminator like the Silver µMax. If you<br />
don’t dig any junk at all, you are surely passing up a lot of good finds as well. Set the DISC<br />
LEVEL only high enough to suit the conditions where you are searching. If there is any doubt<br />
whether a target is good or not, dig it.<br />
Recovering a Target<br />
If the target is shallow and the soil is soft, you may be able to “probe” and find the exact location<br />
of the target before you dig it. Since filling all holes after you recover the target is so important,<br />
digging a small precise hole is best. If the target is deep, you may need to dig a larger hole. As<br />
you dig, occasionally check the hole with your detector to see if you have moved the object, can<br />
probe it or have already dug it. Be sure to fill all holes after you recover the target. Two methods<br />
are shown on the next two pages that work most everywhere. Be sure to protect your hobby by<br />
leaving the site cleaner than you found it and with all holes filled!<br />
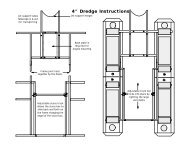
RECOMMENDED RECOVERY METHODS<br />
GENERAL INFORMATION - CARE AND USE<br />
Basic Care<br />
The Silver µMAX is a sturdy instrument, but it is not designed to withstand abuse. In caring for<br />
your Silver µMAX, there are several important “DO NOTs” to remember. DO NOT use it to pry<br />
rocks loose or to beat bushes out of the way. DO NOT drop the machine into water. DO NOT<br />
use it unprotected in the rain. DO NOT leave it exposed at night where dew could form on it. DO<br />
NOT store it in places that could get extremely hot (next to a woodstove, in an attic). DO NOT<br />
leave it in the trunk of a car or in the back of a hatchback-style car where high temperatures<br />
could build up. DO NOT store it with the battery installed as batteries may leak. DO NOT spray<br />
lubricants such as WD-40, or any type of cleaners, solvents, sealants or other chemicals into or<br />
onto the electronic parts, switches or controls. And finally, DO NOT attempt to modify or repair<br />
the detector’s electronics as this will void your detector's warranty.<br />
THE WARRANTY DOES NOT COVER DAMAGE RESULTING FROM AN<br />
ACCIDENT, NEGLECT OR ABUSE.<br />
Protecting Your Investment<br />
Often detectorists are disappointed when their new detector slowly becomes less and less<br />
responsive and seems to have lost some of its original peak performance. You can help prevent<br />
this from happening to your detector by following these basic care and protection guidelines.<br />
• Operate your detector exactly as recommended in this Operator <strong>Instruction</strong> <strong>Manual</strong>.
• Use only high-quality alkaline batteries of the correct voltage. Never substitute a different<br />
voltage. When using a Ni-Cad battery, always use a separate convertible pack with the<br />
proper voltage output for the detector’s design.<br />
• Remove the battery from the detector after each use. This will prevent damage to the<br />
detector if the battery leaks.<br />
• The searchcoil cable is hard-wired to the searchcoil and protected by a strain relief.<br />
Inspect the strain relief frequently to make sure it is firmly attached and intact.<br />
• Keep cables properly wound around the pole stems and protect them during use. Floppy,<br />
pinched, or cables that become snagged during use may short, causing erratic noises or<br />
unnecessary replacement of the searchcoil.<br />
• Sweep the searchcoil carefully, especially when using around rocks and building<br />
foundations. Avoid hitting the searchcoil against hard, solid objects and surfaces.<br />
• Keep your searchcoil slightly off of the ground during the sweep, especially when using<br />
in gravel or hard, rocky dirt.<br />
• Always use a properly designed protective scuff cover on the searchcoil. (See "Optional<br />
Accessories" in the next section.)<br />
• Remove and clean out scuff covers periodically to avoid buildup of mineralized dirt<br />
particles which will affect performance.<br />
• The searchcoil is waterproof and can be submerged in either fresh or salt water. After the<br />
searchcoil is used in salt water, rinse it and the lower stem assembly well with fresh water<br />
to prevent corrosion of the metal parts.<br />
• The searchcoil is waterproof but the electronics are not, so always prevent any moisture<br />
or water from entering the control housing and never allow the cable connectors to<br />
become submerged in water.<br />
• If working in or near water, or if there is a possibility of rain, use a protective weather<br />
resistant pouch or plastic bag to cover the control housing. Make sure it can "breathe" in<br />
order to ensure against condensation buildup inside.<br />
• After each use, clean the detector with a soft cloth to remove dust, moisture, or other<br />
contaminants.<br />
• When transporting the detector in a car during hot weather, store it on the floor of the<br />
passenger compartment if possible. Using a carry bag gives additional protection. In any<br />
case, never allow the detector to roll around unprotected in the trunk or back of a pickup<br />
truck.<br />
• Protect your detector from dust, moisture, and extreme temperatures during storage.<br />
• When shipping, use the original factory carton or similar heavy-duty container and<br />
provide a minimum one inch of padding around all parts.<br />
• Treat your detector as you would any sensitive electronic instrument. Though ruggedly<br />
constructed and designed to withstand the demands of normal treasure hunting, proper<br />
care is essential.<br />
OPTIONAL ACCESSORIES<br />
Tesoro metal detectors and genuine Tesoro accessories are sold only through independent Tesoro<br />
Authorized Dealers, who are almost always metal detectorists themselves. They can answer your
questions about your Tesoro detector, what accessories may be helpful and about metal detecting<br />
in general. See your Tesoro Authorized Dealer for more information and prices on optional<br />
accessories.<br />
Scuff Covers<br />
We highly recommend using a scuff cover to protect your searchcoil at all times. The scuff cover<br />
for the Silver µMax fitted with the 8" searchcoil, is Tesoro Part # SCUF-8R-B.<br />
Searchcoils<br />
The 8" concentric searchcoil provided with the Silver µMax is designed for best all-around<br />
performance. Optional searchcoils may add to your detector's performance.<br />
Smaller searchcoils give better “target separation”—that is, more distinct target response for<br />
metal objects buried closely together—which is very useful when hunting trashy sites. Very<br />
small searchcoils can deliver the best response and depth to small targets such as fine gold chains<br />
with some sacrifice in depth on larger objects. Larger searchcoils give a wider sweep, covering<br />
more ground, and provide greater depth especially on larger objects; however, they may not<br />
detect some very small objects such as half dimes and will have difficulty in very trashy areas.<br />
Wide scan searchcoils ignore ground mineralization better than concentric searchcoils and may<br />
offer improved performance in extreme ground conditions.<br />
Selecting the right optional searchcoil depends on factors such as what you are searching for and<br />
search site conditions. No one searchcoil is better than all the rest. Several optional<br />
interchangeable searchcoils are available for the Silver. They are all easy to mount and require<br />
no special tools. See the following list of these searchcoils with the Tesoro part # and<br />
description.<br />
Tesoro Searchcoils<br />
Tesoro Part #<br />
Description<br />
COIL-4RC 4" round concentric (closed center, white)<br />
COIL-7RC 7" round concentric (closed center, white)<br />
COIL-7RW 7" round wide scan (closed center, white)<br />
COIL-8.5RW 8½" round wide scan (closed center, white)<br />
COIL-9 x 8 9 x 8" concentric (spoked)<br />
COIL-10.5RC 10½" round concentric (closed center, white)<br />
COIL-11RW 11" round wide scan (closed center, white)<br />
COIL-12x10-CL 12 x 10 concentric (spoked, white)<br />
Optional scuff covers are also available for any Tesoro searchcoil.<br />
Headphones
Most metal detectorists prefer to use headphones instead of the detector's built-in speaker.<br />
Headphones help block out background noise (such as wind) and make it easier to hear faint<br />
signals. Headphones with a built-in volume control will allow you to adjust the sound volume to<br />
your preference.<br />
SPECIFICATIONS<br />
Operating Frequency 10.6 kHz<br />
Searchcoil Type<br />
Round, open center concentric<br />
Searchcoil Size<br />
8" diameter<br />
Cable Length Approx. 3’<br />
Audio Frequency<br />
Approx. 630 Hz<br />
Audio Output<br />
1½” speaker and headphone jack<br />
Headphone Compatibility ¼” stereo plug<br />
Weight (may vary slightly) 2.2 lbs.<br />
Battery Requirement One 9 volt DC (alkaline)<br />
Battery Life (typical) 10 to 20 hours<br />
Optimum Temperature Range 30° to 100° F<br />
Optimum Humidity 0 to 75% R.H.<br />
No-motion All <strong>Metal</strong><br />
Operating Modes<br />
Silent Search Discriminate<br />
Silent Search All <strong>Metal</strong><br />
METAL DETECTORIST'S CODE OF ETHICS<br />
1. Always check federal, state, county and local laws before searching. It is your<br />
responsibility to “know the law.”<br />
2. Abide by all laws, ordinances or regulations that may govern your search and the area<br />
you will be in.<br />
3. Never trespass. Always obtain permission prior to entering private property, mineral<br />
claims, or underwater salvage leases.<br />
4. Do not damage, deface, destroy, or vandalize any property, including ghost towns and<br />
deserted structures, and never tamper with any equipment at the site.<br />
5. Never litter. Always pack out what you take in and remove all trash dug in your search.<br />
6. Fill all holes, regardless how remote the location. Never dig in a way that will damage, be<br />
damaging to, or kill any vegetation.<br />
7. Do not build fires, camp at or park in non-designated or restricted areas.<br />
8. Leave all gates and other accesses to land as found.
9. Never contaminate wells, creeks, or any other water supplies.<br />
10. Be courteous, considerate, and thoughtful at all times.<br />
11. Report the discovery of any items of historic significance to the local historical society or<br />
proper authorities.<br />
12. Uphold all finders, search and salvage agreements.<br />
13. Promote responsible historical research and artifact recovery and the sharing of<br />
knowledge with others.<br />
WARRANTY SERVICE<br />
Your Tesoro metal detector is covered by a Limited Lifetime Warranty, the terms of which are<br />
listed below. If your metal detector should require service, you may return it to the Tesoro<br />
factory at the address below.<br />
LIMITED LIFETIME WARRANTY<br />
This warranty gives you specific legal rights, and you may have other rights which vary from<br />
state to state.<br />
This instrument is warranted to be free of defects in material and workmanship as long as it is<br />
owned by the original consumer purchaser. This warranty is not transferable and is valid only if<br />
the warranty registration card has been completed and mailed within 10 days of purchase.<br />
TESORO will, at its option, repair or replace any instrument covered by this warranty, without<br />
charge, except for transportation charges, at its factory in Prescott, Arizona.<br />
This warranty excludes batteries, damage caused by leaky batteries, cable breakage due to<br />
flexing on body mount units, and wear of the search coil housing. Also excluded are instruments<br />
which have been abused, altered, or repaired by an unauthorized party.