Instruction Manual Explorer II - Minelab
Instruction Manual Explorer II - Minelab
Instruction Manual Explorer II - Minelab

Create successful ePaper yourself
Turn your PDF publications into a flip-book with our unique Google optimized e-Paper software.
THE MINELAB EXPLORER <strong>II</strong><br />
<strong>Minelab</strong> <strong>Explorer</strong> <strong>II</strong><br />
<br />
!<br />
P0591-A<br />
"<br />
4901-0047 Rev 1.3<br />
I
www.minelab.com<br />
THE MINELAB EXPLORER <strong>II</strong><br />
© <strong>Minelab</strong> Electronics Pty Ltd<br />
This document contains proprietary information which is protected by<br />
copyright. Apart from any use as permitted under the Copyright Act<br />
1968, no part may be reproduced by any process without written<br />
permission from <strong>Minelab</strong> Electronics Pty Ltd, 118 Hayward Avenue,<br />
Torrensville, SA 5031, Australia.<br />
WARNING. This document contains <strong>Minelab</strong> Electronics Pty Ltd<br />
rights, technical data or restricted rights data, or both. Patents and<br />
trademarks apply.<br />
Since there may be a range of options available in this detector<br />
type, equipment may vary according to the model or items ordered<br />
with your detector. Certain descriptions and illustrations may differ<br />
(in this manual) from the exact model that you purchased. In<br />
addition, <strong>Minelab</strong> reserve the right to respond to ongoing technical<br />
progress by introducing changes in design, equipment and<br />
technical features at any time.<br />
<strong>II</strong>
THE MINELAB EXPLORER <strong>II</strong><br />
TABLE OF CONTENTS<br />
contents<br />
1<br />
INTRODUCTION.................................................................................................................... 1<br />
About this manual ................................................................................................................................... 2<br />
Introducing the <strong>Minelab</strong> <strong>Explorer</strong> <strong>II</strong> ....................................................................................................... 3<br />
<strong>Minelab</strong>’s unique technology ................................................................................................................. 4<br />
2<br />
3<br />
4<br />
ASSEMBLY ............................................................................................................................ 9<br />
Unpacking your <strong>Explorer</strong> <strong>II</strong> [easy reference] ...................................................................................... 10<br />
Unpacking your <strong>Explorer</strong> <strong>II</strong>................................................................................................................... 11<br />
Assembling the detector ....................................................................................................................... 12<br />
Connecting the search coil .................................................................................................................. 13<br />
The shaft assembly ............................................................................................................................... 15<br />
Connecting the shaft assembly ........................................................................................................... 16<br />
The handle assembly............................................................................................................................ 18<br />
Headphones........................................................................................................................................... 20<br />
Replacing and fitting the search coil ................................................................................................... 21<br />
BATTERIES ......................................................................................................................... 23<br />
The battery pack ................................................................................................................................... 24<br />
Battery performance ............................................................................................................................. 27<br />
THE CONTROL PANEL...................................................................................................... 29<br />
The control panel [easy reference] ..................................................................................................... 30<br />
Power and Backlight buttons ............................................................................................................... 31<br />
Menu and Back buttons ........................................................................................................................ 32<br />
Shortcut buttons .................................................................................................................................... 33<br />
Shift buttons........................................................................................................................................... 35<br />
<strong>II</strong>I
www.minelab.com<br />
THE MINELAB EXPLORER <strong>II</strong><br />
TABLE OF CONTENTS<br />
contents<br />
5<br />
QUICKSTART ...................................................................................................................... 37<br />
Getting started ....................................................................................................................................... 38<br />
Beginner use ......................................................................................................................................... 39<br />
Quickstart display [easy reference]..................................................................................................... 40<br />
Quickstart’s Smartfind display ............................................................................................................. 42<br />
The Iron Mask........................................................................................................................................ 45<br />
Quickstart’s Digital display................................................................................................................... 47<br />
Modifying the display ............................................................................................................................ 48<br />
Adjusting sensitivity .............................................................................................................................. 49<br />
Adjusting threshold ............................................................................................................................... 50<br />
Audio response ..................................................................................................................................... 51<br />
Audio menu ............................................................................................................................................ 52<br />
Audio: adjusting the volume................................................................................................................. 53<br />
Audio: adjusting the tone ..................................................................................................................... 55<br />
Audio: adjusting the sounds................................................................................................................. 56<br />
Testing target audio responses [tutorial] ............................................................................................ 58<br />
Pinpointing the object ........................................................................................................................... 59<br />
Recovering the object ........................................................................................................................... 61<br />
Selecting targets ................................................................................................................................... 62<br />
Selecting targets [easy reference] ...................................................................................................... 63<br />
Accepting and rejecting targets [tutorial] ............................................................................................ 64<br />
Advanced mode option ......................................................................................................................... 65<br />
IV
THE MINELAB EXPLORER <strong>II</strong><br />
TABLE OF CONTENTS<br />
contents<br />
6<br />
ADVANCED USE ................................................................................................................. 67<br />
Advanced mode’s Main Menu [easy reference] ................................................................................ 68<br />
Starting in Advanced mode .................................................................................................................. 69<br />
Advanced Mode’s displays [easy reference]..................................................................................... 70<br />
Advanced mode’s Learn display [easy reference] ............................................................................. 71<br />
Learning targets .................................................................................................................................... 72<br />
Learn’s target selection [tutorial] ......................................................................................................... 73<br />
Advanced mode’s Edit display [easy reference] ............................................................................... 75<br />
Editing patterns ..................................................................................................................................... 76<br />
Editing and saving target patterns [tutorial] ...................................................................................... 77<br />
Advanced mode’s Select menu ........................................................................................................... 79<br />
Saving targets ....................................................................................................................................... 80<br />
Audio menu ............................................................................................................................................ 81<br />
Options menu ........................................................................................................................................ 82<br />
Options: noise ....................................................................................................................................... 83<br />
Options: response ................................................................................................................................. 84<br />
Options: recovery .................................................................................................................................. 86<br />
Settings menu........................................................................................................................................ 87<br />
V
www.minelab.com<br />
THE MINELAB EXPLORER <strong>II</strong><br />
TABLE OF CONTENTS<br />
contents<br />
7<br />
USER INFO .......................................................................................................................... 89<br />
Helpful hints ........................................................................................................................................... 90<br />
Battery performance comparisons ...................................................................................................... 92<br />
User preferences................................................................................................................................... 93<br />
Control Panel button functions ............................................................................................................ 95<br />
Quickstart menu structure .................................................................................................................... 96<br />
Advanced menu structure .................................................................................................................... 97<br />
Troubleshooting..................................................................................................................................... 98<br />
Service repair form ............................................................................................................................... 99<br />
Warranty ............................................................................................................................................... 101<br />
Technical specifications for the <strong>Minelab</strong> <strong>Explorer</strong> <strong>II</strong> ........................................................................ 102<br />
<strong>Explorer</strong> model features ..................................................................................................................... 103<br />
Glossary of terms ................................................................................................................................ 104<br />
Detector care and safety .................................................................................................................... 108<br />
VI
THE MINELAB EXPLORER <strong>II</strong><br />
1<br />
1<br />
INTRODUCTION<br />
Introduction<br />
The <strong>Explorer</strong> <strong>II</strong> is the most<br />
technologically advanced detector ever<br />
produced.<br />
It is possible to start treasure hunting as<br />
soon as you have assembled the<br />
detector, but it is worth familiarizing<br />
yourself with its many features.<br />
1
www.minelab.com<br />
THE MINELAB EXPLORER <strong>II</strong><br />
ABOUT THIS MANUAL<br />
1<br />
INTRODUCTION<br />
This manual is designed to introduce the detector’s features, give you step-by-step<br />
directions for everything from assembling and adjusting your detector to basic detector<br />
use and customizing your own advanced settings.<br />
!<br />
1. INTRODUCTION<br />
Basic overview of the <strong>Explorer</strong> <strong>II</strong><br />
and this User’s <strong>Manual</strong>.<br />
2. ASSEMBLY<br />
This chapter provides details and<br />
instructions on assembling and<br />
adjusting the <strong>Explorer</strong> <strong>II</strong>.<br />
3. BATTERIES<br />
The <strong>Explorer</strong> <strong>II</strong> can be powered by<br />
alkaline batteries or a rechargeable<br />
Nickel Metal Hydride (NiMH) battery<br />
pack. This chapter provides details<br />
on battery installation, use and<br />
performance.<br />
4. CONTROL PANEL<br />
This chapter is designed to<br />
familiarize you with the various<br />
features of the <strong>Explorer</strong> <strong>II</strong> control<br />
panel. A few minutes spent reading<br />
this chapter will be a worthwhile<br />
preliminary to basic or advanced<br />
detecting.<br />
"<br />
5. QUICKSTART<br />
However experienced you are at<br />
using a metal detector, it is important<br />
that you read this chapter to<br />
understand how to use the <strong>Explorer</strong> <strong>II</strong><br />
in Quickstart mode.<br />
6. ADVANCED USE<br />
Once you are comfortable with basic<br />
detector use and Quickstart it is time<br />
to investigate the more advanced<br />
features of the <strong>Explorer</strong> <strong>II</strong>.<br />
7. USER INFO<br />
This chapter provides a glossary of<br />
terminology, user guides, technical<br />
specifications, warranty and repair<br />
details and troubleshooting tips.<br />
2<br />
ABOUT THIS MANUAL
THE MINELAB EXPLORER <strong>II</strong><br />
INTRODUCING THE MINELAB EXPLORER <strong>II</strong><br />
P0591-A<br />
Thank you for purchasing a <strong>Minelab</strong> <strong>Explorer</strong> <strong>II</strong> detector. The<br />
<strong>Explorer</strong> <strong>II</strong> is different to conventional metal detectors and<br />
features a number of technological innovations and design<br />
features which are introduced and explained in this manual.<br />
The <strong>Explorer</strong> <strong>II</strong> is designed to locate valuable metal objects in a wide<br />
variety of ground conditions including extreme salt conditions and<br />
sea water, wet beach sand and highly mineralized ground<br />
conditions. The detector’s simple-to-use control panel and fully<br />
automatic Quickstart mode enable the beginner to start detecting<br />
immediately after assembling the detector. Advanced mode’s options<br />
will enable you to customize your detector for years to come.<br />
Before you attempt to use your detector in the field, you should<br />
follow the chapters of this manual to assemble, understand and<br />
customize the <strong>Explorer</strong> <strong>II</strong> to suit your personal requirements.<br />
Please read all the information thoroughly.<br />
<strong>Minelab</strong> Electronics wish you every success in your treasure<br />
hunting.<br />
1<br />
INTRODUCTION<br />
Contact <strong>Minelab</strong><br />
If you have any questions or comments regarding the <strong>Explorer</strong> <strong>II</strong> or any other <strong>Minelab</strong> product,<br />
please feel free to contact us via your local Authorized <strong>Minelab</strong> dealer, or write to us:<br />
<strong>Minelab</strong> Electronics Pty Ltd<br />
PO Box 537 Torrensville Plaza<br />
South Australia 5031<br />
AUSTRALIA<br />
email: ho@minelab.com.au<br />
tel: 61-8-8238 0888<br />
<strong>Minelab</strong> USA<br />
871 Grier Drive, Suite B1<br />
Las Vegas, Nevada 89119<br />
UNITED STATES OF AMERICA<br />
email: minelab@minelabusa.com<br />
tel: 1-702-891 8809<br />
<strong>Minelab</strong> International Limited<br />
Laragh, Bandon<br />
Co. Cork<br />
IRELAND<br />
email: minelab@minelab.ie<br />
tel: 353-23 52101<br />
#<br />
Visit our site www.minelab.com for the latest information on <strong>Minelab</strong> products and services.<br />
INTRODUCING THE MINELAB EXPLORER<br />
3
www.minelab.com<br />
1<br />
INTRODUCTION<br />
THE MINELAB EXPLORER <strong>II</strong><br />
MINELAB’S UNIQUE TECHNOLOGY<br />
The <strong>Explorer</strong> <strong>II</strong> is one of a new generation of detectors from <strong>Minelab</strong>. Its sleek, sturdy<br />
design, innovative control panel and comprehensive targeting options set it apart from<br />
any other detector available today.<br />
Two mode detecting<br />
The <strong>Explorer</strong> <strong>II</strong> is so feature-packed that the research team at<br />
<strong>Minelab</strong> decided to offer two modes of operation: fully automated<br />
detection (Quickstart mode) and personally customized precision<br />
detecting (Advanced mode).<br />
All of the detector’s vital functions are common to Quickstart and<br />
Advanced mode. Because the <strong>Explorer</strong> <strong>II</strong> is such an innovative<br />
machine, even the seasoned treasure hunter will benefit from<br />
beginning in Quickstart mode.<br />
Main Menu<br />
Figure 1.1<br />
Quickstart mode<br />
Smartfind display<br />
Quickstart mode<br />
As soon as you have assembled the <strong>Explorer</strong> <strong>II</strong>, you are ready to<br />
start detecting. When it leaves the factory, the detector is<br />
programmed to start in Quickstart.<br />
Quickstart settings are optimized to provide you with accurate<br />
detection in most conditions you will encounter in the field, so you<br />
can concentrate your attention on the objects you discover.<br />
This manual’s Chapter 4: Control Panel, outlines all of the control<br />
panel features needed to use your detector in Quickstart (or<br />
Advanced mode) including shortcut buttons, special functions like<br />
Pinpoint and adjusting your detector settings.<br />
Chapter 5: Quickstart, explains basic use in detail and provides<br />
tips on everything from sweeping the detector coil to digging up<br />
objects.<br />
4<br />
MINELAB’S UNIQUE TECHNOLOGY
THE MINELAB EXPLORER <strong>II</strong><br />
Advanced mode<br />
Main Menu<br />
Figure 1.2<br />
Advanced mode<br />
Smartfind display<br />
Once you are familiar with the feel and functions of the detector, it<br />
is a simple matter to move into Advanced mode. This will enable<br />
you to change the appearance of the display, modify audio<br />
responses, specify custom targets and edit and save personal<br />
settings. Chapter 6: Advanced Use provides all of the information<br />
you need to personalize your <strong>Explorer</strong> for specialized targeting.<br />
1<br />
INTRODUCTION<br />
Getting Lost?<br />
Factory Reset Power On Tune<br />
If at any time you become a little confused with the settings for your<br />
detector, or just want to brush up on basic detector use, it is simple to<br />
reset the <strong>Explorer</strong> <strong>II</strong> to its original factory settings.<br />
Turn the detector off and then PRESS AND HOLD THE POWER BUTTON<br />
until a six-note musical tune is sounded (rising C-major chord). The<br />
<strong>Minelab</strong> logo and the words ‘FACTORY PRESETS’ will be briefly displayed<br />
on the screen (as shown above).<br />
This will return you to the original Quickstart mode settings. You can<br />
resume basic detecting or make selections from the Main Menu.<br />
MINELAB’S UNIQUE TECHNOLOGY<br />
5
www.minelab.com<br />
1<br />
INTRODUCTION<br />
6<br />
THE MINELAB EXPLORER <strong>II</strong><br />
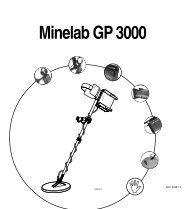
Discrimination<br />
Discrimination is the ability of a<br />
metal detector to identify the user’s<br />
desired target (e.g. jewelry) and<br />
eliminate signals from undesirable<br />
material (e.g. nails).<br />
The <strong>Explorer</strong> <strong>II</strong> can be programmed<br />
in a number of ways to discriminate<br />
against unwanted targets in<br />
different types of ground.<br />
Figure 1.3. Metal detector comparisons<br />
MINELAB’S UNIQUE TECHNOLOGY<br />
Full Band Spectrum (FBS)<br />
When developing Full Band Spectrum (FBS) technology, <strong>Minelab</strong>’s<br />
scientists looked at improving the already successful Broad Band<br />
Spectrum (BBS) technology used in previous <strong>Minelab</strong> detectors.<br />
Discussions with seasoned treasure hunters from around the<br />
world identified a number of possible enhancements for<br />
operators. The improvements to the <strong>Explorer</strong> <strong>II</strong> detectors include:<br />
• increased detection depth;<br />
• accurate identification of targets to greater depth;<br />
• enhanced detection of desired targets amidst iron trash;<br />
• adjustments to improve operation for searching salt-water<br />
beaches.<br />
Most detectors on the market<br />
operate on a single (or dual)<br />
frequency, ranging from 1 to 70<br />
kilohertz (kHz). Although this<br />
technology has served the industry<br />
well for years, <strong>Minelab</strong>’s scientists<br />
found that a frequency that worked<br />
well in one area would often offer<br />
only marginal performance when<br />
used in another location. Ground<br />
mineralisation, trash content, and<br />
target size all had an effect on how<br />
effective a detector transmitting a single frequency would operate.<br />
Full Band Spectrum technology combines <strong>Minelab</strong>’s existing<br />
multiple frequency BBS technology with a powerful new<br />
microprocessor to give:<br />
• greater detecting depth;<br />
• consistent sensitivity over a wide range of targets;<br />
• less interference from electromagnetic sources;<br />
• more accurate identification of target characteristics.
THE MINELAB EXPLORER <strong>II</strong><br />
Operating Frequencies<br />
A metal detector’s<br />
electromagnetic operating<br />
frequencies are measured in<br />
kiloHertz (kHz).<br />
Low signal frequencies<br />
(e.g. 1.5 kHz) penetrate<br />
deepest, but sensitivity to<br />
smaller targets is low.<br />
On the other hand, higher<br />
frequencies have a more<br />
shallow depth of penetration<br />
but high sensitivity to small<br />
targets.<br />
The <strong>Explorer</strong> <strong>II</strong>’s multiplefrequency<br />
operation provides<br />
the advantage of both.<br />
The Full Band Spectrum (FBS) circuit automatically transmits 28<br />
frequencies simultaneously. This increased frequency range means<br />
that the signal received from the detector coil is analyzed from a<br />
wide range of responses. This information is relayed to the<br />
operator via the speaker or headphones and the control panel’s<br />
liquid crystal display as an audio or visual target response.<br />
Put simply, <strong>Minelab</strong>’s unique FBS technology means deep,<br />
sensitive, accurate detecting.<br />
Ground Compensation<br />
The <strong>Explorer</strong> <strong>II</strong> uses a sophisticated approach to the elimination<br />
of ground mineralisation. It uses advanced digital filtering to<br />
eliminate the influence of ground signals.<br />
You are now ready to proceed to Chapter 2: Assembly.<br />
!<br />
1<br />
INTRODUCTION<br />
MINELAB’S UNIQUE TECHNOLOGY<br />
7
www.minelab.com<br />
THE MINELAB EXPLORER <strong>II</strong><br />
1<br />
INTRODUCTION<br />
8
THE MINELAB EXPLORER <strong>II</strong><br />
2<br />
2<br />
Assembly<br />
ASSEMBLY<br />
This chapter provides details and<br />
instructions on assembling and<br />
adjusting the <strong>Explorer</strong> <strong>II</strong>.<br />
9
www.minelab.com<br />
THE MINELAB EXPLORER <strong>II</strong><br />
ASSEMBLING THE DETECTOR<br />
Handle assembly<br />
2<br />
ASSEMBLY<br />
Shaft assembly<br />
Search coil<br />
P0591-A<br />
10<br />
ASSEMBLING THE DETECTOR<br />
Please follow these instructions to assemble the <strong>Explorer</strong> <strong>II</strong>.<br />
Refer to the drawings to identify parts and how they are<br />
positioned. The detector’s components are organized into three<br />
categories:<br />
• the search coil;<br />
• the shaft assembly, made up of the upper shaft and lower<br />
shaft;<br />
• the handle assembly, made up of the handle, armrest and<br />
control box.<br />
NOTE To avoid difficulties or damage to the detector’s<br />
electronic components, it is strongly recommended you<br />
follow the sequence of instructions for assembly.<br />
Please contact your <strong>Minelab</strong> dealer for further instructions should<br />
any difficulties arise.
THE MINELAB EXPLORER <strong>II</strong><br />
CONNECTING THE SEARCH COIL<br />
The search coil transmits electromagnetic signals into the ground and receives<br />
the response.<br />
Coil Cable<br />
Yoke Bolt<br />
Search Coil<br />
Rubber Washer<br />
Coil Yoke<br />
Yoke Nut<br />
Yoke Bracket<br />
2<br />
ASSEMBLY<br />
P0608-A<br />
Figure 2.1<br />
Connecting the search coil<br />
to the lower shaft<br />
Connecting the search coil to the lower shaft<br />
Figure 2.1–2.3<br />
CAUTION DO NOT attempt to disconnect the coil cable<br />
where it enters the search coil itself. They are shipped<br />
pre-assembled and any attempt to disconnect will void your<br />
detector warranty.<br />
To attach the search coil to the lower shaft:<br />
STEP 1<br />
STEP 2<br />
Place the search coil on a flat surface close to the coil<br />
yoke.<br />
(Figure 2.2, following page) Plug the two black plastic<br />
washers into the recesses provided on either side of the<br />
coil yoke.<br />
(Continued next page)<br />
CONNECTING THE SEARCH COIL<br />
11
www.minelab.com<br />
2<br />
ASSEMBLY<br />
THE MINELAB EXPLORER <strong>II</strong><br />
P0605-A<br />
STEP 3<br />
STEP 4<br />
STEP 5<br />
Check the orientation of the search coil and shaft ensuring<br />
that the open side of the yoke faces the ground.<br />
(Figure 2.2) To join the shaft to the search coil, slide the<br />
yoke into the yoke bracket on top of the coil.<br />
(Figure 2.3) Insert yoke bolt through the search coil’s yoke<br />
bracket and the coil yoke. Fasten with the yoke nut<br />
provided, being careful not to damage the thread of the<br />
nut by over-tightening. This may need to be loosened to<br />
adjust the coil to a comfortable detecting angle.<br />
You are now ready to proceed to the shaft assembly.<br />
Figure 2.2 Inserting coil yoke into bracket<br />
P0606-A<br />
Figure 2.3<br />
Securing yoke to search coil<br />
12<br />
CONNECTING THE SEARCH COIL
THE MINELAB EXPLORER <strong>II</strong><br />
THE SHAFT ASSEMBLY<br />
The shaft assembly is made up of the upper and lower shafts connected by the shaft<br />
camlock. The assembly houses the coil cable and connects the search coil to the handle<br />
assembly. These instructions assume that the search coil is connected to the lower shaft.<br />
2<br />
Camlock Released<br />
ASSEMBLY<br />
P0601-A<br />
Figure 2.4<br />
Feeding coil cable into upper shaft<br />
Upper Shaft<br />
Search Coil<br />
Shaft Camlock<br />
P0602-A<br />
Figure 2.5 Sliding lower shaft into upper shaft<br />
Shaft assembly<br />
Figure 2.4, 2.5<br />
To assemble the lower and upper shaft:<br />
CAUTION Release the shaft camlock lever before inserting<br />
the lower shaft.<br />
STEP 1<br />
STEP 2<br />
STEP 3<br />
(Figure 2.4) Feed the coil cable which is inside the lower<br />
shaft through the inside of the upper shaft.<br />
(Figure 2.5) Slide the lower shaft entirely into the upper<br />
shaft until the camlock rests against the yoke.<br />
Pull the coil cable’s metal connector through the open end<br />
of the upper shaft until it ‘dangles’ from the opening.<br />
You are now ready to connect the shaft assembly to the<br />
handle assembly.<br />
THE SHAFT ASSEMBLY<br />
13
www.minelab.com<br />
2<br />
THE MINELAB EXPLORER <strong>II</strong><br />
CONNECTING THE SHAFT ASSEMBLY<br />
Connecting the shaft assembly to the handle assembly<br />
Figure 2.6–2.9<br />
NOTE Shaft orientation: camlock is on lower side of upper<br />
shaft.<br />
To connect the shaft assembly to the handle assembly:<br />
ASSEMBLY<br />
Figure 2.6<br />
P0597-A<br />
Attaching coil cable to control box<br />
STEP 1<br />
STEP 2<br />
(Figure 2.6) Release the control box camlock lever to the<br />
open position.<br />
(Figure 2.6) Align the connections and push the coil cable<br />
connector into the socket underneath the handle<br />
assembly control box. Ensure the connector’s threaded<br />
bracelet is firmly secured.<br />
STEP 3<br />
(Figure 2.7) To prevent the coil cable from ‘bunching’,<br />
extend the lower shaft from the upper shaft by<br />
approximately 15cm (6 inches).<br />
STEP 4<br />
(Figure 2.8) Making sure that the control box camlock<br />
lever is in the released position, push the upper shaft<br />
firmly into the control box until you feel it has reached the<br />
back of the control box.<br />
P0614-A<br />
14<br />
Figure 2.7<br />
Preventing the coil cable ‘bunching’<br />
CONNECTING THE SHAFT ASSEMBLY
THE MINELAB EXPLORER <strong>II</strong><br />
STEP 5<br />
STEP 6<br />
Secure upper shaft in position by locking the control box<br />
camlock.<br />
(Figure 2.9) Adjust shaft to the desired length and then<br />
lock with shaft camlock lever.<br />
Figure 2.8<br />
Inserting shaft assembly into<br />
control box<br />
P0598-A<br />
STEP 7<br />
(Figure 2.9) Tilt the search coil to the most comfortable<br />
angle, keeping in mind it will need to be parallel to the<br />
ground during detecting.<br />
NOTE To avoid difficulty securing the control box camlock<br />
lever, ensure the shaft camlock is released to allow greater<br />
shaft movement.<br />
2<br />
ASSEMBLY<br />
You are now ready to proceed to the handle assembly.<br />
P0599-A<br />
Figure 2.9<br />
Adjusting the shaft and angle of<br />
the search coil<br />
Coil not connected?<br />
!<br />
These instructions require the<br />
search coil to be connected to the<br />
lower shaft. For directions on this<br />
procedure, refer to page 13.<br />
15<br />
CONNECTING THE SHAFT ASSEMBLY
www.minelab.com<br />
THE MINELAB EXPLORER <strong>II</strong><br />
THE HANDLE ASSEMBLY<br />
The handle assembly is made up of the armrest, straps and the control box. It is<br />
connected to the shaft assembly by the control box camlock.<br />
2<br />
ASSEMBLY<br />
Adjusting the armrest assembly<br />
Figure 2.10<br />
To adjust armrest:<br />
STEP 1<br />
Loosen the screw in the center of the armrest (turn<br />
counter-clockwise). Use a screwdriver or the edge of a<br />
coin.<br />
Figure 2.10 Armrest adjustment<br />
P0268-C<br />
STEP 2<br />
STEP 3<br />
Slide armrest to your desired position. Your hand should<br />
comfortably grip the angled neck of the handle assembly,<br />
with the detector feeling like an extension of your forearm.<br />
Gently remove your arm.<br />
STEP 4<br />
Tighten screw (clockwise) to lock into position.<br />
16<br />
THE HANDLE ASSEMBLY
THE MINELAB EXPLORER <strong>II</strong><br />
Fitting the armrest strap<br />
Figure 2.11–2.13<br />
To fit and adjust the armrest strap:<br />
Figure 2.11 Fitting buckle to armrest strap<br />
STEP 1<br />
STEP 2<br />
STEP 3<br />
STEP 4<br />
(Figure 2.11) Thread the strap through the buckle<br />
openings as illustrated.<br />
(Figure 2.12) Clip both buckles into the openings at each<br />
outer side of the armrest.<br />
Test by sliding your arm underneath the strap and resting<br />
your forearm on the armrest (which should be adjusted to<br />
a comfortable setting).<br />
(Figure 2.13) Loosen strap by tilting the edge of the<br />
buckle out to release it from the armrest. Undo the velcro<br />
and pull the buckle outwards (towards yourself). Clip the<br />
buckle back into place and tighten the strap by pulling up<br />
(in the direction of the top arrow in Figure 2.13).<br />
The armrest should now be adjusted to your satisfaction. Next<br />
time you use your detector, all you will need to do is click the<br />
buckle back into the armrest.<br />
2<br />
ASSEMBLY<br />
Figure 2.12 Fitting armrest strap to armrest<br />
Figure 2.13 Tightening armrest strap<br />
THE HANDLE ASSEMBLY<br />
17
www.minelab.com<br />
THE MINELAB EXPLORER <strong>II</strong><br />
HEADPHONES<br />
2<br />
ASSEMBLY<br />
Figure 2.14 Inserting headphone<br />
Headphone<br />
Socket<br />
P0595-A<br />
Attaching headphones<br />
Figure 2.14<br />
The use of headphones when treasure hunting with the <strong>Explorer</strong><br />
<strong>II</strong> will avoid disturbing others in the area. The reduced power<br />
demands of the headphones will also extend the battery life.<br />
The socket for the headphone plug is located in the top right of<br />
the rubber seal at the top of the handle assembly. The<br />
headphones may be plugged into this socket or unplugged at any<br />
stage of operation.<br />
Congratulations! Your <strong>Explorer</strong> <strong>II</strong> is now assembled. You are<br />
"<br />
now ready to proceed to Chapter 3: Batteries.<br />
Should you wish to remove the search coil, instructions<br />
follow on the next two pages.<br />
18<br />
HEADPHONES
THE MINELAB EXPLORER <strong>II</strong><br />
REPLACING AND FITTING THE SEARCH COIL<br />
Coil Cable<br />
Yoke Bolt<br />
Search Coil<br />
Rubber Washer<br />
Coil Yoke<br />
Yoke Nut<br />
Yoke Bracket<br />
2<br />
ASSEMBLY<br />
P0608-A<br />
Figure 2.14 Replacing the search coil<br />
Replacing the search coil<br />
Figure 2.14–2.16<br />
CAUTION DO NOT attempt to remove the coil cable from the<br />
search coil. Any attempt to disconnect will void your<br />
detector warranty.<br />
To replace the search coil:<br />
STEP 1<br />
Disconnect the shaft assembly from handle assembly by<br />
reversing the procedure outlined in Connecting the shaft<br />
assembly on page 16.<br />
CAUTION DO NOT attempt to remove the shaft assembly<br />
without disconnecting the coil cable from the control box.<br />
Pull cable down<br />
from inside<br />
shaft/yoke<br />
P0607-A<br />
STEP 2<br />
Separate the two shaft assemblies by releasing the shaft<br />
camlock and sliding the lower shaft out.<br />
Figure 2.15 Removing cable<br />
STEP 3<br />
(Figure 2.14) Loosen the yoke nut and carefully remove<br />
the bolt from the yoke bracket. This removes the yoke<br />
from the search coil. Be careful not to lose the two plastic<br />
washers.<br />
(Continued next page)<br />
REPLACING AND FITTING THE SEARCH COIL<br />
19
www.minelab.com<br />
2<br />
ASSEMBLY<br />
THE MINELAB EXPLORER <strong>II</strong><br />
STEP 4<br />
STEP 5<br />
STEP 6<br />
STEP 7<br />
(Figure 2.15) Gently pull the coil cable from inside the<br />
yoke/lower shaft.<br />
(Figure 2.16). Carefully feed the coil cable of the new coil<br />
back into yoke and lower shaft. Continue to feed the cable<br />
into the shaft unitl the connector is visible at the top of the<br />
shaft.<br />
NOTE : It may be easier to pull the cable through the<br />
lower shaft using a length of string or cord. Once this is<br />
completed you should be able to see approximately 4<br />
inches (100mm) of cable between the coil yoke and the<br />
search coil. This is the slack necessary to allow<br />
adjustment to the angle of the search coil.<br />
Re-attach the yoke and the search coil. Be careful not to<br />
damage the thread of the nut by over-tightening. See<br />
Figure 2.2 and 2.3.<br />
Reconnect cable to control box (as directed in<br />
Connecting the shaft assembly, page 16).<br />
Pull Coil Cable<br />
up inside of<br />
yoke/shaft<br />
P0613-A<br />
20<br />
REPLACING AND FITTING THE SEARCH COIL<br />
Figure 2.16 Removing the coil cable
THE MINELAB EXPLORER <strong>II</strong><br />
3<br />
Batteries<br />
3<br />
The <strong>Explorer</strong> <strong>II</strong> can be powered by<br />
alkaline batteries or a rechargeable Nickel<br />
Metal Hydride (NiMH) battery pack. This<br />
chapter provides details on battery<br />
installation, use and performance.<br />
BATTERIES<br />
21
THE MINELAB EXPLORER <strong>II</strong><br />
www.minelab.com<br />
THE BATTERY PACK<br />
The <strong>Explorer</strong> <strong>II</strong> has both Alkaline and NiMH battery packs available as either standard<br />
or accessory items. Removal instructions apply to both types of pack. Battery<br />
installation instructions apply to alkaline battery replacement only.<br />
3<br />
Removal of battery pack<br />
Figure 3.1<br />
CAUTION Ensure that the detector is turned OFF before<br />
proceeding with any of the following directions.<br />
BATTERIES<br />
Figure 3.1<br />
Removal of battery pack<br />
STEP 1<br />
STEP 2<br />
STEP 3<br />
Prop or rest the detector on a stable flat surface.<br />
Lift the rubber cap of the battery handle assembly.<br />
Raise the yellow tab. This releases the spring loaded<br />
battery pack.<br />
STEP 4<br />
Remove battery pack entirely from handle assembly.<br />
22<br />
Figure 3.2<br />
THE BATTERY PACK<br />
Replacing alkaline batteries<br />
Replacing alkaline batteries<br />
Figure 3.2<br />
STEP 1<br />
STEP 2<br />
STEP 3<br />
Remove alkaline battery pack from handle assembly. Slide<br />
the battery pack lid in the direction of the arrow to remove.<br />
Place 8 x ‘AA’ cell alkaline batteries inside. Make sure that<br />
they are aligned as indicated on the label.<br />
Replace the battery pack lid and slide the pack into the<br />
compartment until it ‘clicks’ into place.<br />
Replace the rubber cap, sealing the battery compartment.<br />
NOTE High quality alkaline batteries are recommended to<br />
optimise detector usage time. Rechargeable alkaline<br />
batteries may be used but must be removed and recharged<br />
separately. Check fitment of rechargable batteries prior to<br />
purchase.<br />
NOTE
THE MINELAB EXPLORER <strong>II</strong><br />
Recharging NiMH battery pack with the mains charger<br />
Figure 3.3<br />
The <strong>Explorer</strong> <strong>II</strong> is provided with a sealed Nickel Metal Hydride<br />
(NiMH) battery pack and a charger which plugs into a<br />
conventional wall socket.<br />
Figure 3.3 Recharging NiMH battery pack<br />
Safety Tip<br />
Do not attempt to disassemble<br />
the NiMH battery pack. If<br />
disposing of pack, do not<br />
incinerate. Contact your local<br />
authorities to enquire about<br />
disposal or recycling facilities.<br />
Recharging<br />
NOTE The NiMH battery pack supplied with your detector<br />
comes in the discharged condition. It is necessary to charge<br />
it as explained below before operating the detector. The<br />
batteries will reach their full capacity after several charge/<br />
discharge cycles.<br />
STEP 1<br />
STEP 2<br />
STEP 3<br />
STEP 4<br />
Remove battery pack as per instructions on previous<br />
page.<br />
Insert the mains charger plug into the socket at the<br />
tapered end of the battery pack.<br />
Plug the mains charger into the wall socket and turn on<br />
the switch (if switch available). Leave for about 18 hours<br />
to fully recharge.<br />
Remove the battery charger plug from the battery pack.<br />
Slide the pack back into the handle assembly battery<br />
compartment until it clicks into place.<br />
3<br />
BATTERIES<br />
!<br />
<strong>Minelab</strong>’s batteries can be left on<br />
the battery charger indefinitely<br />
without harming the battery.<br />
23<br />
THE BATTERY PACK
www.minelab.com<br />
THE MINELAB EXPLORER <strong>II</strong><br />
Recharging<br />
!<br />
Recharging NiMH battery pack with the car charger<br />
A car charger for the NiMH battery pack is available for the<br />
<strong>Explorer</strong> <strong>II</strong>.<br />
STEP 1 Remove battery pack as per instructions on page 24.<br />
STEP 2<br />
Insert the car charger plug into the cigarette lighter socket.<br />
3<br />
BATTERIES<br />
<strong>Minelab</strong>’s battery chargers are<br />
suitable for the <strong>Explorer</strong> NiMH<br />
battery pack only. The battery<br />
chargers will not recharge<br />
rechargeable alkaline batteries.<br />
Using a non-<strong>Minelab</strong> charger with<br />
the battery pack may damage it<br />
and will void the product<br />
warranty.<br />
STEP 3<br />
Insert the car charger plug into the socket at the tapered end<br />
of the battery pack. A small light on the car charger<br />
illuminates indicating that the car charger is in operation.<br />
NOTE Some vehicles will need the ignition to be switched on<br />
to ‘accessories’ for power to be supplied to the charger.<br />
STEP 4<br />
Leave the battery to charge for about 18 hours for a<br />
complete recharge. If the battery was not completely<br />
discharged, the charging time will be shorter.<br />
The car charger is provided with a 3AG 2Amp fast fuse for short<br />
circuit protection that can be accessed by unscrewing the tip of<br />
the cigarette lighter plug.<br />
NOTE Charging the battery beyond full capacity will not<br />
damage the NiMH battery pack, but it could gradually<br />
discharge your car battery.<br />
24<br />
THE BATTERY PACK
THE MINELAB EXPLORER <strong>II</strong><br />
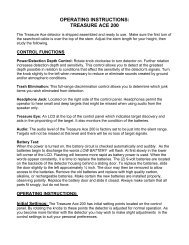
BATTERY PERFORMANCE<br />
Battery life indications<br />
Figure 3.4<br />
Figure 3.4<br />
Full<br />
battery power<br />
Battery life indicator<br />
Battery Life<br />
Low<br />
battery power<br />
Battery Performance<br />
Visual indication – The battery life indicator appears on all of the<br />
<strong>Explorer</strong> detect screens. The battery will be fully shaded at<br />
maximum battery charge. When this shaded area nears the<br />
bottom, the detector will begin to sound its low battery warning.<br />
Audio indication – When the alkaline or NiMH batteries<br />
approach the point at which they do not supply enough power to<br />
operate the <strong>Explorer</strong> <strong>II</strong>, a falling extended chord is emitted from the<br />
speaker (or headphones). When this low battery warning is heard,<br />
there will be only a few minutes of life left in the batteries. It is<br />
recommended that the batteries be replaced or recharged as soon<br />
as possible to avoid missing any targets. When the battery symbol<br />
is completely empty, the detector will sound an extended ‘dropping’<br />
tune and display a message immediately before turning itself off.<br />
3<br />
BATTERIES<br />
ALKALINE<br />
NiMH 1600 mAh<br />
NiMH 1800 mAh<br />
14 hours<br />
12.5 hours<br />
14 hours<br />
Notes supporting performance figures<br />
Alkaline batteries will power the <strong>Explorer</strong> <strong>II</strong> for up to 14 hours of<br />
constant use. The NiMH 1600 battery pack will power the detector<br />
for up to 12.5 hours of constant use and the NiMH 1800 battery<br />
pack for 14 hours. Battery performance is charted in Chapter 7:<br />
User Info.<br />
More detecting time?<br />
To extend battery life:<br />
• use headphones<br />
• turn off the backlight<br />
• turn the detector off<br />
when not in use<br />
NOTE Unlike Nickel Cadmium batteries, the NiMH battery<br />
pack DOES NOT have to be flattened to be recharged.<br />
Whenever the detector has been unused for a lengthy period,<br />
recharge the battery pack to ensure full performance. There<br />
is no limit to the time the battery pack can be left on charge.<br />
You are now ready to proceed to Chapter 4: Control Panel.<br />
"<br />
BATTERY PERFORMANCE<br />
25
THE MINELAB EXPLORER <strong>II</strong><br />
www.minelab.com<br />
3<br />
BATTERIES<br />
26
THE MINELAB EXPLORER <strong>II</strong><br />
4<br />
Control Panel<br />
It is important to familiarize yourself with<br />
the features of the <strong>Explorer</strong> <strong>II</strong> control<br />
panel. A few minutes spent reading this<br />
chapter will be a worthwhile preliminary<br />
to basic or advanced detecting.<br />
4<br />
CONTROL PANEL<br />
27
www.minelab.com<br />
THE MINELAB EXPLORER <strong>II</strong><br />
THE CONTROL PANEL<br />
easy reference<br />
As the control panel provides user access to all <strong>Explorer</strong> <strong>II</strong> functions, the various<br />
buttons will be referred to throughout this User’s <strong>Manual</strong>. The terminology will<br />
remain consistent with the elements labelled below and will be a useful reference<br />
as you begin detecting.<br />
4<br />
CONTROL PANEL<br />
6<br />
1<br />
3<br />
2<br />
4<br />
7<br />
6<br />
5<br />
1 Power button (see page 31)<br />
2<br />
3<br />
4<br />
5<br />
6<br />
7<br />
Display screen (for details see page 40)<br />
Main Menu button (see page 32)<br />
Shortcut buttons (see pages 33-34)<br />
Back button (see page 32)<br />
Shift buttons (see page 35)<br />
Backlight button (see page 31)<br />
28<br />
THE CONTROL PANEL
THE MINELAB EXPLORER <strong>II</strong><br />
POWER AND BACKLIGHT BUTTONS<br />
The Power button offers you the option of operating the <strong>Explorer</strong> <strong>II</strong> with its factory<br />
settings or in the most recent manual setting. The backlight provides greater screen<br />
clarity in dim conditions.<br />
Power<br />
Figure 4.1<br />
POWER<br />
The POWER button turns the <strong>Explorer</strong> <strong>II</strong> on and off and also allows<br />
you to specify operation in the detector’s last manual setting.<br />
Figure 4.1<br />
Power button<br />
P0400b<br />
NOTE The first time you turn on the detector it will start up<br />
with factory presets as the most recent manual setting.<br />
To start the detector in factory preset mode:<br />
• Press and hold the POWER button until a six-note musical<br />
tune is sounded. The <strong>Minelab</strong> logo and the words ‘FACTORY<br />
PRESETS’ will be briefly displayed on the screen.<br />
To start the detector with its previous manual setting:<br />
• Press and release the POWER button. This will start the<br />
detector with the previous settings from when the detector<br />
was last used (e.g. target specifications, sensitivity levels,<br />
etc) and you may proceed with detecting or modifying<br />
detector settings.<br />
4<br />
CONTROL PANEL<br />
Backlight<br />
Figure 4.2<br />
Figure 4.2<br />
BACKLIGHT<br />
Backlight button<br />
P0401b<br />
Pressing the BACKLIGHT button turns the light behind the<br />
<strong>Explorer</strong> display screen on or off. Contrast can be adjusted to suit<br />
via the Main Menu (detailed in Chapter 5: Quickstart). Turning this<br />
light off will extend battery life. Whenever the detector is switched<br />
on, the backlight illuminates for the first 5 seconds.<br />
POWER AND BACKLIGHT BUTTONS<br />
29
www.minelab.com<br />
THE MINELAB EXPLORER <strong>II</strong><br />
MENU AND BACK BUTTONS<br />
The Menu and Back buttons are likely to be the most frequently used of all the control panel<br />
functions in both Quickstart and Advanced modes.<br />
Menu<br />
Figure 4.3<br />
Figure 4.3<br />
Menu button<br />
Pressing the MENU button at any stage of detector operation will<br />
bring up the Main Menu screen. This allows access to the various<br />
operational settings of the <strong>Explorer</strong> <strong>II</strong>. This manual covers Menu<br />
options in detail in Chapter 5: Quickstart and Chapter 6:<br />
Advanced Use.<br />
4<br />
Back<br />
CONTROL PANEL<br />
Figure 4.4<br />
Back button<br />
Figure 4.4<br />
This button allows you to ‘retrace’ your steps through the control<br />
panel display screens. Pressing the BACK button during detecting<br />
or from within the menu structures will take you back one step in<br />
the history of control panel use. This button will typically be used<br />
when selecting or customizing settings within various menu<br />
categories.<br />
NOTE The BACK button will only retrace the last 3 steps.<br />
30<br />
MENU AND BACK BUTTONS
THE MINELAB EXPLORER <strong>II</strong><br />
SHORTCUT BUTTONS<br />
The <strong>Explorer</strong> <strong>II</strong>’s shortcut buttons are intended to offer quick access to the functions and<br />
settings most likely to be used in detector operation.<br />
Noise Cancel<br />
Figure 4.5<br />
Figure 4.5<br />
Noise cancel shortcut button<br />
Pressing the NOISE CANCEL button automatically selects the<br />
quietest, most stable channel for detecting. This will automatically<br />
eliminate most audio response to electromagnetic disturbances<br />
(e.g. powerlines). Selection takes approximately 30 seconds. It is<br />
very important to keep the detector coil motionless during this<br />
time. Also ensure that no metallic objects are moved in close<br />
vicinity of the search coil.<br />
In Advanced mode it is possible to manually select your desired<br />
detecting channel.<br />
Detect<br />
Figure 4.6<br />
4<br />
CONTROL PANEL<br />
This shortcut button returns to the Detect mode display at any<br />
stage of operation, allowing you to continue detecting.<br />
Figure 4.6<br />
Detect shortcut button<br />
• When detecting in the Quickstart mode, pressing DETECT<br />
will switch between Smartfind and Digital displays.<br />
• When detecting in the Advanced mode, pressing DETECT<br />
will switch between Smartfind, Digital, Learn and Edit<br />
displays.<br />
More information on detect screens appears in the opening pages<br />
of Chapter 5: Quickstart and Chapter 6: Advanced Use.<br />
SHORTCUT BUTTONS<br />
31
www.minelab.com<br />
THE MINELAB EXPLORER <strong>II</strong><br />
Iron Mask<br />
Figure 4.7<br />
The IRON MASK shortcut button allows you to quickly switch<br />
between two detection modes: Discrim and Iron Mask.<br />
4<br />
CONTROL PANEL<br />
Figure 4.7<br />
Iron Mask shortcut button<br />
Assuming the detector is in the preset Discrim Coins function:<br />
• Pressing the button once switches to the adjustment screen<br />
for Iron Mask which allows you to set the detector’s level of<br />
ferrous rejection.<br />
• Pressing the button a second time switches to the Iron Mask<br />
function.<br />
• Pressing the button again returns you to Discrim Coins.<br />
Discrim displays a pattern representing which targets are<br />
selected from the Discrim Select list (the factory preset is Coins).<br />
This pattern is explained in detail on page 42 of Chapter 5:<br />
Quickstart. A small bar also appears at the bottom of the<br />
Smartfind screen to indicate whether Iron Mask is ON or OFF.<br />
Pinpoint<br />
Figure 4.8<br />
Pinpoint shortcut button<br />
Figure 4.8<br />
The <strong>Explorer</strong> <strong>II</strong> is programmed to operate as a motion detector<br />
(detecting targets as the search coil is swept). The PINPOINT<br />
shortcut button overrides this automatic setting enabling the<br />
<strong>Explorer</strong> <strong>II</strong> to become a non-motion detector. This allows a<br />
target’s location to be pinpointed. Continuous target response will<br />
be emitted when the search coil is positioned directly over a<br />
target.<br />
A small bar appears at the bottom of the screen to indicate<br />
whether Pinpoint is ON or OFF. It will flash in ON mode to remind<br />
you to turn Pinpoint OFF. Using the Pinpoint function is explained<br />
in detail in Chapter 5: Quickstart (page 59-60).<br />
32<br />
SHORTCUT BUTTONS
THE MINELAB EXPLORER <strong>II</strong><br />
SHIFT BUTTONS<br />
The six buttons at either side of the <strong>Explorer</strong> <strong>II</strong> display screen perform several functions.<br />
Menu items may be selected, help screens displayed or adjustments made to display and<br />
audio levels.<br />
Selecting a menu item<br />
Figure 4.9<br />
Figure 4.9<br />
Example of selected menu item<br />
Pressing and releasing the shift button next to a menu item or<br />
icon will select this option. For example, in Figure 4.9 pressing<br />
the left-hand top shift button selects the ADVANCED option of<br />
Advanced mode’s OPTIONS menu.<br />
Figure 4.10 Example of a help screen<br />
Help function<br />
Figure 4.10<br />
Pressing and holding down the shift button next to a menu item<br />
or pressing and holding a shortcut button for approximately one<br />
second will display a Help screen describing this particular<br />
function and various other menu options available.<br />
4<br />
CONTROL PANEL<br />
Figure 4.11 Example of an adjustment bar<br />
Repeat function<br />
Figure 4.11<br />
Pressing and holding the shift button adjacent to either side of an<br />
adjustment bar for more than one second will repeat the function<br />
of a single depression of the same button (until the button is<br />
released). For example, (Figure 4.11) pressing and holding the<br />
right-hand bottom shift button will steadily increase display<br />
contrast.<br />
You are now ready to proceed to Chapter 5: Quickstart.<br />
!<br />
SHIFT BUTTONS<br />
33
www.minelab.com<br />
THE MINELAB EXPLORER <strong>II</strong><br />
CONTROL BUTTON FUNCTIONS ... INCLUDE?<br />
4<br />
CONTROL PANEL<br />
34
THE MINELAB EXPLORER <strong>II</strong><br />
5<br />
Quickstart<br />
However experienced you are at using a<br />
metal detector, it is important that you<br />
read this chapter to understand how to<br />
use the <strong>Explorer</strong> <strong>II</strong> in Quickstart mode.<br />
5<br />
QUICKSTART<br />
35
www.minelab.com<br />
THE MINELAB EXPLORER <strong>II</strong><br />
GETTING STARTED<br />
Now that your detector is assembled, batteries inserted and you are familiar with the control<br />
panel, you should be ready to start detecting. This chapter on Quickstart is designed to be<br />
the starting point for all users of the <strong>Explorer</strong> <strong>II</strong>.<br />
Introducing Quickstart<br />
POWER<br />
P0400b P0400-B<br />
Figure 5.1<br />
When you first turn on the <strong>Explorer</strong> <strong>II</strong>, the Quickstart Smartfind<br />
display will appear and you are able to begin detecting. The<br />
detector is prepared to respond to non-ferrous targets while<br />
filtering out ground signals.<br />
Figure 5.1<br />
Quickstart’s opening screen<br />
The following pages in this chapter outline the basics of metal<br />
detecting and use of the <strong>Explorer</strong> <strong>II</strong>. You will learn how to<br />
interpret its responses to targets and make your own adjustments<br />
to the settings.<br />
5<br />
QUICKSTART<br />
Display memory<br />
The <strong>Explorer</strong> <strong>II</strong>’s factory setting is<br />
to start in Smartfind for your first<br />
detecting session.<br />
If the alternative Digital display is<br />
the last used, the <strong>Explorer</strong> <strong>II</strong><br />
opens with this screen next time<br />
you turn on the detector. It also<br />
retains all adjustments to<br />
settings made in the previous<br />
session (including those<br />
made in Smartfind).<br />
Regardless of your level of experience with metal detecting,<br />
<strong>Minelab</strong> recommends you begin in Quickstart mode to familiarize<br />
yourself with basic features and operation before experimenting<br />
with the detector’s advanced features (detailed in Chapter 6:<br />
Advanced Use).<br />
A number of additional functions and features that are likely to be<br />
accessed frequently while detecting are also explained.<br />
These include:<br />
• Target SENSITIVITY and THRESHOLD levels, adjusted with<br />
shift buttons<br />
• IRON MASK and PINPOINT, activated by shortcut buttons.<br />
• MENU functions, accessed from the control panel shift<br />
buttons. These enable you to adjust the display and audio,<br />
define targets and move into Advanced mode.<br />
36<br />
GETTING STARTED
THE MINELAB EXPLORER <strong>II</strong><br />
BEGINNER USE<br />
CORRECT<br />
INCORRECT<br />
P0265-A<br />
Trying out the detector<br />
Figure 5.2<br />
Don’t try this at home!<br />
If you attempt to begin detecting while you are inside your home,<br />
you will quickly find that there are many metallic objects (such as<br />
nails or reinforcing in the floor) which will result in almost<br />
continuous detection. There will also be interference from TV sets<br />
and other household appliances. Placing the sensitive detector<br />
coil near large metallic objects can result in temporary saturation<br />
of the sensor, meaning that it then cannot detect small objects.<br />
Therefore it is best to turn your detector off and head outside, as<br />
far away as you can from sources of electromagnetic disturbance.<br />
Figure 5.2 Sweeping the coil<br />
Audio Overload<br />
Sometimes it is possible that a<br />
large object close to the search<br />
coil will overload the detector’s<br />
electronics. When this happens,<br />
the <strong>Explorer</strong> <strong>II</strong> emits a low ‘warble’<br />
which will repeat until the coil is<br />
moved away from the source of the<br />
overload.<br />
Sweeping the coil<br />
The <strong>Explorer</strong> <strong>II</strong> will perform at its best when the coil is kept in<br />
close proximity to the ground. This will increase detection depth<br />
and response to small objects. Becoming practised at sweeping<br />
the coil is very important, as variation in coil height at the end of<br />
each swing can cause confusing sounds and reduce detection<br />
depth. Each sweep of the coil should overlap the last one (Figure<br />
5.2). This will ensure good ground coverage.<br />
You think you’ve found something?<br />
When an object is detected, the <strong>Explorer</strong> <strong>II</strong> emits an audio<br />
response and visually displays a target classification on the<br />
control panel’s screen.<br />
Before you attempt to pinpoint or recover the object – which<br />
is explained later in this chapter – it is vital you understand<br />
how to interpret these audio and visual responses.<br />
This is explained over the next few pages.<br />
5<br />
QUICKSTART<br />
BEGINNER USE<br />
37
www.minelab.com<br />
THE MINELAB EXPLORER <strong>II</strong><br />
QUICKSTART DISPLAY<br />
easy reference<br />
The Quickstart display visually represents everything from target details to the<br />
<strong>Explorer</strong> <strong>II</strong>’s operating settings. Quickstart’s Smartfind display (pictured below) and<br />
alternate Digital display share many common elements.<br />
10 2 7<br />
8 1 5<br />
9 8<br />
5<br />
QUICKSTART<br />
3<br />
4 6<br />
38<br />
QUICKSTART DISPLAY
THE MINELAB EXPLORER <strong>II</strong><br />
QUICKSTART DISPLAY<br />
easy reference<br />
1<br />
2<br />
Sensitivity level. The sensitivity bar and<br />
numbers indicate how responsive the detector is<br />
to a target in the presence of ground noise and/<br />
or electromagnetic interference. Numbers range<br />
between 1 and 32. When the shift button next to<br />
the number is pressed the detector moves<br />
between semi-auto and manual sensitivity. See<br />
page 49 for details.<br />
Threshold level. The threshold setting controls<br />
the audible level of threshold ‘hum’ during<br />
detecting. When the shift button next to the<br />
adjustment arrow is pressed, the threshold hum<br />
increases or decreases. See page 50 for details.<br />
5<br />
6<br />
7<br />
8<br />
Smartfind display. The shaded and unshaded<br />
areas of the screen are Smartfind’s preset<br />
Discrimination setting. Smartfind also has an<br />
alternative Iron Mask setting. See pages 42-43.<br />
Pinpoint. This shaded block indicates whether<br />
PINPOINT is ON or OFF. See page 59.<br />
Battery life. This icon indicates the charge<br />
remaining in the installed batteries. See page 27.<br />
Adjustment arrows. Pressing shift buttons next to<br />
these arrows increases or decreases preset<br />
settings.<br />
5<br />
3<br />
Depth indicator. The clear portion of the depth<br />
indicator represents the approximate distance of<br />
a target below the coil. The top of the indicator<br />
represents the position of the coil and the<br />
bottom represents 300mm (12 inches) from the<br />
coil. The bar will be clear if the target is too far<br />
from the coil or its depth cannot be accurately<br />
gauged.<br />
9<br />
10<br />
Full screen icon. Selection enlarges display to fill<br />
screen. See page 48. This icon temporarily<br />
changes to show the threshold level setting when<br />
threshold is being adjusted.<br />
Target crosshair. Represents the detected<br />
object’s properties on a two-dimensional scale of<br />
discrimination. See page 42-43.<br />
QUICKSTART<br />
4<br />
Iron Mask. This shaded block indicates whether<br />
IRON MASK function is ON or OFF.<br />
See page 45.<br />
QUICKSTART DISPLAY<br />
39
www.minelab.com<br />
THE MINELAB EXPLORER <strong>II</strong><br />
QUICKSTART’S SMARTFIND DISPLAY<br />
When first using the detector, you will see the Smartfind screen. Smartfind displays an object's<br />
characteristics using a two-dimensional scale of target discrimination.<br />
Two-dimensional discrimination<br />
Figure 5.3<br />
Figure 5.3<br />
Smartfind display with preset<br />
Coins discrimination pattern<br />
When an object is detected, Smartfind indicates what kind of<br />
object you have found with a target crosshair. The location of this<br />
crosshair on the Smartfind screen is based on <strong>Minelab</strong>'s unique<br />
two-dimensional scale of discrimination. An understanding of this<br />
will be helpful before Smartfind's Iron Mask and Discrimination<br />
functions are explained in the next few pages.<br />
Two-dimensional discrimination explained<br />
5<br />
QUICKSTART<br />
The <strong>Explorer</strong> <strong>II</strong> rates detected objects according to their<br />
conductivity (like most traditional detectors). What makes twodimensional<br />
discrimination unique is a rating of the same object's<br />
ferrous content. Smartfind graphically represents both of these<br />
target properties on the same display.<br />
• The vertical dimension (or axis) rates the object on size/<br />
conductivity.<br />
40<br />
QUICKSTART’S SMARTFIND DISPLAY
THE MINELAB EXPLORER <strong>II</strong><br />
Discrimination<br />
Discrimination is the ability of a<br />
metal detector to identify the user’s<br />
desired target (e.g. jewelry) and<br />
eliminate signals from unwanted<br />
material (e.g. nails).<br />
The <strong>Explorer</strong> <strong>II</strong> can be programmed<br />
in a number of ways to discriminate<br />
against unwanted targets in<br />
different types of ground.<br />
• The horizontal dimension (or axis) rates the extent of the<br />
object’s resemblance to ferrous characteristics.<br />
• The object’s cross-referenced rating is represented by a<br />
‘target crosshair’ inside the rectangular display area.<br />
Interpreting target responses<br />
Conductivity<br />
• Objects with high conductivity (e.g. large silver coins, copper<br />
items) will cause the target crosshair to appear at the top of<br />
the Smartfind screen.<br />
• Objects with low conductivity (e.g. small alloy coins, foil) will<br />
cause the target crosshair to appear at the bottom of the<br />
Smartfind screen.<br />
Along with the type of metal, the size of objects will have some<br />
effect on the conductivity rating for targets. Generally, the larger<br />
the target, the higher the corresponding conductivity rating (and<br />
proximity of the target crosshair to the top of the screen).<br />
5<br />
Ferrous content<br />
• Objects with high ferrous content cause the target crosshair<br />
to appear on the left of the screen unless its rating would<br />
situate the object in the dark area of the discrimination<br />
pattern (see page 44).<br />
QUICKSTART<br />
• Objects with low ferrous content (e.g. jewelry, coins) cause<br />
the target crosshair to appear on the right of the screen.<br />
The preset discrimination setting is designed to search for Coins.<br />
NOTE Both ferrous and non-ferrous objects have varying<br />
degrees of inductive response to electromagnetic waves.<br />
This characteristic – in addition to conductivity – allows for<br />
more accurate identification of targets.<br />
QUICKSTART’S SMARTFIND DISPLAY<br />
41
www.minelab.com<br />
THE MINELAB EXPLORER <strong>II</strong><br />
Introducing Discrim<br />
Discrim (an abbreviation of Discrimination) instructs the detector<br />
to accept some types of targets and reject others. It uses<br />
Smartfind's two-dimensional discrimination, allowing you to<br />
specify one or more target patterns for detection.<br />
Figure 5.4<br />
Smartfind’s preset Discrim<br />
function<br />
Smartfind Discrimination pattern<br />
Figure 5.4<br />
When you begin in Quickstart, you will see a Smartfind display<br />
resembling Figure 5.4. This display shows that the detector is<br />
ready to operate in its preset Coins Discrim function.<br />
5<br />
QUICKSTART<br />
The discrimination pattern represents the typical characteristics<br />
of non-ferrous coins (actually a composite of hundreds of coins<br />
from around the world). When the search coil passes over an<br />
object matching the conductive and ferrous characteristics of<br />
coins, the target crosshair will appear in the clear area and a<br />
target response will sound. Objects outside of the accepted<br />
(clear) area are not displayed and the threshold ‘hum’ is<br />
temporarily silenced. The target crosshair will remain locked in<br />
the position of the last accepted target.<br />
The discrimination pattern 'maps' the specific ferrous and<br />
conductive properties of coins, providing excellent accuracy in<br />
detection of this particular type of target.<br />
NOTE Quickstart offers a range of discrimination patterns<br />
which may be used on their own or in combination. This is<br />
detailed in Selecting Targets, page 62.<br />
42<br />
QUICKSTART’S SMARTFIND DISPLAY
THE MINELAB EXPLORER <strong>II</strong><br />
THE IRON MASK<br />
Figure 5.5<br />
Adjusting the Iron Mask<br />
Adjusting the Iron Mask<br />
Figure 5.5<br />
Pressing the IRON MASK shortcut button on the control panel will<br />
display the Iron Mask adjustment screen.<br />
Preset Level<br />
The <strong>Explorer</strong> <strong>II</strong>'s Iron Mask is set at a rating of -6. This is suitable<br />
when detecting non-ferrous metals.<br />
Iron Mask Shortcut<br />
Detecting more ferrous objects<br />
If you want target responses from more ferrous objects (e.g. war<br />
relics) it is necessary to reduce the level of ferrous rejection. This<br />
is done by pressing the bottom left shift button next to the slider<br />
control, reducing the extent of the Iron Mask. You may need to<br />
experiment a little with the settings.<br />
The Iron Mask shortcut button on<br />
the control panel allows you to<br />
switch between Iron Mask and<br />
Discrimination.<br />
Before you experiment with this,<br />
an understanding of the features<br />
of these functions will greatly<br />
assist in deciding which will<br />
locate the kind of targets you<br />
want and how to adjust the<br />
<strong>Explorer</strong> <strong>II</strong> to suit your<br />
preferences.<br />
Detecting all ferrous objects<br />
If you wanted to detect all objects, regardless of ferrous content,<br />
ferrous rejection can be reduced to a minimum level of -16. The<br />
screen will be completely clear and all objects will sound a target<br />
response.<br />
Rejecting all ferrous objects<br />
If you want target responses to be suppressed for all ferrous<br />
objects, the Iron Mask may be increased to a level of 0. This is<br />
represented by the mask extending to half way across the<br />
Smartfind screen (as depicted in the section explaining<br />
two-dimensional discrimination, see page 42).<br />
5<br />
QUICKSTART<br />
The tutorials featured later in this<br />
chapter also assume a basic<br />
understanding of Iron Mask and<br />
Discrimination functions.<br />
THE IRON MASK<br />
43
www.minelab.com<br />
THE MINELAB EXPLORER <strong>II</strong><br />
Figure 5.6 Smartfind in Iron Mask<br />
Operating in Iron Mask<br />
Figure 5.6<br />
Pressing the IRON MASK shortcut button again will display a<br />
Smartfind screen resembling Figure 5.6. This display shows that<br />
the detector is ready to operate in Iron Mask. This function is<br />
programmed to reject ferrous targets and make it easier for you<br />
to find more desirable (non-ferrous) objects like coins and jewelry.<br />
Iron Mask is preset to reject ferrous objects at a level suitable for<br />
basic detecting. This is shown in Figure 5.5 as a rating of -6 with<br />
the dark area filling the left third of the screen. Smartfind will not<br />
display an object when its target crosshair would appear in this<br />
dark, masked area of the screen and the <strong>Explorer</strong><strong>II</strong>’s threshold<br />
‘hum’ will disappear momentarily.<br />
However, if you wish to locate specific types of objects you may<br />
need to modify the <strong>Explorer</strong><strong>II</strong>'s level of ferrous rejection. This is done<br />
by adjusting the Iron Mask as explained previously on page 45.<br />
5<br />
QUICKSTART<br />
44<br />
THE IRON MASK
THE MINELAB EXPLORER <strong>II</strong><br />
QUICKSTART’S DIGITAL DISPLAY<br />
Digital display<br />
Figure 5.7, 5.8<br />
Preferred Display<br />
P0611-A<br />
Figure 5.7 Quickstart’s Digital Display<br />
P0612-A<br />
Figure 5.8 Digital as full screen display<br />
When the Smartfind screen is displayed, pressing the DETECT<br />
shortcut button on the control panel switches to the <strong>Explorer</strong> <strong>II</strong>’s<br />
alternative Digital display.<br />
The display rates both the ferrous content and the conductivity of<br />
an object with numbers from 0-31. The number for ferrous<br />
content is under the label ‘Fer’ and that for the conductivity is<br />
under the label ‘Cond’. A value of 0 represents low ferrous<br />
content and 31 represents high ferrous content. Similarly, 0<br />
represents low conductivity and 31 represents high conductivity.<br />
The right of the digital read-out you will see an icon representing<br />
the possible target and, in full screen display, a list of displaying<br />
up to three possible target classifications.<br />
The <strong>Explorer</strong> <strong>II</strong> remembers which<br />
display was last used in your<br />
detecting. If this happens to be<br />
Digital, this display will appear<br />
next time you turn on the detector.<br />
It should be noted that any<br />
adjustments to discrimination that<br />
are made in Smartfind will be<br />
retained and used in Digital.<br />
It is important to note that the discrimination settings (either the<br />
current Discrimination Pattern or the Iron Mask are still active and<br />
targets outside the accepted area will not update the display. If<br />
you want to adjust the discrimination, simply press the DETECT<br />
button to return to the Smartfind display.<br />
HINT The digits shown in Digital display are a numeric<br />
estimation of the horizontal and vertical position of the<br />
target crosshair displayed in Smartfind mode (that is, its<br />
ferrous and conductivity rating).<br />
As you familiarize yourself with each display, try switching<br />
from one to the other to compare the results.<br />
5<br />
QUICKSTART<br />
QUICKSTART’S DIGITAL DISPLAY<br />
45
www.minelab.com<br />
THE MINELAB EXPLORER <strong>II</strong><br />
MODIFYING THE DISPLAY<br />
Figure 5.9<br />
Quickstart’s standard screen<br />
Full screen display<br />
Figure 5.9, 5.10<br />
If you wish to enlarge the Smartfind or Digital display during<br />
detecting, it is possible to instruct the detector to remove the<br />
display border and other screen elements leaving only the target<br />
details displayed on the full screen.<br />
STEP 1<br />
STEP 2<br />
Press the shift button next to the full screen icon at the<br />
right of the control panel. This will increase the viewing<br />
area from that depicted in Figure 5.9 to that in Figure 5.10.<br />
To return to the original screen, press the same shift<br />
button again (next to the small bar at the edge of screen).<br />
5<br />
QUICKSTART<br />
46<br />
Figure 5.10 Quickstart as full screen display<br />
Figure 5.11 Quickstart’s Main Menu<br />
Figure 5.12 Display menu’s contrast<br />
adjustment screen<br />
MODIFYING THE DISPLAY<br />
Adjusting the display contrast<br />
Figure 5.11, 5.12<br />
If brighter or more overcast conditions make the detector display<br />
harder to see, it is possible to adjust the display contrast.<br />
STEP 1<br />
STEP 2<br />
STEP 3<br />
STEP 4<br />
STEP 5<br />
Press the MENU shortcut button on the control panel. This<br />
will display the MAIN MENU (Figure 5.11).<br />
Four menu items will be displayed, each with a<br />
turned-down corner. This indicates a following screen.<br />
Press the shift button next to the DISPLAY option. To<br />
denote selection, the box will fill in with solid black and a<br />
new screen with a slider control will appear (Figure 5.12).<br />
Press the shift buttons next to the arrows of the slider<br />
control to change the contrast of the screen display from<br />
the factory setting of 6.<br />
Press the DETECT shortcut button again to continue<br />
detecting.
THE MINELAB EXPLORER <strong>II</strong><br />
ADJUSTING SENSITIVITY<br />
Sensitivity control<br />
The sensitivity bar indicates how responsive the detector is to a<br />
target in the presence of ground noise and/or electromagnetic<br />
interference.<br />
Noise Cancel<br />
So that you can detect in best<br />
conditions, we would advise you to<br />
always choose the channel with<br />
least interference before beginning<br />
your detecting session.<br />
If the detector becomes noisy and<br />
you suspect electromagnetic<br />
interference, change to a better<br />
channel before adjusting<br />
sensitivity.<br />
To do this automatically, press the<br />
Noise Cancel shortcut button, or<br />
manually select the least noisy<br />
channel.<br />
The degree of sensitivity is increased by pressing the top shift<br />
button and decreased by pressing the bottom shift button (on the<br />
left side of the control panel). Pressing the center left shift button<br />
switches between semi-auto and manual sensitivity.<br />
Semi-auto<br />
A line cycling around the number indicates that the detector’s<br />
sensitivity is in semi-automatic mode. In this mode, the detector<br />
continuously monitors the environmental conditions and will<br />
adjust actual detector sensitivity as close as possible to your<br />
specified level of stability, depending on these conditions.<br />
<strong>Manual</strong><br />
In the manual mode (where the line does not cycle around the<br />
number) the adjustment controls the sensitivity directly. This<br />
mode is suitable for the beach and very quiet (unmineralized)<br />
ground. <strong>Manual</strong> sensitivity is also recommended for high trash<br />
areas when best results are obtained by sweeping the coil very<br />
slowly.<br />
A high manual number is preferable for stable conditions with low<br />
interference. A low number is suggested for very variable, ‘noisy’<br />
conditions.<br />
Adjusting sensitivity<br />
The highest sensitivity setting (32) is suitable in only the least<br />
‘noisy’, most stable environments. Decreasing sensitivity will<br />
stabilize the detector where it is affected by noise or interference,<br />
but will marginally affect depth penetration and detection of small<br />
objects. This may still be preferable to operating with excessive<br />
background ‘chatter’.<br />
47<br />
5<br />
QUICKSTART<br />
ADJUSTING SENSITIVITY
www.minelab.com<br />
THE MINELAB EXPLORER <strong>II</strong><br />
ADJUSTING THRESHOLD<br />
Threshold control<br />
The <strong>Explorer</strong> <strong>II</strong> usually emits a constant tone or threshold ‘hum’ in<br />
the absence of a target. The threshold setting controls the audible<br />
level of this sound during detecting. <strong>Minelab</strong> recommends setting<br />
the threshold to a comfortable audible level in the early stages of<br />
your detecting session, as this feature is designed to highlight the<br />
variations in signal response which often indicate detection of a<br />
target.<br />
Threshold level is increased by pressing the top shift button and<br />
decreased by pressing the bottom shift button (on the right side of<br />
the control panel). A number corresponding to the threshold level<br />
will appear temporarily between the two adjustment arrows.<br />
5<br />
QUICKSTART<br />
Display Icon<br />
The icon between the adjustment<br />
arrows for threshold is not related<br />
to this function. It changes the<br />
display to full screen (explained<br />
on page 48).<br />
Preset threshold<br />
The preset level of 20 will usually emit a constant threshold hum.<br />
This level is programmed to enable audible response to most<br />
target signals.<br />
Suggested threshold setting<br />
Everyone’s hearing is different, so <strong>Minelab</strong> suggests that your<br />
preferred level of threshold be set to a very low, but still audible<br />
level. The threshold setting may need to be adjusted when<br />
moving from speaker to headphones.<br />
Reducing threshold<br />
With the level set at 8, there will usually be no constant threshold<br />
hum. Adjusting the level to 0 will ensure silent operation but could<br />
mask audio response to small targets.<br />
48<br />
ADJUSTING THRESHOLD<br />
Increasing threshold<br />
The threshold hum will become louder as the threshold level is<br />
increased. Small target responses will become difficult to discern<br />
as threshold nears a maximum setting of 40 when there is certain<br />
to be a persistently loud threshold hum.
THE MINELAB EXPLORER <strong>II</strong><br />
AUDIO RESPONSE<br />
The <strong>Explorer</strong> <strong>II</strong> emits a target audio response that varies in pitch and volume depending on<br />
what type of object it detects.<br />
Pitch of response<br />
Figure 5.13<br />
Figure 5.13 Target sounding response<br />
Generally, a target that is highly conductive (e.g. a large silver<br />
coin) emits a high pitched signal. A low pitch is sounded for less<br />
conductive targets. Large targets or targets close to the ground<br />
surface emit a louder signal.<br />
In Quickstart’s preset function, Coins Discrimination, the target<br />
audio response is emitted if a target is predominantly non-ferrous<br />
–when the target crosshair is displayed in the clear part of the<br />
Smartfind screen (Figure 5.13).<br />
As you detect different targets you will quickly find it easy to<br />
identify objects by the audio and visual responses of the <strong>Explorer</strong><br />
<strong>II</strong>. Directions for familiarizing yourself with specific target<br />
responses appear toward the end of this chapter.<br />
5<br />
Headphones Caution!<br />
When using headphones, volume<br />
level should be adjusted to protect<br />
your hearing from excessive<br />
sound.<br />
Adjusting the volume<br />
The preset volume control on the <strong>Explorer</strong> <strong>II</strong> is turned up to<br />
maximum volume. This is usually appropriate with either the<br />
detector’s built-in speaker or headphones. If the volume is too<br />
loud in the headphones, use the volume control.<br />
Main Menu > Audio > Volume > Max. Limit can be set to reduce<br />
potentially loud signals (see page 54).<br />
QUICKSTART<br />
AUDIO RESPONSE<br />
49
www.minelab.com<br />
THE MINELAB EXPLORER <strong>II</strong><br />
AUDIO MENU<br />
Features accessed through the Audio menu allow you to define the various audio<br />
properties of your <strong>Explorer</strong> <strong>II</strong>.<br />
Introduction to the Audio menu<br />
Figure 5.14<br />
5<br />
QUICKSTART<br />
Figure 5.14 The Audio menu<br />
Headphones<br />
Use of the <strong>Explorer</strong> <strong>II</strong> with<br />
headphones will allow you to<br />
discern subtle variations in audio<br />
response and lessen exposure to<br />
adverse conditions (i.e. wind)<br />
which may distort sound from the<br />
speaker. Headphones also<br />
minimize disturbance from your<br />
treasure hunting for other people<br />
in the area.<br />
Main Menu > AUDIO<br />
As mentioned earlier in the section on Audio Response, the<br />
<strong>Explorer</strong> <strong>II</strong> emits a target signal that varies in volume and pitch<br />
depending on the object it detects. Generally, large targets or<br />
targets close to the ground surface emit the loudest signal.<br />
A target that is less conductive emits a low pitched signal and a<br />
highly-conductive target emits a high pitched signal.<br />
The AUDIO menu allows you to modify the detector’s operating<br />
VOLUME, TONE and define the SOUNDS emitted to lend greater<br />
refinement to audio responses.<br />
50<br />
AUDIO MENU
THE MINELAB EXPLORER <strong>II</strong><br />
AUDIO: ADJUSTING THE VOLUME<br />
Introducing Volume<br />
Figure 5.15<br />
Figure 5.15 Volume adjustment screen<br />
Main Menu > Audio > VOLUME<br />
The VOLUME screen of the Audio menu displays two slider<br />
controls: MAX LIMIT and GAIN (Figure 5.15).<br />
NOTE To test sounds upon selection it is necessary to move<br />
the coil across the target.<br />
Max limit<br />
Main Menu > Audio > Volume > MAX LIMIT (adjustment)<br />
This setting is the detector’s overriding volume control. It controls<br />
the ‘loudness’ of a signal response emitted from the detector,<br />
much like the volume knob on a stereo system.<br />
A setting of 0 instructs the detector to be completely silent.<br />
A setting of 10 instructs the detector’s audio to operate at its<br />
maximum level of ‘loudness’.<br />
Lower settings are likely to help extend battery usage time.<br />
5<br />
QUICKSTART<br />
Volume<br />
(Continued next page)<br />
It is also possible to access the<br />
volume menu (see page 71) from the<br />
icon shortcut of the Advanced<br />
mode’s LEARN screen.<br />
AUDIO: ADJUSTING THE VOLUME<br />
51
www.minelab.com<br />
THE MINELAB EXPLORER <strong>II</strong><br />
Normal alisasing<br />
5<br />
Figure 5.16 Volume gain settings<br />
Figure 5.17 Volume gain preset<br />
Gain<br />
Figure 5.16, 5.17<br />
5<br />
QUICKSTART<br />
Main Menu > Audio > Volume > GAIN (adjustment)<br />
Volume gain affects the way the detector amplifies target audio<br />
responses in respect to the strength of the original signal.<br />
Looking at figure 5.16, it is clear that with a setting of 1 the sound<br />
produced will be proportional to the strength of the signal for the<br />
whole range of signals. Based on this and the depth indication,<br />
some information on the size of the target can be inferred. It<br />
should be noted that in this case weak signals will produce an<br />
accordingly faint audio signal.<br />
52<br />
AUDIO: ADJUSTING THE VOLUME<br />
With the preset value of 5, the audio response is being partially<br />
amplified. Weak to medium strength signals will give proportional<br />
responses, but strong signals will not sound much louder than<br />
medium ones because the sound has reached its maximum limit<br />
(Figure 5.17).<br />
On the other hand, with a setting of 10, all but the weakest signals<br />
will be amplified to a very strong audio response (Figure 5.16). No<br />
indication of size or strength of target signal can be deduced in<br />
this case, but even weak target signals will be easier to hear.
THE MINELAB EXPLORER <strong>II</strong><br />
AUDIO: ADJUSTING THE TONE<br />
Introducing Tone<br />
Figure 5.18<br />
Figure 5.18 Tone menu<br />
Main Menu > Audio > TONE<br />
Tone is the frequency of sound emitted on target detection. It is<br />
important to experiment with tone settings and listen carefully to<br />
tone variations during your detecting. To test variation in tones<br />
upon selection it will be helpful to move the coil across a few<br />
different targets spaced apart.<br />
Threshold tone<br />
Threshold Tone allows you to adjust the tone of the threshold<br />
‘hum’. This can be modified using the slider control to suit your<br />
preferred threshold tone.<br />
Variability<br />
Variability controls how much the tone will change depending on<br />
the target’s characteristics. A setting of 10 represents significant<br />
variation from target to target. A setting of 1 represents minimum<br />
change in pitch. Variation of pitch between targets can greatly<br />
assist in identifying targets in close proximity to one another.<br />
5<br />
QUICKSTART<br />
Limits<br />
This sets the upper limit of all tones emitted by the <strong>Explorer</strong> <strong>II</strong>.<br />
<strong>Minelab</strong> recommends setting the upper limit to the highest<br />
frequency you are comfortable with. You can test the upper limits<br />
with a highly conductive object (e.g. a large silver coin). Setting<br />
the limit to 1 will produce only low pitch target signals, a setting of<br />
10 will provide very high as well as low pitch signals.<br />
AUDIO: ADJUSTING THE TONE<br />
53
www.minelab.com<br />
THE MINELAB EXPLORER <strong>II</strong><br />
AUDIO: ADJUSTING THE SOUNDS<br />
Introducing Sounds<br />
Figure 5.19<br />
Figure 5.19 Sounds menu<br />
Main Menu > Audio > SOUNDS<br />
The SOUNDS menu allows you to define how the pitch varies with<br />
target characteristics. This can be a very useful feature in<br />
identifying targets in close proximity to one another. It is possible<br />
to instruct the detector to emit a distinct sound responding to an<br />
object’s ferrous characteristics, rather than its conductive<br />
properties. To test sounds upon selection it is necessary to move<br />
the coil across one or more targets with different conductive and<br />
ferrous properties.<br />
5<br />
QUICKSTART<br />
Constant<br />
Main Menu > Audio > Sounds > CONST<br />
Selecting CONST eliminates the variation of the pitch upon<br />
detection. If selected, the <strong>Explorer</strong> <strong>II</strong> will emit a consistent tone<br />
regardless of the target detected.<br />
Conductivity<br />
Main Menu > Audio > Sounds > CONDUCT<br />
Conduct is the factory preset and <strong>Minelab</strong>’s recommended option.<br />
Selecting CONDUCT adjusts the tone to identify the object relative<br />
to its conductivity (the vertical axis of the Smartfind screen).<br />
54<br />
AUDIO: ADJUSTING THE SOUNDS<br />
A high pitched tone denotes a large, highly conductive object with<br />
target crosshair displayed near the top of the Smartfind screen<br />
(or near a Digital rating of 32).<br />
A low pitched tone denotes a small object with low conductivity.<br />
The target crosshair is displayed near the bottom of the Smartfind<br />
screen (or near a Digital rating of 1).
Ferrous<br />
THE MINELAB EXPLORER <strong>II</strong><br />
Main Menu > Audio > Sounds > FERROUS<br />
Selecting FERROUS adjusts the tone according to the target’s<br />
ferrous content (the horizontal axis of the Smartfind screen or the<br />
first number in the Digital display). A low ‘blaat’ tone denotes a<br />
highly ferrous object, displayed on the left of the screen and<br />
having a high ‘Fer’ number. A high pitched ‘squeak’ tone denotes<br />
a non-ferrous target, displayed on the right of the Smartfind<br />
screen and having a low ‘Fer’ number.<br />
Clear the Smartfind screen to test the Ferrous sound. There are<br />
two ways to do this: adjust the Iron Mask level to -16 or choose<br />
CLEAR from Main Menu > Discrim > SELECT.<br />
NOTE When the Iron Mask is set to the left of the Smartfind<br />
screen (setting -16) there will be a maximum variation in<br />
pitch between detected objects. When the Iron Mask is fully<br />
activated (setting 0) there will be no signal for objects with<br />
ferrous content.<br />
5<br />
QUICKSTART<br />
AUDIO: ADJUSTING THE SOUNDS<br />
55
www.minelab.com<br />
THE MINELAB EXPLORER <strong>II</strong><br />
TESTING TARGET AUDIO RESPONSES<br />
tutorial!<br />
Take some time to become familiar with how the <strong>Explorer</strong> <strong>II</strong><br />
responds to various metal objects. This tutorial is designed<br />
for Smartfind’s Iron Mask and Discrimination functions.<br />
Repeat the procedure to familiarize yourself with both.<br />
Gather a collection of different metal objects like a rusted nail,<br />
pull-tab, brass button, aluminium foil, various coins, and some<br />
gold and silver jewelry. Take the detector outside, away from<br />
known electromagnetic devices or metal objects.<br />
5<br />
QUICKSTART<br />
STEP 1<br />
STEP 2<br />
STEP 3<br />
STEP 4<br />
STEP 5<br />
Find an area of ground without targets.<br />
Lay objects in a line, sufficiently spaced apart to allow<br />
the coil to pass between the objects.<br />
One at a time, pass the coil across the test objects. The<br />
detector should ‘beep’ on the non-ferrous objects and<br />
ignore the ferrous objects.<br />
Take note that as the coil is passed over the nail, the<br />
threshold ‘hum’ disappears, indicating that the object<br />
ignored was ferrous.<br />
Passing the coil over different non-ferrous objects will<br />
produce different signal tones. Objects with high<br />
conductivity, such as silver or lead, produce a highpitched<br />
signal tone while objects with lower conductivity,<br />
such as aluminium foil, produce a lower pitched signal<br />
tone.<br />
With experience (and adjustments to the Audio settings) it will be<br />
possible to use the signal tone from an object to accurately<br />
determine the type of object discovered before recovering it from<br />
the ground.<br />
56<br />
TESTING TARGET AUDIO RESPONSES
THE MINELAB EXPLORER <strong>II</strong><br />
PINPOINTING THE OBJECT<br />
Introducing Pinpoint<br />
Figure 5.20. See also Pinpoint overview in Chapter 4: Control Panel, page 34.<br />
Figure 5.20 Pinpoint shortcut button<br />
During normal operation the <strong>Explorer</strong> <strong>II</strong> operates with<br />
discrimination settings like Iron Mask or targets chosen from the<br />
Select target list. When the approximate location of a target has<br />
been determined, it is necessary to identify the object’s exact<br />
position. This is done using the <strong>Explorer</strong> <strong>II</strong>’s Pinpoint function.<br />
Enabling Pinpoint instructs the <strong>Explorer</strong> <strong>II</strong> to temporarily<br />
disengage discrimination and become an ‘all metal’ detector. This<br />
means that objects normally discriminated against will emit a<br />
target signal when beneath the coil.<br />
For example, Iron Mask is activated and the <strong>Explorer</strong> <strong>II</strong> has<br />
detected the approximate location of a non-ferrous coin but<br />
ignored the rusty nail buried nearby. Selection of Pinpoint<br />
instructs the <strong>Explorer</strong> <strong>II</strong> to respond to all metals positioned<br />
directly beneath the coil. Now, instead of a single signal for the<br />
coin the detector will also respond to the nail.<br />
It should be noted that the Pinpoint function is designed to zone in<br />
on a target with subsequent passes. For this reason it is<br />
recommended that you maintain the same sweep height above<br />
the target and not to pass repeatedly back and forth across the<br />
target at various heights. This incorrect method can cause the<br />
detector to desensitize and reduces the depth of Pinpoint. If this<br />
happens, remove the coil from the area of the target for a few<br />
seconds so its sensitivity can recover.<br />
5<br />
QUICKSTART<br />
For this reason, <strong>Minelab</strong> recommends Pinpoint is only used<br />
once the approximate location of a target has been<br />
determined. The display screen’s Pinpoint indicator will flash to<br />
remind you to turn Pinpoint off before resuming normal detecting.<br />
<strong>Instruction</strong>s for the use of Pinpoint appear on the following page.<br />
PINPOINTING THE OBJECT<br />
57
www.minelab.com<br />
THE MINELAB EXPLORER <strong>II</strong><br />
Using Pinpoint<br />
Figure 5.21<br />
Once the <strong>Explorer</strong> <strong>II</strong> has found the approximate position of a<br />
target it is necessary to locate its exact position using Pinpoint.<br />
5<br />
QUICKSTART<br />
STEP 1<br />
STEP 2<br />
STEP 3<br />
STEP 4<br />
STEP 5<br />
STEP 6<br />
Move the search coil to one side of the approximate target<br />
location and press the PINPOINT shortcut button. If this<br />
step is not taken the <strong>Explorer</strong> <strong>II</strong> will sound when moved<br />
away from the object.<br />
Slowly sweep the search coil over the target a couple of<br />
times. You will only hear a sound when the center-bar of<br />
the coil is directly in line with the target.<br />
Taking note of the detector response, reduce the span of<br />
each successive pass of the coil until you are confident of<br />
the target’s location. Make a mental note of the position.<br />
Move to one side so that you can pass the coil over the<br />
target at a right angle to your initial direction.<br />
When the detector sounds you should know exactly where<br />
to dig.<br />
If you have difficulty pinpointing the target, press the<br />
Pinpoint shortcut button again to take the detector out of<br />
Pinpoint and sweep the coil over the area again before<br />
returning to STEP 1.<br />
NOTE The Pinpoint indicator will<br />
flash to remind you to turn<br />
Pinpoint off to resume normal<br />
detecting.<br />
Pinpointing works best when the<br />
search coil is swept slowly.<br />
58<br />
Figure 5.21 Pinpointing the object<br />
PINPOINTING THE OBJECT
THE MINELAB EXPLORER <strong>II</strong><br />
"<br />
RECOVERING THE OBJECT<br />
For this procedure you’ll need: a knife or trowel, a small spade<br />
and a sheet of plastic.<br />
STEP 1<br />
Once the object has been pinpointed, clear the surface of<br />
loose material and check again for the signal. If there is no<br />
signal then the object is amongst the surface material. In<br />
this case, search the surface material until the object is<br />
located.<br />
STEP 2<br />
If the object is still in the ground, check again using<br />
Pinpoint. If you are about to dig in a grassy area, first<br />
remove a plug of grass using a sharp knife or trowel.<br />
STEP 3<br />
Dig carefully to avoid defacing or devaluing the object. The<br />
use of probes can often aid in locating the exact position of<br />
the object prior to digging.<br />
Fill your holes!<br />
#<br />
For the safety of others and in the<br />
interests of respecting the<br />
environment, ensure you leave an<br />
area of ground as you found it.<br />
Leaving holes, or an area ‘scarred’<br />
may result in action being taken to<br />
prevent the use of metal detectors<br />
(which spoils the hobby for others<br />
as well as yourself!)<br />
STEP 4<br />
STEP 5<br />
STEP 6<br />
Place the grass plug and all soil you dig onto a plastic sheet<br />
beside the hole. This sheet (which can be folded small<br />
enough to fit into your pocket) enables you to keep all soil<br />
for refilling the hole and prevents material being scattered<br />
about the area.<br />
Check the hole for the object. If it is not in the hole, place<br />
the detector on the ground and with the coil flat, pick up dirt<br />
by the handful and pass over the coil. Be sure you are not<br />
wearing any metal objects like rings, bracelets or a watch<br />
which may interfere with the signal. If you receive no<br />
response, return the dirt to the hole. Repeat this procedure<br />
until the object is located.<br />
Check the hole again with the detector. Ensure that no other<br />
objects remain, then refill the hole. All soil on the plastic<br />
sheet should be returned to the hole followed by the plug of<br />
grass. This should leave the area as you found it.<br />
5<br />
QUICKSTART<br />
RECOVERING THE OBJECT<br />
59
www.minelab.com<br />
THE MINELAB EXPLORER <strong>II</strong><br />
SELECTING TARGETS<br />
This section of the chapter and the following tutorial will help you to effectively use the<br />
targeting features of the <strong>Explorer</strong> <strong>II</strong>.<br />
Select targets list<br />
Figure 5.22, 5.23<br />
Figure 5.22 Quickstart’s Main Menu<br />
As outlined earlier in this chapter, Quickstart provides the option<br />
of identifying targets based upon Smartfind’s two-dimensional<br />
discrimination. If you wish to detect one or more object types it is<br />
necessary to specify which the <strong>Explorer</strong> <strong>II</strong> should detect or reject.<br />
Choosing SELECT from Quickstart’s MAIN MENU (Figure 5.22)<br />
displays the SELECT target list (Figure 5.23). It is possible to<br />
move down this list using the left middle and lower shift buttons.<br />
The selections, in order of appearance are:<br />
• CLEAR (clears Smartfind screen)<br />
5<br />
QUICKSTART<br />
Figure 5.23 The Select menu<br />
• COINS (non-ferrous coins)<br />
• FE COINS (ferrous coins)<br />
• JEWELRY (rings, bracelets, necklaces)<br />
• FOIL (aluminium foil)<br />
• PULL TAB (aluminium ring from can)<br />
• CROWNCAP (crown seal bottle cap)<br />
• SCREWCAP (screw-on bottle cap)<br />
• NAIL (nails, screws, short lengths of wire, shards of rust)<br />
Once you have made your selection(s) with a tick or cross – as<br />
shown in the following tutorial – press the DETECT button on the<br />
control panel to begin detecting with your new target setting(s).<br />
NOTE When you enter the SELECT menu and make choices<br />
the Iron Mask indicator will be automatically switched to the<br />
OFF position when you return to the Smartfind screen.<br />
60<br />
SELECTING TARGETS
THE MINELAB EXPLORER <strong>II</strong><br />
SELECTING TARGETS<br />
easy reference<br />
Quickstart’s SELECT menu lists eight object types typically encountered during<br />
treasure hunting. It is up to you to select one or more to modify the <strong>Explorer</strong> <strong>II</strong>’s<br />
discrimination pattern.<br />
1<br />
5<br />
2<br />
4<br />
3<br />
5<br />
1<br />
Smartfind thumbnail. Discrimination pattern for current<br />
selection(s) from target list.<br />
QUICKSTART<br />
2<br />
3<br />
4<br />
5<br />
Arrows for moving up or down target list.<br />
Target icon as shown in Digital display mode.<br />
Displays most recent selection from target list.<br />
Target list. Menu of typical target items<br />
(CLEAR function is also provided).<br />
Accepted target. Tick indicates this target is desirable.<br />
A cross indicates the target is not wanted.<br />
SELECTING TARGETS<br />
61
www.minelab.com<br />
THE MINELAB EXPLORER <strong>II</strong><br />
ACCEPTING AND REJECTING TARGETS<br />
tutorial!<br />
This tutorial outlines how to instruct the <strong>Explorer</strong> <strong>II</strong> to<br />
accept JEWELRY and reject bottle CROWNCAPS as targets.<br />
5<br />
QUICKSTART<br />
Figure 5.24 Cleared SELECT menu<br />
Figure 5.25 Accepting jewelry<br />
Figure 5.26 Rejecting bottle cap<br />
Figure 5.27 New discrimination pattern in<br />
Discrim mode<br />
STEP 1<br />
STEP 2<br />
STEP 3<br />
STEP 4<br />
STEP 5<br />
STEP 6<br />
Switch to Smartfind’s Discrim function using the IRON<br />
MASK shortcut button.<br />
Choose SELECT from the MAIN MENU. This displays a<br />
target list and the discrimination pattern for COINS, the<br />
<strong>Explorer</strong>’s <strong>II</strong> Discrim factory setting.<br />
(Figure 5.24) Press the shift button next to the CLEAR<br />
option. This clears the Smartfind thumbnail screen in the<br />
top left corner of all discrimination patterns.<br />
(Figure 5.25) To accept jewelry, use the bottom left shift<br />
button to move down the target list until JEWELRY<br />
option is visible. Press the adjacent shift button once to<br />
accept jewelry. A tick will appear next to the selection<br />
and the Smartfind thumbnail and icon for jewelry will be<br />
displayed.<br />
(Figure 5.26) To reject crowncaps, use the bottom left<br />
shift button to move down the target list until<br />
CROWNCAP is displayed. Press the adjacent shift<br />
button twice to display a cross. This rejects bottle caps<br />
from the discrimination pattern. The detector is now set<br />
to detect for jewelry and exclude crowncaps.<br />
(Figure 5.27) Press the DETECT shortcut button to begin<br />
detecting in Smartfind with your new target settings.<br />
NOTE If SELECT is chosen from the MAIN MENU while the<br />
<strong>Explorer</strong> <strong>II</strong> is functioning in Iron Mask, the current Iron<br />
Mask Smartfind thumbnail will be displayed. As soon as a<br />
selection is made from the target list, a thumbnail of the<br />
chosen discrimination pattern will replace the Iron Mask.<br />
62<br />
ACCEPTING AND REJECTING TARGETS
THE MINELAB EXPLORER <strong>II</strong><br />
ADVANCED MODE OPTION<br />
Once you have experimented with target options and the other features of Quickstart,<br />
it may be time to investigate the features of the <strong>Explorer</strong> <strong>II</strong> available to the advanced user.<br />
Moving to Advanced mode<br />
Figure 5.28, 5.29<br />
Figure 5.28 Options screen in Quickstart<br />
Main Menu > Options > ADVANCED<br />
Press the MENU shortcut button, select OPTIONS from the<br />
displayed list and then select ADVANCED mode.<br />
The detector moves into ADVANCED mode and a new OPTIONS<br />
menu appears displaying the broader array of options available to<br />
you in Advanced mode.<br />
Figure 5.29 Options screen in Advanced<br />
If you are ready for advanced detecting, read through Chapter 6:<br />
Advanced Use. It is likely you will only need to return to this<br />
chapter for background on basic adjustments and general<br />
detector operation.<br />
Just remember that it is always possible to return to Quickstart<br />
mode. If at any time you become a little confused with the<br />
settings for your detector, or just want to brush up on basic<br />
detector use, it is simple to reset the <strong>Explorer</strong> <strong>II</strong> to its original<br />
factory settings. To reset the detector:<br />
5<br />
QUICKSTART<br />
• Turn the detector off<br />
• Press and hold the POWER button until a six-note musical<br />
tune is sounded. The <strong>Minelab</strong> logo and the words ‘Factory<br />
Presets’ will be briefly displayed on screen.<br />
You will be returned to the original Quickstart settings and you may<br />
resume basic detecting or make selections from the Main Menu.<br />
You are now ready to proceed to Chapter 6: Advanced<br />
$<br />
Use.<br />
ADVANCED MODE OPTION<br />
63
www.minelab.com<br />
THE MINELAB EXPLORER <strong>II</strong><br />
5<br />
QUICKSTART<br />
64
THE MINELAB EXPLORER <strong>II</strong><br />
6<br />
Advanced Use<br />
Once you are comfortable with basic<br />
detector use and Quickstart, it is time to<br />
investigate the more advanced features<br />
of the <strong>Explorer</strong> <strong>II</strong>.<br />
6<br />
ADVANCED USE<br />
65
www.minelab.com<br />
THE MINELAB EXPLORER <strong>II</strong><br />
easy reference<br />
ADVANCED MODE’S MAIN MENU<br />
Many of Advanced Mode’s operational functions are accessed<br />
through the Main Menu. This guide is intended to direct you to<br />
the appropriate pages to learn more. The descriptions below<br />
are also displayed in help function when a shift button menu<br />
option is pressed and held.<br />
DISPLAY menu. See page 70.<br />
Menu to select DIGITAL, SMART, LEARN or EDIT display and<br />
CONTRAST adjustment.<br />
SELECT menu. See page 79.<br />
Menu to choose one or more pre-programmed or saved target patterns<br />
from a list.<br />
SAVE DISCRIM. See page 80.<br />
Menu where up to 6 user-defined target patterns may be saved.<br />
6<br />
ADVANCED USE<br />
AUDIO menu. See page 81.<br />
Menu to manually adjust VOLUME, TONE or SOUNDS. It is also<br />
possible to access the volume settings by pressing the shift button next<br />
to the volume icon in LEARN.<br />
OPTIONS menu. See pages 82-86.<br />
Menu to select NOISE, RESPONSE or RECOVERY options or take you<br />
back to QUICKSTART mode.<br />
SETTINGS menu. See page 87.<br />
Menu to save or load user-preferred settings.<br />
66<br />
ADVANCED MODE’S MAIN MENU
THE MINELAB EXPLORER <strong>II</strong><br />
STARTING IN ADVANCED MODE<br />
Beginning Advanced use<br />
POWER<br />
P0400b<br />
To enter Advanced mode from Quickstart, press the MAIN MENU<br />
shortcut button, select OPTIONS and then ADVANCED. Then<br />
press the DETECT shortcut button to display the Advanced<br />
Smartfind screen. Pressing DETECT will switch between<br />
Smartfind, Digital, Learn and Edit displays.<br />
If you operated in Advanced mode last time you used the<br />
<strong>Explorer</strong> <strong>II</strong>, the detector will remember this. To enter the<br />
Advanced mode when first switching on, press and quickly<br />
release the POWER shortcut button.<br />
Any time you want to move from Advanced mode to Quickstart<br />
just select the MAIN MENU shortcut button, OPTIONS and then<br />
select QUICK. Pressing the DETECT shortcut button will return<br />
you to Quickstart’s Smartfind screen.<br />
Are you ready?<br />
!<br />
From this point on, it is assumed<br />
that you have familiarized yourself<br />
with the Quickstart chapter of this<br />
<strong>Manual</strong> and spent a reasonable<br />
amount of time using your<br />
<strong>Explorer</strong> <strong>II</strong>. If you have not read<br />
the Quickstart chapter, please do<br />
so before proceeding.<br />
CAUTION Restoring factory settings by pressing and<br />
holding the POWER button erases all current user settings.<br />
This does not affect user preferences and discrimination<br />
patterns that have been saved (see pages 80 and 87).<br />
Advanced target preferences<br />
The tutorials on the last few pages of Chapter 5: Quickstart<br />
provided instructions on composing your own discrimination<br />
pattern with combinations of items from the SELECT menu.<br />
Advanced mode offers numerous options to further enhance the<br />
accuracy of your detecting. To this end, the following section<br />
deals with target options in Advanced mode’s LEARN and EDIT<br />
displays before proceeding to other Menu functions.<br />
6<br />
ADVANCED USE<br />
STARTING IN ADVANCED MODE<br />
67
www.minelab.com<br />
THE MINELAB EXPLORER <strong>II</strong><br />
ADVANCED MODE’S DISPLAYS<br />
easy reference<br />
Advanced mode has four display options – SMART,<br />
DIGITAL, LEARN and EDIT. The DETECT shortcut button<br />
is used to cycle between them. Advanced mode’s SMART<br />
and DIGITAL have the same screen elements and<br />
functions as those in Quickstart. For a refresher on this,<br />
turn back to pages 40-48 of Chapter 5: Quickstart.<br />
SMART DISPLAY<br />
6<br />
LEARN DISPLAY<br />
EDIT DISPLAY<br />
ADVANCED USE<br />
68<br />
ADVANCED MODE’S DISPLAYS
THE MINELAB EXPLORER <strong>II</strong><br />
easy reference<br />
ADVANCED MODE’S LEARN DISPLAY<br />
12<br />
1<br />
2<br />
3<br />
6<br />
11<br />
10<br />
9<br />
4 5 7 8<br />
1<br />
2<br />
Accept target icon. Modifies discrimination<br />
pattern to accept a specific item – part of LEARN’s<br />
target selection, see page 73-74.<br />
Reject target icon. Modifies discrimination pattern<br />
to reject a specific item – part of LEARN’s target<br />
selection, see page 73-74.<br />
6<br />
7<br />
Discrimination pattern. The black and clear areas<br />
of the screen schematically represent the current<br />
target discrimination pattern. See pages 42–43 for<br />
basic information.<br />
Pinpoint. This shaded block indicates whether<br />
PINPOINT function is ON or OFF. See page 59.<br />
3<br />
4<br />
5<br />
Resize cursor. This allows you to manually<br />
increase or decrease the size of the area modified<br />
on the screen by LEARN’s response to a target,<br />
see page 73-74.<br />
Depth indicator. The clear portion of the depth<br />
indicator represents the approximate distance of<br />
a target below the coil. The top of the indicator<br />
represents the position of the coil and the bottom<br />
represents 12 inches (300mm) from the coil. The<br />
bar will be clear if the target is too far from the coil<br />
or its depth cannot be accurately gauged.<br />
Iron Mask. This shaded block indicates whether<br />
IRON MASK function is ON or OFF. See page 45.<br />
8<br />
9<br />
10<br />
11<br />
Target crosshair. Represents the detected<br />
object’s properties on a two-dimensional scale of<br />
discrimination. See page 42 for basic information.<br />
Save icon. This shortcut icon leads to the SAVE<br />
DISCRIM menu where the current target pattern<br />
can be saved. See page 80.<br />
Volume icon. This shortcut icon takes you to the<br />
VOLUME section of the AUDIO menu where you<br />
can adjust various volume characteristics. See<br />
page 53 for instructions.<br />
Reject All/Accept All. Allows you to switch between<br />
clearing or filling the whole screen in preparation for<br />
accepting or rejecting learnt targets only.<br />
6<br />
ADVANCED USE<br />
12<br />
Battery life. This shaded block indicates the<br />
charge remaining in the installed batteries. See<br />
page 27.<br />
69<br />
ADVANCED MODE’S LEARN DISPLAY
www.minelab.com<br />
THE MINELAB EXPLORER <strong>II</strong><br />
LEARNING TARGETS<br />
Advanced mode’s Learn option programs the <strong>Explorer</strong> <strong>II</strong> to recognize certain targets. The<br />
following pages show you how to instruct the detector to ‘learn’ a particular target and save<br />
its characteristics for later use.<br />
Figure 6.1<br />
The Learn screen<br />
Introducing Learn<br />
Figure 6.1<br />
Sometimes during your treasure hunting you may wish to instruct<br />
the <strong>Explorer</strong> <strong>II</strong> to detect targets with very specific characteristics.<br />
It may be that you have found a particular type of coin which you<br />
would like to find more of, or you find yourself constantly<br />
unearthing the same types of junk.<br />
6<br />
ADVANCED USE<br />
Silence please!<br />
!<br />
For the Learn option to work<br />
accurately, it needs to recognize<br />
the same target characteristics<br />
with each pass of the search coil.<br />
For this reason, it is essential that<br />
you use Learn in an environment<br />
free of electromagnetic<br />
disturbance. This may mean<br />
moving away from other<br />
detectorists or powerlines.<br />
It may be useful to perform a<br />
Noise Cancel before undergoing<br />
the procedure outlined in the<br />
following tutorial.<br />
<strong>Minelab</strong> has designed Learn to enable you to instruct the <strong>Explorer</strong><br />
<strong>II</strong> to accept or reject precisely the types of targets you do or do<br />
not want.<br />
Your new target patterns are treated in exactly the same way as<br />
those you have used from the SELECT target list. Once saved,<br />
they can be used by themselves or in combination with other<br />
discrimination patterns.<br />
In time, you may find this one of the <strong>Explorer</strong> <strong>II</strong>’s most powerful<br />
features. For instance, once you have saved target patterns of<br />
several unwanted targets you may exclude them all from your<br />
current Smartfind discrimination pattern simply by rejecting them<br />
from the SELECT target list. In a similar way, you could combine<br />
all of your desired targets into your own composite discrimination<br />
pattern.<br />
The following tutorial will help you to make Learn a feature of<br />
your metal detecting.<br />
NOTE Selection of Pinpoint effectively disengages the<br />
<strong>Explorer</strong> <strong>II</strong>’s Discrimination functions.<br />
70<br />
LEARNING TARGETS
THE MINELAB EXPLORER <strong>II</strong><br />
LEARN’S TARGET SELECTION<br />
tutorial!<br />
This tutorial shows you how to learn a target, make<br />
adjustments and save your selection.<br />
Phase 1: Preparation for Learn<br />
Figure 6.2 Advanced Mode’s Learn display<br />
Figure 6.3 Accept all clears the screen<br />
Figure 6.4 Reject all fills the screen<br />
STEP 1<br />
STEP 2<br />
STEP 3<br />
STEP 4<br />
STEP 5<br />
STEP 6<br />
(Figure 6.2) Go to the Advanced Learn display. It does<br />
not matter whether you were in Iron Mask or Discrim<br />
(shown in the adjacent figure).<br />
(Figure 6.3) Press the shift button next to Reject All/<br />
Accept All icon to fill in the screen. The icon changes to<br />
all clear to indicate that the next time it is pressed, the<br />
Learn screen will clear. Press the button again to clear<br />
the screen and accept all targets.<br />
While the screen is completely cleared, rest the coil and<br />
check for interference (erratic noises and random<br />
movements of the target crosshair). If you experience<br />
interference press Noise Cancel, reduce the Sensitivity,<br />
or move the detector to a different place.<br />
Check the area of ground where you would like to learn<br />
the target to make sure that there are no other targets in<br />
the ground.<br />
Press the Reject All/Accept All shift button to completely<br />
fill the screen and reject all targets.<br />
(Figure 6.4) Press the lower left hand shift button twice to<br />
change the cursor to medium size. The size of the cursor<br />
sets how ‘loosely’ the target is matched for each<br />
successive pass of the coil. Place the target on the<br />
ground and press the upper left shift button next to the<br />
Accept icon. The tick will begin to flash.<br />
Now the detector is prepared to Learn targets.<br />
6<br />
ADVANCED USE<br />
LEARN’S TARGET SELECTION<br />
71
www.minelab.com<br />
THE MINELAB EXPLORER <strong>II</strong><br />
LEARN’S TARGET SELECTION<br />
... continued<br />
tutorial!<br />
Phase 2: Learning and Saving the target pattern<br />
Figure 6.5<br />
Adjusting size of learnt region<br />
STEP 7<br />
Wave the search coil several times above the desired<br />
target until the detector learns it by clearing an area on<br />
the screen. Learn needs to ‘see’ the target consistently<br />
to accept it for inclusion. If you have more than one<br />
target, repeat the procedure for each one. In Figure 6.5,<br />
two current high denomination coins have been used.<br />
STEP 8<br />
When you have finished learning the targets, press the<br />
shift button next to the flashing tick.<br />
Figure 6.6<br />
Saving the newly-edited<br />
discrimination pattern<br />
STEP 9<br />
Press the shift button next to the Save icon to go<br />
directly to the SAVE DISCRIM menu. Press a button<br />
next to your choice of option S1–S6 (for example S1 in<br />
Figure 6.6). This will save the learnt discrimination<br />
pattern for future use.<br />
6<br />
STEP 10 Press the DETECT shortcut button to return to the<br />
detect screen. SELECT DISCRIM will then use this<br />
saved pattern as the current search pattern.<br />
NOTE For more detail on SAVE DISCRIM, turn to page 80.<br />
ADVANCED USE<br />
72<br />
LEARN’S TARGET SELECTION
THE MINELAB EXPLORER <strong>II</strong><br />
easy reference<br />
ADVANCED MODE’S EDIT DISPLAY<br />
11<br />
1<br />
2<br />
3<br />
6<br />
10<br />
3<br />
4<br />
5 7<br />
8<br />
9<br />
1<br />
2<br />
3<br />
4<br />
Target frame size. This allows you to select the<br />
size of the framed area you wish to accept or reject<br />
from the displayed discrimination pattern. There<br />
is a choice of three sizes. See pages 77-78.<br />
Reject or accept framed area. Instructs<br />
<strong>Explorer</strong> <strong>II</strong> to accept the framed area on selection<br />
of the tick icon. Selection of the cross icon will<br />
reject the framed area. This edits the current<br />
pattern. See page 78.<br />
Horizontal navigation. Pressing the shift button<br />
adjacent to these arrows moves the target frame<br />
to the left or right of screen.<br />
Depth indicator. The clear portion of the depth<br />
indicator represents the approximate distance of<br />
a target below the coil. The top of the indicator<br />
represents the position of the coil and the bottom<br />
represents 12 inches (300mm) from the coil. The<br />
bar will be clear if the target is too far from the<br />
coil or its depth cannot be accurately gauged.<br />
5<br />
6<br />
7<br />
8<br />
9<br />
10<br />
11<br />
Iron Mask. This shaded block indicates whether IRON<br />
MASK function is ON or OFF. See page 45.<br />
Discrimination pattern. The shaded and unshaded<br />
areas of the screen schematically represent the<br />
current target discrimination characteristics. See<br />
pages 42-43 for basic information.<br />
Pinpoint. This shaded block indicates whether<br />
PINPOINT function is ON or OFF. See page 59.<br />
Target Crosshair. Represents the detected object’s<br />
properties on a two-dimensional scale of<br />
discrimination. See page 42.<br />
Target frame. Any area of the screen enclosed by<br />
this frame may be excluded from or become part of<br />
your preferred target pattern.<br />
Vertical navigation. Pressing the shift buttons next<br />
to these arrows moves the target frame up or down<br />
screen.<br />
Battery life. This shaded block indicates the charge<br />
remaining in the installed batteries. See page 27.<br />
6<br />
ADVANCED USE<br />
ADVANCED MODE’S EDIT DISPLAY<br />
73
www.minelab.com<br />
THE MINELAB EXPLORER <strong>II</strong><br />
EDITING PATTERNS<br />
Edit makes it possible to customize an existing discrimination pattern to match your preferred<br />
target characteristics.<br />
Introducing Edit<br />
Figure 6.7<br />
Figure 6.7<br />
Edit screen with target frame<br />
Main Menu > Display > EDIT<br />
As described earlier in this chapter, Advanced mode’s LEARN<br />
display allows you to accept or reject a target and create your<br />
own discrimination patterns.<br />
EDIT offers a final enhancement to these targeting features,<br />
enabling you to make manual changes to any discrimination<br />
pattern.<br />
For example: Learn mode’s target selection may not provide<br />
quite the result you wanted (even when using a different-sized<br />
cursor) Rather than start all over again, you can just ‘touch up’<br />
your results. Similarly, you may find that the discrimination<br />
pattern for FOIL may need to be modified to suit your<br />
requirements.<br />
6<br />
ADVANCED USE<br />
The following tutorial outlines how to edit and then save<br />
discrimination patterns.<br />
NOTE Make sure Pinpoint is in OFF position before using<br />
EDIT to customize your discrimination pattern.<br />
74<br />
EDITING PATTERNS
EDITING AND SAVING TARGET PATTERNS<br />
THE MINELAB EXPLORER <strong>II</strong><br />
tutorial!<br />
This tutorial builds upon what has been covered in earlier<br />
target tutorials. The tutorial’s four phases outline the steps<br />
necessary to edit and save a preselected discrimination<br />
pattern.<br />
PHASE 1: Preparing for editing<br />
STEP 1<br />
Choose SELECT from the Main Menu and press the top<br />
right shift button to CLEAR the Smartfind thumbnail<br />
display.<br />
Figure 6.8<br />
Figure 6.9<br />
Select option<br />
Edit screen<br />
STEP 2<br />
STEP 3<br />
(Figure 6.8) Move down the target list and accept<br />
JEWELRY and reject FOIL to establish an initial<br />
discrimination pattern.<br />
Press the Main Menu shortcut button and select<br />
DISPLAY.<br />
Figure 6.9<br />
Edit screen with small target<br />
frame<br />
Figure 6.10 Edit screen with target crosshair<br />
and medium target frame<br />
STEP 4<br />
(Figure 6.9) Select EDIT to show the ADVANCED-EDIT<br />
screen. It is now possible to change the existing<br />
discrimination pattern.<br />
PHASE 2: Resizing and moving the target frame<br />
STEP 5<br />
STEP 6<br />
(Figure 6.10) To change the size of the target frame,<br />
press the top left shift button to switch between Edit’s<br />
three target frame sizes. (For the purposes of this<br />
tutorial, please choose the medium-sized frame).<br />
To move the target frame, press the shift buttons next to<br />
the display’s navigation arrows. Position the resized<br />
frame over the screen section you wish to edit (in the<br />
location approximated in Figure 6.10).<br />
6<br />
ADVANCED USE<br />
Continued next page...<br />
EDITING AND SAVING TARGET PATTERNS<br />
75
www.minelab.com<br />
THE MINELAB EXPLORER <strong>II</strong><br />
EDITING AND SAVING TARGETS<br />
... continued<br />
tutorial!<br />
Figure 6.11 Rejecting framed target area<br />
PHASE 3: Rejecting the framed target area<br />
STEP 7<br />
(Figure 6.11) To reject the area enclosed by the target<br />
frame, press the center left shift button once. You will<br />
note that a cross appears next to the button and the area<br />
of screen within the target frame has darkened.<br />
(Figure 6.12) It is now possible to drag the target frame<br />
to the left to increase the rejected area until it connects<br />
to the zone rejected previously.<br />
NOTE To accept the framed area, press the center left shift<br />
button until a tick appears next to the button. This instructs<br />
the <strong>Explorer</strong> <strong>II</strong> to clear the framed area.<br />
6<br />
ADVANCED USE<br />
Figure 6.12 Target frame dragged to<br />
complete discrimination pattern<br />
Figure 6.13 Saving discrimination pattern<br />
PHASE 4: Saving edited discrimination pattern<br />
STEP 8<br />
STEP 9<br />
(Figure 6.13) To save the edited discrimination pattern,<br />
press the Main Menu shortcut button and select SAVE<br />
from the displayed menu.<br />
Press the shift button corresponding to the location you<br />
want to save it (e.g. S2).<br />
STEP 10 Now you can recall your edited discrimination pattern<br />
from the SELECT target list.<br />
NOTE The last saved discrimination pattern is retained in<br />
the SELECT menu as Advanced mode’s current setting.<br />
76<br />
EDITING AND SAVING TARGET PATTERNS
THE MINELAB EXPLORER <strong>II</strong><br />
ADVANCED MODE’S SELECT MENU<br />
In Advanced mode, the <strong>Explorer</strong> <strong>II</strong> allows you to define and save your own target patterns.<br />
Figure 6.14 Two examples of Advanced<br />
mode’s Select menu<br />
Advanced mode’s Select menu<br />
Figure 6.14<br />
Main Menu > SELECT<br />
This section follows on from the Selecting Targets section of the<br />
Quickstart chapter, page 62.<br />
Advanced mode’s one distinction from Quickstart is the addition<br />
of 6 items to the SELECT target list. These six options are the<br />
memorized discrimination patterns you have selected or manually<br />
created in LEARN or EDIT. This has been described in detail in<br />
the preceding pages of this chapter and is explained further in<br />
Saving Targets on the following page.<br />
6<br />
ADVANCED USE<br />
ADVANCED MODE’S SELECT MENU<br />
77
www.minelab.com<br />
THE MINELAB EXPLORER <strong>II</strong><br />
SAVING TARGETS<br />
Advanced mode’s SAVE DISCRIM function provides a means of saving personalized<br />
discrimination patterns, it also provides a visual display of the patterns already saved.<br />
Saving targets<br />
Figure 6.15<br />
Figure 6.15. Save Discrim menu<br />
Saving Shortcut<br />
Main Menu > Save > SAVE DISCRIM (S1–S6)<br />
The SAVE menu’s SAVE DISCRIM options represent six potential<br />
places to store memorized target patterns. They will typically be<br />
selected when you want to save personalized discrimination<br />
patterns.<br />
As mentioned earlier, discrimination patterns may be created in<br />
Learn’s instant target selection, from one or more target options<br />
chosen from the SELECT menu, or from a discrimination pattern<br />
customized in EDIT.<br />
6<br />
ADVANCED USE<br />
The SAVE DISCRIM menu can<br />
also be accessed in Learn mode<br />
by pressing the shift button next<br />
to the Save icon.<br />
To copy the current discrimination pattern into the SAVE DISCRIM<br />
menu, press the shift button next to the location where you want it<br />
to be saved. This new pattern will replace the previous content.<br />
When you encounter the same detecting conditions again, it is<br />
possible to instruct the <strong>Explorer</strong> <strong>II</strong> to detect with the memorized<br />
setting (e.g. S1) by choosing from the SELECT target list as you<br />
would COINS or JEWELRY.<br />
78<br />
SAVING TARGETS
THE MINELAB EXPLORER <strong>II</strong><br />
AUDIO MENU<br />
Features accessed through the Audio menu allow you to define the audio properties of<br />
your <strong>Explorer</strong> <strong>II</strong>.<br />
The Audio menu<br />
Figure 6.16<br />
Figure 6.16 The Audio Menu<br />
Volume Shortcut<br />
Main Menu > AUDIO<br />
Details on the <strong>Explorer</strong> <strong>II</strong>’s audio response, Audio menu, settings<br />
and instructions appear in Chapter 5: Quickstart. Please refer to<br />
page 52 for information and instructions.<br />
There is no difference in the functionality of the detector’s audio<br />
between Quickstart and Advanced modes.<br />
It is also possible to access the<br />
volume menu from a shortcut on<br />
the LEARN screen. This is<br />
detailed on page 71.<br />
6<br />
ADVANCED USE<br />
AUDIO MENU<br />
79
www.minelab.com<br />
THE MINELAB EXPLORER <strong>II</strong><br />
OPTIONS MENU<br />
The Main Menu’s OPTIONS provide a selection of universal options and advanced<br />
settings.<br />
Figure 6.17 Advanced mode’s Options menu<br />
The Options menu<br />
Figure 6.17<br />
Main Menu > OPTIONS<br />
Choosing OPTIONS from the Main Menu displays 5 selections.<br />
QUICK and ADVANCED switch the detector between its two<br />
detecting modes.<br />
To move from Advanced mode to Quickstart, press the shift button<br />
next to the QUICK option. This selection will be highlighted and<br />
the Quickstart OPTIONS menu displayed. To begin detecting in<br />
Quickstart, press the DETECT shortcut button.<br />
The three remaining selections in OPTIONS allow you to adjust<br />
the detector to suit specific detecting environments. These options<br />
are explained on the following pages.<br />
6<br />
ADVANCED USE<br />
80<br />
OPTIONS MENU
THE MINELAB EXPLORER <strong>II</strong><br />
OPTIONS: NOISE<br />
Noise<br />
Figure 6.18<br />
Figure 6.18 Noise adjustment screen<br />
Main Menu > Options > NOISE<br />
Sometimes during detecting you may notice some interference in<br />
the form of erratic noises and movements of the target crosshair<br />
(even without movement of the detector). The NOISE option<br />
enables you to select an operating channel which does not clash<br />
with other detectors or electrical sources in the area. This feature<br />
is also good for metal detecting competitions if several <strong>Explorer</strong><br />
<strong>II</strong>s are working close to one another. Each detector can be set to<br />
operate on a different channel so interference between detectors<br />
is eliminated.<br />
The factory setting for NOISE is 5.<br />
Noise Shortcut<br />
NOTE It may be useful to select manual sensitivity from the<br />
Smartfind or Digital screen before attempting this procedure.<br />
Sensitivity is covered in Chapter 5: Quickstart, page 49.<br />
To adjust channel for least noise:<br />
Pressing the NOISE CANCEL<br />
shortcut button alerts the detector<br />
to automatically select the quietest<br />
operating channel. Allow 30<br />
seconds and keep the search coil<br />
immobile and clear of targets.<br />
STEP 1<br />
STEP 2<br />
Rest detector on the ground. Make sure the detector is not<br />
moved and the area is clear of targets.<br />
Use the shift buttons next to the adjust arrows to select a<br />
channel and listen for interference (or ‘noise’). Adjust the<br />
detector to a new channel and listen again. Do this with<br />
each channel in turn until you locate the channel with the<br />
least noise.<br />
NOTE The number associated with Noise does not denote an<br />
increase or decrease in power. It is simply a channel number<br />
which can be remembered.<br />
6<br />
ADVANCED USE<br />
OPTIONS: NOISE<br />
81
www.minelab.com<br />
THE MINELAB EXPLORER <strong>II</strong><br />
OPTIONS: RESPONSE<br />
Introducing Response<br />
Figure 6.19<br />
Main Menu > Options > RESPONSE<br />
Figure 6.19 Response menu<br />
The relationship between proximity of targets to one another and<br />
detector response can influence its performance. The<br />
RESPONSE option allows you to select the way the detector<br />
responds to targets and change the way targets sound upon<br />
detection. Response can affect your ability to identify certain<br />
targets in differing circumstances.<br />
Normal<br />
This is the factory preset of the detector in Quickstart and<br />
Advanced modes. Only Advanced mode provides alternative<br />
audio options to Normal. Normal emits a short response to targets<br />
(almost a 'beep') and is recommended for general detecting<br />
conditions. However, it should be noted that Normal has the<br />
potential to miss small targets in areas littered with objects<br />
producing a target response.<br />
6<br />
ADVANCED USE<br />
Audio 1<br />
This setting is ideal for responding to several targets close<br />
together. Audio 1 offers an almost continuous audio response.<br />
It is recommended for the experienced user who can pick the<br />
differences in tone between various targets. This setting should<br />
be used in combination with display responses. It will help if you<br />
sweep the search coil in different directions to separate the<br />
targets. The tone can be more confusing for the beginner, but it<br />
has the potential to offer greater accuracy and depth.<br />
82<br />
OPTIONS: RESPONSE
THE MINELAB EXPLORER <strong>II</strong><br />
Audio 2<br />
This setting is similar to Audio 1, with the addition of some<br />
filtering of the audio tone response. Audio 2 reduces the<br />
variability of the pitch, offering a smoother continuous sound.<br />
Audio 3<br />
This setting is similar to Audio 2, with increased filtering of the<br />
audio tone response. This offers more consistent tone for a single<br />
target, but for multiple targets the tones will ‘blend’.<br />
NOTE It is recommended you experiment with these settings<br />
once you are familiar with the sounds produced by the<br />
<strong>Explorer</strong> <strong>II</strong> in the Normal Response setting, then choose<br />
according to conditions and preference.<br />
6<br />
ADVANCED USE<br />
OPTIONS : RESPONSE<br />
83
www.minelab.com<br />
THE MINELAB EXPLORER <strong>II</strong><br />
OPTIONS: RECOVERY<br />
Introducing Recovery<br />
Figure 6.20<br />
Figure 6.20 Recovery menu<br />
Main Menu > Options > RECOVERY<br />
This menu allows you to modify the way the discrimination<br />
process works. Recovery settings affect both the detector’s audio<br />
and display response to target characteristics.<br />
Fast<br />
By selecting this setting, the detector will react faster to the<br />
signals received, but the discrimination may be slightly less<br />
accurate. Use Fast in areas littered with objects, where a desired<br />
target could be hiding next to unwanted objects.<br />
6<br />
Deep<br />
This setting affects only weak target signals and enhances them<br />
to allow identification of deep targets. This setting should be<br />
selected in relatively uncluttered areas where deep targets are<br />
anticipated. Strong signals are unaffected.<br />
ADVANCED USE<br />
84<br />
OPTIONS: RECOVERY
THE MINELAB EXPLORER <strong>II</strong><br />
SETTINGS MENU<br />
The Settings menu provides the advanced user the opportunity to save all user preferred<br />
settings as an alternative to preprogrammed <strong>Explorer</strong> <strong>II</strong> settings.<br />
Introducing the Settings menu<br />
Figure 6.21<br />
Figure 6.21 Settings menu<br />
Main Menu > Options > SETTINGS<br />
Once you have selected and modified the detector’s operational<br />
settings (as detailed in Chapters 5 and 6) it is possible to save<br />
them to the <strong>Explorer</strong> <strong>II</strong>’s memory for future detecting sessions.<br />
Advanced mode allows you to save and load two different<br />
settings (in addition to the factory presets). It may be that two<br />
people with different preferences use the detector (e.g. different<br />
volume, tone, sensitivity settings) or perhaps you divide your time<br />
between a couple of very different detecting environments (e.g.<br />
the beach and a highly-mineralized battlefield). The <strong>Explorer</strong> <strong>II</strong>’s<br />
Settings feature makes it easy to save rather than going through<br />
the whole fine-tuning process again.<br />
Saving and loading a setting<br />
For example, to save your current detector settings, press the<br />
shift button next to USER A or USER B on the right side of the<br />
screen. A screen prompt will appear asking if you want to save<br />
current settings in the memory. Select YES.<br />
You can now proceed to detect with this setting knowing it has<br />
been saved for future use in similar conditions. On the next<br />
occasion you wish to use these preferred settings you can load<br />
by choosing SETTINGS from the Options menu and pressing<br />
the shift button next to the USER A or USER B option on the left<br />
side of the screen.<br />
6<br />
ADVANCED USE<br />
(Continued next page)<br />
SETTINGS MENU<br />
85
www.minelab.com<br />
THE MINELAB EXPLORER <strong>II</strong><br />
Get into the habit.<br />
As mentioned earlier in this<br />
<strong>Manual</strong>, starting in factory preset<br />
discards all unsaved adjustments.<br />
To prevent this happening when<br />
you have gone to the effort of<br />
adjusting the <strong>Explorer</strong> <strong>II</strong> to suit<br />
your own needs, it is worth<br />
saving for a future detecting<br />
session.<br />
The USER A or USER B option will<br />
save all of your preferences. This<br />
will provide you with two sets of<br />
memorized settings which you<br />
can use at any time.<br />
A screen prompt will appear asking if you want to discard your<br />
current detector settings and load the memorized setting. Select<br />
YES (settings will load in about 5 seconds).<br />
NOTE A table of <strong>Explorer</strong> <strong>II</strong> functions with a range of values<br />
and factory presets is provided in Chapter 7: User Info (page<br />
93-94). This table is designed to be used for recording your<br />
saved preferences. You may wish to make photocopies of<br />
this blank table for future changes.<br />
You should now be familiar with all aspects of your <strong>Explorer</strong><br />
<strong>II</strong> detector. For helpful hints, user guides,<br />
technical details and other valuable user information<br />
(like the Glossary), refer to Chapter 7: User Info.<br />
"<br />
6<br />
ADVANCED USE<br />
86<br />
SETTINGS MENU
THE MINELAB EXPLORER <strong>II</strong><br />
7<br />
User Info<br />
This chapter provides a glossary of<br />
terminology, user guides, technical<br />
specifications, warranty and repair<br />
details and troubleshooting tips.<br />
7<br />
USER INFO<br />
87
www.minelab.com<br />
THE MINELAB EXPLORER <strong>II</strong><br />
HELPFUL HINTS<br />
user tips<br />
These tips are provided to enhance your personal use of the <strong>Explorer</strong> <strong>II</strong>. They are intended<br />
to work together with the information and instructions appearing elsewhere in the manual.<br />
Batteries<br />
It is normal for the tip of the rechargeable battery to get warm<br />
while charging because the current regulator is mounted inside<br />
the battery pack.<br />
Using headphones extends battery life. The speaker draws<br />
significant current from the battery for short amounts of time.<br />
Using the headphones when the battery voltage is low (when the<br />
battery indicator’s level starts decreasing) helps in getting the<br />
most out of the battery.<br />
7<br />
USER INFO<br />
Noise Cancel<br />
Clearing saved patterns<br />
It is best if you perform a Noise Cancel with the search coil in the<br />
position used for detection. This is because the interference<br />
picked up in a vertical position can be different from the<br />
interference picked up in the horizontal orientation.<br />
In competitions, where several <strong>Explorer</strong> <strong>II</strong>s have to work nearby, it<br />
might be best to select the channels manually.<br />
If you want to know what channel has been chosen by the<br />
detector after a Noise Cancel, go into the Advanced mode in Main<br />
Menu > Options > NOISE and look at the number displayed. If you<br />
do a Noise Cancel while in that menu, you have to go out of the<br />
menu and back to get the new channel number.<br />
If you want to clear one or more patterns from the SAVE DISCRIM<br />
menu, do the following:<br />
STEP 1 Go to SELECT menu and select CLEAR.<br />
STEP 2 Go to the SAVE menu and save cleared screen into the<br />
locations you want.<br />
88<br />
HELPFUL HINTS
THE MINELAB EXPLORER <strong>II</strong><br />
Choosing the right Tone<br />
Make sure that you start with the Main Menu > Audio > Sounds ><br />
CONDUCT selected and the threshold level and the volume are<br />
appropriate for your environment (i.e. for headphones or speaker<br />
use, ambient noise etc.)<br />
STEP 1 Adjust the threshold 'hum' to a tone you are comfortable with<br />
using the Main Menu > Audio > Tone > TH. TONE. This tone<br />
should be the lowest tone you can still hear clearly.<br />
STEP 2 Using two targets you are likely to often seek which<br />
display a difference of 1 or 2 on the digital reading, adjust<br />
Main Menu > Audio > Tone > Variability so you can hear<br />
the difference between one and the other.<br />
STEP 3 Select a target with high conductivity (giving a high<br />
number on the digital display) and wave it past the coil.<br />
Adjust Main Menu > Audio > Tone > Limits for a pitch as high<br />
as possible but still within the range where you can hear well.<br />
Setting your own reject<br />
target patterns<br />
If you want the detector to reject targets (for example to make a<br />
new pattern for bottle caps, suitable for your conditions):<br />
STEP 1 Prepare a number of targets from the category you want<br />
to reject (bottle caps).<br />
STEP 2 Go to Advanced Learn and start with an all black screen.<br />
STEP 3 Select Learn Accept (the flashing tick) and pass the coil<br />
over the bottle caps until the detector accepts them.<br />
STEP 4 Go to SAVE (press the shift button next to the SAVE icon)<br />
and save to the location you want (e.g. S4). The Smartfind<br />
thumbnail will display your pattern.<br />
Now that this pattern has been saved, you can use it to construct<br />
your own discrimination pattern by:<br />
• Going to SELECT menu and choosing CLEAR. For instance,<br />
construct this personal discrimination pattern by accepting<br />
coins with a tick and rejecting your newly learnt bottlecaps<br />
pattern (S4) with a cross.<br />
• If you want to improve the pattern, use Advanced Edit to<br />
modify the clear (accepted) area.<br />
HELPFUL HINTS<br />
89<br />
7<br />
USER INFO
www.minelab.com<br />
THE MINELAB EXPLORER <strong>II</strong><br />
BATTERY PERFORMANCE COMPARISONS<br />
The average life-span for both good quality alkaline and NiMH rechargeable batteries<br />
under constant use is compared on the graph below. This graph assumes the backlight<br />
is turned off and headphones are being used.<br />
Leading Alkaline<br />
7<br />
USER INFO<br />
Note: The backlight adds about 8% to the current consumption of the detector.<br />
90<br />
BATTERY PERFORMANCE COMPARISONS
THE MINELAB EXPLORER <strong>II</strong><br />
USER PREFERENCES<br />
SETTING RANGE<br />
FACTORY PRESET USER A USER B<br />
Detector mode<br />
Sensitivity function<br />
Sensitivity value<br />
Threshold<br />
Discrimination function<br />
Iron Mask value<br />
Noise channel*<br />
Display type<br />
Display size<br />
Display contrast<br />
Learn cursor size<br />
Edit frame size<br />
Audio Volume Max. limit<br />
Audio Volume Gain<br />
Audio Th. Tone Lowest<br />
Audio Tone Variability<br />
Audio Tone Limits<br />
Audio Sounds<br />
Options Response<br />
Options Recovery Fast<br />
Options Recovery Deep<br />
Quickstart, Advanced<br />
Semi-auto, <strong>Manual</strong><br />
1–32<br />
0–40<br />
Iron Mask, Discrim<br />
-16–0<br />
1–11<br />
Smart, Digital,<br />
Learn (Adv.), Edit (Adv.)<br />
Normal, Full screen<br />
1–10<br />
Small, Medium, Large<br />
Small, Medium, Large<br />
0–10<br />
1–10<br />
1–10<br />
1–10<br />
1–10<br />
Const, Conduct, Ferrous<br />
Normal, Audio 1,<br />
Audio 2, Audio 3<br />
On, Off<br />
On, Off<br />
Quickstart<br />
Semi-auto<br />
16<br />
20<br />
Discrim<br />
-6<br />
5<br />
Smart<br />
Normal<br />
5<br />
Large<br />
Small<br />
10<br />
5<br />
5<br />
8<br />
10<br />
Conduct<br />
Normal<br />
Off<br />
Off<br />
7<br />
<strong>Minelab</strong> suggests that you record your preferences using a pencil, or make photocopies of this<br />
table.<br />
USER INFO<br />
*Noise channel is selected automatically by the Noise Cancel shortcut button or manually through Main Menu > Options<br />
> NOISE selection. • This option cannot be saved into User A or User B. Selections not saved: Backlight status,<br />
Pinpoint.<br />
USER PREFERENCES<br />
91
7<br />
www.minelab.com<br />
THE MINELAB EXPLORER <strong>II</strong><br />
USER PREFERENCES<br />
SETTING RANGE<br />
FACTORY PRESET USER A USER B<br />
Detector mode<br />
Sensitivity function<br />
Sensitivity value<br />
Threshold<br />
Discrimination function<br />
Iron Mask value<br />
Noise channel*<br />
Display type<br />
Display size<br />
Display contrast<br />
Learn cursor size<br />
Edit frame size<br />
Audio Volume Max. limit<br />
Audio Volume Gain<br />
Audio Th. Tone Lowest<br />
Audio Tone Variability<br />
Audio Tone Limits<br />
Audio Sounds<br />
Options Response<br />
Options Recovery Fast<br />
Options Recovery Deep<br />
Quickstart, Advanced<br />
Semi-auto, <strong>Manual</strong><br />
1–32<br />
0–40<br />
Iron Mask, Discrim<br />
-16–0<br />
1–11<br />
Smart, Digital,<br />
Learn (Adv.), Edit (Adv.)<br />
Normal, Full screen<br />
1–10<br />
Small, Medium, Large<br />
Small, Medium, Large<br />
0–10<br />
1–10<br />
1–10<br />
1–10<br />
1–10<br />
Const, Conduct, Ferrous<br />
Normal, Audio 1,<br />
Audio 2, Audio 3<br />
On, Off<br />
On, Off<br />
Quickstart<br />
Semi-auto<br />
16<br />
20<br />
Discrim<br />
-6<br />
5<br />
Smart<br />
Normal<br />
5<br />
Large<br />
Small<br />
10<br />
5<br />
5<br />
8<br />
10<br />
Conduct<br />
Normal<br />
Off<br />
Off<br />
USER INFO<br />
<strong>Minelab</strong> suggests that you record your preferences using a pencil, or make photocopies of this<br />
table.<br />
92<br />
*Noise channel is selected automatically by the Noise Cancel shortcut button or manually through Main Menu > Options<br />
> NOISE selection. • This option cannot be saved into User A or User B. Selections not saved: Backlight status,<br />
Pinpoint.<br />
USER PREFERENCES
THE MINELAB EXPLORER <strong>II</strong><br />
CONTROL PANEL BUTTON FUNCTIONS<br />
MAIN MENU<br />
QUICKSTART<br />
MODE<br />
IRON MASK<br />
ADVANCED<br />
MODE<br />
7<br />
PINPOINT<br />
USER INFO<br />
CONTROL PANEL BUTTON FUNCTIONS<br />
93
www.minelab.com<br />
THE MINELAB EXPLORER <strong>II</strong><br />
QUICKSTART MENU STRUCTURE<br />
7<br />
USER INFO<br />
94<br />
QUICKSTART MENU STRUCTURE
THE MINELAB EXPLORER <strong>II</strong><br />
ADVANCED MENU STRUCTURE<br />
7<br />
USER INFO<br />
ADVANCED MENU STRUCTURE<br />
95
www.minelab.com<br />
THE MINELAB EXPLORER <strong>II</strong><br />
TROUBLESHOOTING<br />
FAULT SOLUTION<br />
Detector does not start<br />
at all<br />
Detector starts, but it<br />
switches off by itself<br />
No sound<br />
• Check the state of the batteries and battery connections.<br />
• Ensure battery pack lid is completely closed.<br />
• If using alkaline batteries, check whether they have been loaded in the<br />
right polarity and correct if necessary.<br />
• Check the state of the batteries. If necessary, try starting with batteries<br />
known to be in good condition.<br />
• Detector may be too hot. Allow detector to cool down in a shaded area.<br />
• Try starting the detector with search coil disconnected. If the detector<br />
starts normally, check the state of the coil cable. If it is damaged, replace<br />
the coil. Otherwise return detector for repairs.<br />
• Unplug the headphones. If there is sound in the speaker but not in the<br />
headphones, check the headphones and their connection.<br />
• Check the AUDIO menu’s Max Limit (a setting of 0 is silent).<br />
• If there is no sound in the speaker or the headphones but the detector<br />
appears to work normally otherwise, return the detector for repairs.<br />
7<br />
USER INFO<br />
Erratic Noises<br />
No Target Response<br />
• Press the NOISE CANCEL shortcut button or manually select a quiet<br />
channel in the Advanced Main Menu > Options > NOISE.<br />
• Reduce the Sensitivity.<br />
• Change the orientation of the coil to the vertical plane and rotate to see if<br />
there is a position where the noise is reduced. If this is the case, it means<br />
that there is a source of interference nearby which must be avoided.<br />
• Check battery charge and battery connections.<br />
• Ensure coil connector is tightened firmly.<br />
• Check headphones and their connection.<br />
• Check for sand or grit between coil cover and coil.<br />
• Ensure the detector is turned on.<br />
• Check headphones and their connection.<br />
• Check coil connection.<br />
• Check discrimination level. No signal will be given if target is within black<br />
area of screen.<br />
96<br />
TROUBLESHOOTING
THE MINELAB EXPLORER <strong>II</strong><br />
SERVICE REPAIR FORM<br />
Today’s Date ___________________________________________________________________________<br />
______________________________________________________________________________________<br />
Detector Model _______________________ Serial No. ________________________________________<br />
Purchased From ________________________________________________________________________<br />
Purchase Date __________________________________________________________________________<br />
Faulty Part(s): __________________________________________________________________________<br />
______________________________________________________________________________________<br />
Description of Fault: _____________________________________________________________________<br />
______________________________________________________________________________________<br />
______________________________________________________________________________________<br />
______________________________________________________________________________________<br />
______________________________________________________________________________________<br />
If necessary, use the space provided overleaf to continue your description of the fault.<br />
Owner’s Name __________________________________________________________________________<br />
Address _______________________________________________________________________________<br />
______________________________________________________________________________________<br />
______________________________________________________________________________________<br />
7<br />
Phone Day ( ) ______________________ Home ( ) _______________________________________<br />
USER INFO<br />
Fax (<br />
) ____________________________ Email ____________________________________________<br />
97<br />
SERVICE REPAIR FORM
www.minelab.com<br />
THE MINELAB EXPLORER <strong>II</strong><br />
SERVICE REPAIR FORM<br />
Description of Fault: _____________________________________________________________________<br />
______________________________________________________________________________________<br />
______________________________________________________________________________________<br />
______________________________________________________________________________________<br />
______________________________________________________________________________________<br />
______________________________________________________________________________________<br />
______________________________________________________________________________________<br />
______________________________________________________________________________________<br />
______________________________________________________________________________________<br />
______________________________________________________________________________________<br />
______________________________________________________________________________________<br />
______________________________________________________________________________________<br />
______________________________________________________________________________________<br />
______________________________________________________________________________________<br />
______________________________________________________________________________________<br />
7<br />
______________________________________________________________________________________<br />
______________________________________________________________________________________<br />
USER INFO<br />
______________________________________________________________________________________<br />
______________________________________________________________________________________<br />
______________________________________________________________________________________<br />
98<br />
SERVICE REPAIR FORM
THE MINELAB EXPLORER <strong>II</strong><br />
WARRANTY<br />
Repairs<br />
In the unfortunate circumstance<br />
that the detector needs to be<br />
returned to <strong>Minelab</strong> for service,<br />
please fill out the <strong>Minelab</strong> Service<br />
Repair Form (or a photocopy of<br />
the same) and enclose<br />
it with the detector.<br />
Please supply as much detail<br />
about the fault as possible. This<br />
will assist our service engineers<br />
to rectify the problem<br />
quickly and efficiently.<br />
There is a two-year parts and labour warranty for the electronic<br />
control box of the <strong>Explorer</strong> <strong>II</strong>. The search coil has a one year<br />
parts and labour warranty. Refer to the supplier or <strong>Minelab</strong> for<br />
service, either in or out of warranty. The <strong>Minelab</strong> warranty does<br />
not cover damage caused by accident, misuse, neglect,<br />
alteration, modifications, or unauthorized service.<br />
For specific details of the <strong>Minelab</strong> warranty, please refer to the<br />
detector’s ‘Product Warranty Card’.<br />
NOTE This warranty is not transferable, nor is it valid unless<br />
the enclosed warranty registration card is returned to<br />
<strong>Minelab</strong> or your <strong>Minelab</strong> dealer within 14 days of the original<br />
purchase.<br />
7<br />
USER INFO<br />
99<br />
WARRANTY
www.minelab.com<br />
THE MINELAB EXPLORER <strong>II</strong><br />
TECHNICAL SPECIFICATIONS FOR THE MINELAB EXPLORER <strong>II</strong><br />
EXPLOPLORER <strong>II</strong><br />
Length unextended<br />
43 inches (1100mm)<br />
Length extended<br />
55 inches (1358mm)<br />
Shipping weight<br />
3 lb 7 oz (1700g) excluding batteries<br />
Coil<br />
10.5 inches (264mm). “Double D” waterproof<br />
Audio inputs<br />
Internal speaker and headphones<br />
Headphone input inch (6.3mm) 100Ω stereo jack<br />
1<br />
4<br />
P0591-A<br />
7<br />
Transmission<br />
Ground rejection<br />
Discrimination<br />
Visual display<br />
Full Band Spectrum. Simultaneous 28 frequency transmission<br />
ranging from 1.5kHz –100kHz<br />
Ground compensation – advanced digital filtering<br />
Smartfind Two-Dimensional Discrimination<br />
64 x 128 pixel liquid crystal display (LCD) control panel<br />
USER INFO<br />
Batteries<br />
(Available options)<br />
Optional accessories<br />
12V Alkaline (8 x 1.5 AA cells not included)<br />
1600 or 1800 mAh NiMH sealed battery pack<br />
Alkaline and NiMH battery pack, mains and car charger,<br />
8” Coil, Control Box Cover, Coil Cover<br />
100<br />
Patents US 4890064, US 5537041, US 5506506<br />
TECHNICAL SPECIFICATIONS FOR THE MINELAB EXPLORER
THE MINELAB EXPLORER <strong>II</strong><br />
EXPLORER <strong>II</strong> MODEL<br />
USER FUNCTIONS (SOFTWARE)<br />
Custom select discrimination<br />
Yes<br />
Saved Discrim patterns 6<br />
Learn Function (accept/reject)<br />
Edit function targets<br />
Auto Noise Cancel (scanning)<br />
<strong>Manual</strong> Noise Cancel<br />
User saved settings (audio, tones, etc)<br />
Yes<br />
Yes<br />
Yes<br />
Yes<br />
Current, User A, User B<br />
Response Normal, Audio 1,2,3<br />
Recovery<br />
Selectable (Fast & Deep)<br />
7<br />
USER INFO<br />
EXPLORER MODEL FEATURES<br />
101
www.minelab.com<br />
THE MINELAB EXPLORER <strong>II</strong><br />
GLOSSARY OF TERMS<br />
7<br />
Advanced mode<br />
Alloy<br />
Camlock<br />
Conductivity<br />
Control box<br />
Control panel<br />
Digital<br />
Discrimination<br />
The <strong>Explorer</strong> <strong>II</strong>’s advanced operating mode. Advanced mode<br />
provides additional features and options to Quickstart.<br />
A substance which is composed of two or more metals<br />
(an alloy may also include non-metals).<br />
Lever which releases or locks detector’s assembly components.<br />
The <strong>Explorer</strong> <strong>II</strong>’s upper and lower shafts are held together by the<br />
shaft camlock. This shaft assembly is fixed to the control box by<br />
the control box camlock.<br />
A measure of the ability of a target to allow eddy currents induced<br />
by the transmitter.<br />
Encloses the electronic components necessary to generate and<br />
interpret signals transmitted from the search coil and provide user<br />
access to functions via the control panel.<br />
This panel, which is the front of the control box, houses the<br />
display screen and provides press-button access to all of the<br />
detector’s operating functions.<br />
One of <strong>Explorer</strong> <strong>II</strong>’s displays. Digital rates an object’s conductivity<br />
and ferric content as a figure between 0 and 31. Digital also<br />
displays an icon representing the possible target.<br />
The ability of a metal detector to identify the user’s desired target<br />
and eliminate signals from undesirable material. The <strong>Explorer</strong> <strong>II</strong><br />
can be programmed to discriminate against unwanted targets in<br />
either Iron Mask or Discrim.<br />
USER INFO<br />
102<br />
GLOSSARY OF TERMS
THE MINELAB EXPLORER <strong>II</strong><br />
GLOSSARY OF TERMS<br />
Discrimination pattern<br />
Edit<br />
Ferrous<br />
Full Band Spectrum (FBS)<br />
Full screen<br />
A two-dimensional pattern made up of shaded and clear regions<br />
of the Smartfind screen. Characteristics of a target are used to<br />
determine its position on a two-dimensional display. A<br />
discrimination pattern is typically a target pattern modified by the<br />
user to accept or reject certain objects through the use of<br />
combined targets from the SELECT menu or created in Advanced<br />
mode’s LEARN or EDIT displays.<br />
One of <strong>Explorer</strong> <strong>II</strong>’s Advanced displays. Edit allows the user to<br />
customize an existing discrimination pattern to match preferred<br />
target characteristics.<br />
Composed of or containing iron. A ferrous object is one that is<br />
predominantly or completely iron. Ferrous objects (e.g. nails) are<br />
usually not desired by the detectorist.<br />
Simultaneous 28 frequency transmission ranging from 1.5kHz to<br />
100 kHz. This range in frequencies means that the signal<br />
received from the detector coil is analyzed from a wide range of<br />
responses.<br />
Target details shown on the full screen with display border and<br />
the other screen elements removed. An icon at the center right of<br />
screen switches to full screen display.<br />
Ground compensation<br />
Handle assembly<br />
Inductance<br />
The ability of the detector to compensate for the effects of ground<br />
mineralization.<br />
Part of the detector made up of the control box, handle and<br />
armrest.<br />
The electrical property of a metal target to oppose variations of<br />
the magnetic field. This characteristic is referred to as ferrous<br />
content in Smartfind.<br />
7<br />
USER INFO<br />
GLOSSARY OF TERMS<br />
103
www.minelab.com<br />
THE MINELAB EXPLORER <strong>II</strong><br />
GLOSSARY OF TERMS<br />
7<br />
Iron Mask<br />
Learn<br />
Mineralized ground<br />
Nickel Metal Hydride (NiMH)<br />
Non-ferrous<br />
Pinpoint<br />
Quickstart mode<br />
Recovery<br />
One of the <strong>Explorer</strong> <strong>II</strong>’s Smartfind displays. The Iron Mask<br />
function rejects objects with ferrous properties. This level of<br />
ferrous rejection is represented with a dark ‘curtain’ which moves<br />
across the horizontal dimension of the Smartfind screen as the<br />
Iron Mask is adjusted.<br />
One of <strong>Explorer</strong> <strong>II</strong>’s Advanced displays. Learn allows the user to<br />
accept or reject certain targets to create a personalized<br />
discrimination pattern.<br />
Ground containing certain minerals which can cause false signals<br />
to be given. Mineralized ground is handled automatically by the<br />
<strong>Explorer</strong>’s ground compensation.<br />
Nickel Metal Hydride batteries are the modern equivalent of older<br />
NiCad (Nickel Cadmium) batteries. NiMH batteries have a longer<br />
life-span and are not affected by memory to the same degree.<br />
Not containing iron. Non-ferrous objects or non-magnetic metals<br />
(such as silver or copper coins, gold jewelry, etc).<br />
Function allowing an object to be precisely located. Pinpoint<br />
overrides the automatic motion detection and discrimination<br />
settings of the <strong>Explorer</strong> <strong>II</strong>.<br />
The <strong>Explorer</strong> <strong>II</strong>’s basic operating mode.<br />
Recovery, one of the <strong>Explorer</strong> <strong>II</strong>’s Advanced options, allows the<br />
user to modify the way the discrimination process works and<br />
affects the audio and display responses to target characteristics.<br />
USER INFO<br />
Response<br />
The signal or audible indication of a target. Also a menu affecting<br />
the audio response of the detector.<br />
104<br />
GLOSSARY OF TERMS<br />
Search coil<br />
The search coil is the circular plate swept across the ground<br />
surface during detecting. It transmits electromagnetic signals into<br />
the ground and receives the response.
THE MINELAB EXPLORER <strong>II</strong><br />
GLOSSARY OF TERMS<br />
Sensitivity<br />
Shaft assembly<br />
Shift buttons<br />
The detector’s level of response to a target in the presence of<br />
ground noise and/or electromagnetic disturbance.<br />
An adjustable assembly made up of the upper and lower shaft<br />
connected by camlocks. The shaft assembly connects the search<br />
coil to the handle assembly.<br />
The three buttons at either side of the display screen are called<br />
shift buttons. They allow selection of adjacent menu items,<br />
movement of screen slider controls and adjustment of settings.<br />
Shortcut buttons<br />
Slider control<br />
Smartfind<br />
Threshold (hum)<br />
Black buttons on the control panel which offer quick access to the<br />
functions and settings most likely to be used during detector<br />
operation. Noise Cancel, Iron Mask, Pinpoint and Detect are all<br />
shortcut buttons.<br />
Visual representation of setting adjustments for a particular<br />
function (e.g. screen contrast). Settings may be adjusted with<br />
shift buttons at either side of the display screen.<br />
One of the <strong>Explorer</strong> <strong>II</strong>’s displays. Smartfind visually represents<br />
target details using two-dimensional discrimination.<br />
The audible level of sound emitted when no target is detected is<br />
the threshold. This threshold hum is the background sound made<br />
as the <strong>Explorer</strong> <strong>II</strong> operates. Threshold can be set anywhere<br />
between no sound (silent) and loud.<br />
7<br />
USER INFO<br />
GLOSSARY OF TERMS<br />
105
www.minelab.com<br />
THE MINELAB EXPLORER <strong>II</strong><br />
take care<br />
The <strong>Explorer</strong> <strong>II</strong> is a high-quality electronic instrument, finely engineered and<br />
packaged in a durable housing. Taking proper care of the detector is mostly common<br />
sense.<br />
DETECTOR CARE AND SAFETY<br />
• Do not leave the battery pack in the <strong>Explorer</strong> <strong>II</strong> handle when the detector is not in use for<br />
extended periods of time. Damage caused by leaking batteries could be severe and would<br />
void the warranty through user negligence.<br />
• If temperatures are very high, do not leave the detector in excessive heat for longer than<br />
necessary. Covering it when not in use will help protect it. Try to avoid leaving it in a closed car<br />
trunk or in a car sitting in sunlight.<br />
• The control box has been designed to resist moisture. However, <strong>Minelab</strong> advises protecting the<br />
control box in extreme conditions. Obviously the control box should not be dropped into water.<br />
• Never allow the detector to come into contact with gasoline or other petroleum-based<br />
liquids.<br />
• Keep the detector clean and dry and avoid getting sand and grit into the shafts or fastenings<br />
(e.g. yoke bolt and camlocks). Do not use solvents to clean the detector. Use a damp cloth with<br />
mild soap detergent.<br />
• Ensure the coil cable is in good condition and not subject to undue stress.<br />
• Search coil. The <strong>Explorer</strong> coil is not interchangeable with any previous <strong>Minelab</strong> model.<br />
7<br />
• Flat or faulty batteries cause many detector problems. Ensure that only quality alkaline<br />
batteries are used, and that they are replaced when you hear the warning signal through the<br />
headphones or speaker.<br />
USER INFO<br />
• Do not dispose of battery pack in fire (contact local authorities for disposal/recycling).<br />
Do not attempt to disassemble or short circuit the battery pack.<br />
• Take precautions when transporting or storing the detector. Although the detector is<br />
constructed from the highest quality materials and has undergone rigorous durability tests, the<br />
display screen could be prone to scratching or serious damage if not treated with due care.<br />
106<br />
DETECTOR CARE AND SAFETY