OWNER'S MANUAL - Kellyco Metal Detectors
OWNER'S MANUAL - Kellyco Metal Detectors
OWNER'S MANUAL - Kellyco Metal Detectors

You also want an ePaper? Increase the reach of your titles
YUMPU automatically turns print PDFs into web optimized ePapers that Google loves.
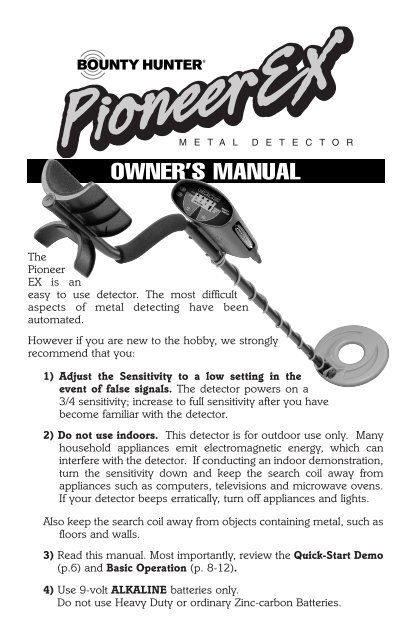
OWNER’S <strong>MANUAL</strong><br />
The<br />
Pioneer<br />
EX is an<br />
easy to use detector. The most difficult<br />
aspects of metal detecting have been<br />
automated.<br />
However if you are new to the hobby, we strongly<br />
recommend that you:<br />
1) Adjust the Sensitivity to a low setting in the<br />
event of false signals. The detector powers on a<br />
3/4 sensitivity; increase to full sensitivity after you have<br />
become familiar with the detector.<br />
2) Do not use indoors. This detector is for outdoor use only. Many<br />
household appliances emit electromagnetic energy, which can<br />
interfere with the detector. If conducting an indoor demonstration,<br />
turn the sensitivity down and keep the search coil away from<br />
appliances such as computers, televisions and microwave ovens.<br />
If your detector beeps erratically, turn off appliances and lights.<br />
Also keep the search coil away from objects containing metal, such as<br />
floors and walls.<br />
3) Read this manual. Most importantly, review the Quick-Start Demo<br />
(p.6) and Basic Operation (p. 8-12).<br />
4) Use 9-volt ALKALINE batteries only.<br />
Do not use Heavy Duty or ordinary Zinc-carbon Batteries.
TABLE OF CONTENTS<br />
2<br />
Terminology . . . . . . . . . . . . . . . . . . . . . . . . . . . .3<br />
Assembly . . . . . . . . . . . . . . . . . . . . . . . . . . . . . .4<br />
Batteries . . . . . . . . . . . . . . . . . . . . . . . . . . . . . . .5<br />
Quick-Start Demo . . . . . . . . . . . . . . . . . . . . . .6-7<br />
Basic Operation<br />
Powering Up . . . . . . . . . . . . . . . . . . . . . . . .8<br />
The Display . . . . . . . . . . . . . . . . . . . . . .8-10<br />
Operating Controls . . . . . . . . . . . . . . . . . . . . . .11<br />
Environmental Conditions . . . . . . . . . . . . . . . .12<br />
Audio Target Identification . . . . . . . . . . . . . . .13<br />
Depth Select (Sensitivity Adjustment) . . . . . . .14<br />
In The Field Techniques . . . . . . . . . . . . . . .15-17<br />
Trouble Shooting . . . . . . . . . . . . . . . . . . . . . . .18<br />
<strong>Metal</strong> Detecting Applications . . . . . . . . . . . . . .19<br />
Treasure Hunter’s Code of Ethics . . . .Back Cover<br />
Warranty . . . . . . . . . . . . . . . . . . . . . . .Back Cover<br />
The BOUNTY HUNTER PIONEER series of metal detectors is not<br />
associated or connected in any way with Pioneer Corporation or its<br />
PIONEER brand audio and video products or other products.
TERMINOLOGY<br />
The following terms are used throughout the manual, and are standard<br />
terminology among detectorists.<br />
ELIMINATION<br />
Reference to a metal being "eliminated" means that the detector will<br />
not emit a tone, nor light up an indicator, when a specified object<br />
passes through the coil’s detection field.<br />
DISCRIMINATION<br />
When the detector emits different tones for different types of metals,<br />
and when the detector "eliminates" certain metals, we refer to this<br />
as the detector "discriminating" among different types of metals.<br />
Discrimination is an important feature of professional metal<br />
detectors. Discrimination allows the user to ignore trash and<br />
otherwise undesirable objects.<br />
RELIC<br />
A relic is an object of interest by reason of its age or its association<br />
with the past. Many relics are made of iron, but can also be made<br />
of bronze or precious metals.<br />
IRON<br />
Iron is a common, low-grade metal that is an undesirable target in<br />
certain metal detecting applications. Examples of undesirable iron<br />
objects are old cans, pipes, bolts, and nails.<br />
Sometimes, the desired target is made of iron. Property markers,<br />
for instance, contain iron. Valuable relics can also be composed of<br />
iron; cannon balls, old armaments, and parts of old structures and<br />
vehicles can also be composed of iron.<br />
FERROUS<br />
<strong>Metal</strong>s which are made of, or contain, iron.<br />
PINPOINTING<br />
Pinpointing is the process of finding the exact location of a buried<br />
object. Long-buried metals can appear exactly like the surrounding<br />
soil, and can therefore be very hard to isolate from the soil.<br />
PULL-TABS<br />
Discarded pull-tabs from beverage containers are the most bothersome<br />
trash items for treasure hunters. They come in many different shapes<br />
and sizes. Pull-tabs can be discriminated, but some other valuable<br />
objects can have a magnetic signature similar to pull-tabs, and will also<br />
be eliminated when discriminating out pull-tabs.<br />
GROUND BALANCE<br />
Ground Balancing is the ability of the detector to ignore, or "see<br />
through," the earth’s naturally occurring minerals, and only sound<br />
a tone when a metal object is detected.<br />
3
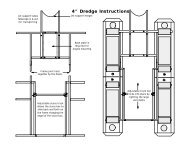
ASSEMBLY<br />
Assembly is easy and requires no tools.<br />
●1 Position the lower stem<br />
with the silver button toward the back.<br />
Using the bolt and knurled knob, attach<br />
the search coil to the plastic extension<br />
protruding from the lower stem.<br />
●2 If your model is equipped with a<br />
3-piece stem, open the<br />
plastic locking nut on<br />
the upper tube by<br />
rotating it<br />
counterclockwise.<br />
Then slide the middle<br />
tube into the upper<br />
tube, inserting the silver<br />
button into the locating hole<br />
which is 1/2” behind the plastic<br />
locking nut. Now tighten the plastic locking nut.<br />
●3 Press the button on the upper end of the lower stem, and<br />
slide the lower stem into the upper stem.<br />
Adjust the stem to a length that lets<br />
you maintain a comfortable upright<br />
posture, with your arm relaxed at<br />
your side, and the search coil<br />
parallel to the ground in front of you.<br />
●4 Wind the cable securely around the<br />
stem.<br />
●5 Insert the plug into the matching<br />
connector on the right underside of<br />
the detector body. Be sure that the<br />
key-way and pins line up<br />
correctly.<br />
Caution:<br />
4<br />
Do not force the plug in. Excess<br />
force will cause damage.<br />
To disconnect the cable, pull<br />
on the plug.<br />
Do not pull<br />
on the cable.<br />
Connector<br />
on back of<br />
control housing
BATTERIES<br />
IMPORTANT: Always use ALKALINE batteries only.<br />
Do not use heavy duty batteries.<br />
Always remove the batteries for prolonged storage.<br />
CHECK THE BATTERIES if your detector exhibits any of the following<br />
symptoms:<br />
●1<br />
●2<br />
●3<br />
The unit does not turn on.<br />
Low speaker volume.<br />
Unit beeps continuously or erratically.<br />
The LOW BATTERY indicator will come on and stay on if the batteries<br />
are discharge. You may notice erratic beeping if using with LOW<br />
BATTERY illuminated.<br />
IMPORTANT: Your Lone Star metal detector requires two 9-Volt<br />
ALKALINE batteries.<br />
Follow these steps to install the batteries.<br />
●1 Carefully remove the battery compartment door by pressing the release<br />
clip on the right side of the door.<br />
●2 Snap one battery onto each of the terminals and place the batteries inside<br />
the compartment.<br />
Insert booth of<br />
the batteries<br />
with terminals<br />
facing outward.<br />
●3 Replace the<br />
compartment<br />
door by carefully<br />
inserting opposite<br />
side of clip<br />
first. Then press<br />
down on clip<br />
side until battery<br />
Both Batteries<br />
teminals<br />
door snaps into<br />
facing out<br />
place.<br />
Release<br />
Clip<br />
5
QUICK-START DEMONSTRATION<br />
I. Supplies Needed<br />
• A Medium-Size Nail<br />
• A Quarter<br />
• A Nickel • A Zinc Penny (dated after 1982)<br />
II. Position the Detector<br />
a. Place the detector on a<br />
table, with the search coil<br />
hanging over the edge.<br />
(or better, have a friend<br />
hold the detector, with<br />
the coil off the ground)<br />
b. Keep the search coil<br />
away from walls, floors,<br />
and metal objects.<br />
c. Remove watches, rings and other jewelry or metal objects from<br />
hands and wrists.<br />
d. Turn off appliances or lights that cause electromagnetic<br />
interference.<br />
e. Pivot the search coil back toward the detector body.<br />
III. Power Up<br />
Press the ON touchpad.<br />
The detector will beep<br />
several times and the<br />
sensitivity setting will<br />
be indicated on the<br />
right of the display. Two<br />
illuminated segments<br />
indicates 3/4 sensitivity.<br />
IV. Wave each Object over the Search Coil (pass the flat side of the coins<br />
parallel to the coil)<br />
a.Notice a different tone for each object.<br />
Low Tone: Nail<br />
Medium Tone: Nickel & Zinc Penny<br />
High Tone: Quarter<br />
b.Motion is required. Objects must be in motion over the<br />
search coil to be detected.<br />
6
QUICK-START DEMONSTRATION (continued)<br />
V. Press the TARGET REJECT<br />
touchpad<br />
a. An “X” will appear under<br />
the IRON segment.<br />
b. The “X” tell us that Iron<br />
has been eliminated from<br />
detection.<br />
VI. Wave the Nail over the Search Coil<br />
a. The Nail will not be detected.<br />
b. The Nail has been "Discriminated Out."<br />
VII. Wave the Quarter, Penny, and Nickel over the Search Coil<br />
These non-ferrous objects will be detected with their own<br />
distinctive tones.<br />
VIII. Press the TARGET<br />
REJECT<br />
touchpad again<br />
Another “X” will<br />
illuminate under “AL ZN”.<br />
IX. Wave all objects over the<br />
Search Coil<br />
The Zinc Penny will not be detected. make sure the penny is post-<br />
1982; these are made of Zinc. CAUTION: some zinc pennies<br />
within 1/2” of the coin surface will induce a high tone.<br />
X. Press the TARGET REJECT touchpad again<br />
a. A third “X” appears.<br />
b. Pass all object over the search coil.<br />
The nail, penny, and nickel are all eliminated from detection.<br />
XI. Press the TARGET REJECT touchpad to return the detector to allmetals<br />
detection, with no “X”s illuminated.<br />
7
BASIC OPERATION<br />
POWERING UP<br />
Press the ON touch pad.<br />
All display indicators will illuminate momentarily<br />
The inverted-pyramid depth-selection indicator on the right of the<br />
display will stay illuminated.<br />
UNDERSTANDING THE DISPLAY<br />
●1 DEPTH SELECT<br />
The detector default to 3/4<br />
sensitivity, indicated by<br />
two illuminated segments.<br />
To change the depth range<br />
of the detector, and thus its<br />
sensitivity to more deeply<br />
buried objects, use the<br />
DEPTH SELECT touch pad.<br />
each touch of DEPTH<br />
SELECT toggles the detector among three different sensitivity settings.<br />
The detector is at maximum depth capability when three depth<br />
segments are illuminated on the right of the display.<br />
At the maximum depth setting, the detector will detect a coin-sized<br />
object buried approximately 6 1/2 inches beneath the surface. With<br />
two depth segments illuminated, the detector’s depth range will be<br />
reduced to 80%, and with one depth segment illuminated, the range<br />
will be reduces to 65%.<br />
A more detailed explanation of depth selection is found on page 14.<br />
●2<br />
8<br />
LOW BATTERY<br />
The LOW BATTERY<br />
indicator will illuminate<br />
when the 9-volt batteries<br />
are discharged to a level<br />
of 6.8 volts.<br />
Replace the batteries as<br />
soon as possible after<br />
receiving th e low battery<br />
indication. The detector
BASIC OPERATION continued<br />
will begin to beep erratically and operate unreliably if continuing use<br />
with discharged batteries.<br />
To save on batteries, check each battery individually, as the two<br />
batteries can discharge at different rates. When LOW BATTERY<br />
illuminates, it is possible that only one of the batteries requires<br />
replacement.<br />
Under normal conditions, a set of batteries will last for approximately<br />
16 hours in the field, depending upon the brand of battery.<br />
●3<br />
PROBABLE TARGET<br />
The four categories depicted across the top of the display<br />
indicate the probable identification of buried, detected metal<br />
objects. The search coil must be in motion over an object to<br />
be detected. Alternatively, you can pass an object over a<br />
motion less search coil to test your detector. One of the four<br />
target indicators will illuminate, indicating the probable<br />
identification of the object. The indicator will remain<br />
illuminated until another object is detected.<br />
You will encounter a never-ending variety of buried metal<br />
objects. It is therefore impossible to accurately identify all<br />
buried metal objects. The target identification system will<br />
accurately identify the most common items.<br />
9
BASIC OPERATION continued<br />
Commonly-found object are classified into the four categories<br />
as follows:<br />
IRON ------------------------------------------------<br />
Ferrous objects<br />
<strong>Metal</strong>s composed mostly or entirely of iron<br />
Most very small metals objects<br />
Small foil pieces; small gold pieces.<br />
AL ZN ------------------------------------------------<br />
Post-1982 pennies (are made of zinc, some zinc pennies<br />
will register as coins within 1” of the coil)<br />
Zinc coins, such as recent foreign currency<br />
Most bottle screw caps<br />
Large foil pieces<br />
Many rings; most gold rings<br />
Older pull-tabs (those which detach from the can)<br />
AL 5¢ ------------------------------------------------<br />
Large gold rings<br />
Newer pull-tabs (those which stay connected to can)<br />
Nickels<br />
Large Aluminum Pieces<br />
COINS ------------------------------------------------<br />
Silver coins, like dimes and quarters<br />
Copper pennies (pre-1982)<br />
Very large metal objects like manhole covers.<br />
●4<br />
REJECTED TARGET<br />
When “X” appears under a target<br />
category, objects falling into this<br />
category are eliminated from<br />
detection. This feature is<br />
commonly referred to as target<br />
discrimination.<br />
10<br />
With each press of the REJECT<br />
TARGET touch ad, you will<br />
progressively eliminate, from<br />
left to right, the common, less desirable, targets. When all three “X”<br />
are illuminated, the next press will erase all “X”s, returning the<br />
detector to all-metal detection status, where all types of metals will<br />
be detected.
BASIC OPERATION continued<br />
OPERATING CONTROLS<br />
The Pioneer EX is the most automated, easy-to-operate, professional<br />
metal detector ever designed. It is designed for those who are new to the<br />
hobby providing maximum basic target discrimination, while requiring<br />
minimal operator adjustment.<br />
DEPTH SELECT<br />
With each press of the DEPTH<br />
SELECT touch pad, the detector<br />
toggles among three different<br />
depth-detection levels. Each of<br />
these sensitivity levels is<br />
identified through the 3-segment<br />
depth-select icon on the right of<br />
the display.<br />
When three segments are illuminated, the detector is at maximum<br />
sensitivity. As you press the DEPTH SELECT touch pad, the detector<br />
toggles among the three different sensitivity levels. A more detailed<br />
explanation of depth selection is found on page 14.<br />
TARGET REJECT<br />
Upon power-up, all types of<br />
metals are detected. The TARGET<br />
REJECT touch pas allows the user<br />
to eliminate undesirable metals<br />
from detection.<br />
With each press of the REJECT<br />
TARGET touch pad, unwanted<br />
metals are progressively<br />
eliminated, from left to right on the display. When all three “X”s are<br />
illuminated, the next press will erase all “X”s, returning the detector to allmetal<br />
detection status, where all types of metals will be detected.<br />
11
BASIC OPERATION continued<br />
ENVIRONMENTAL CONDITIONS<br />
WATER HUNTING: Your Pioneer EX is ideal for damp grass and shallow<br />
water spots. the search coil is waterproof; the case and case-to-cable<br />
connection is not. Be careful to keep the detector body dry.<br />
In saltwater, keep the search coil from contact with the ground. Contact<br />
with saltwater sands will cause the detector to beep falsely. For best<br />
result in saltwater, eliminate IRON to reduce false signals caused by<br />
conductive beach sands. Coil sweep technique is also important in<br />
saltwater; keeping the coil submerged is better than dunking and lifting.<br />
The detector needs time to readjust to the conductive salt water.<br />
RED CLAY: The red clay earth found in the southwestern U.S. may<br />
require a reduction in the DEPTH SELECT level if encountering false<br />
signals. Coil sweep technique is also more critical in red clay; keep the<br />
coil level with the ground. Do not lift the coil at the ends of your sweep.<br />
Review coil sweep technique on page 15.<br />
RED SANDS: Red sand found in desert locations will react like red clays,<br />
so fallow the same precautions as outlined in the paragraph above.<br />
BLACK SANDS: The most promising gold prospecting locations can<br />
contain large amounts of black sand. This black sand is the most<br />
demanding detecting environment, and frequently requires a detector<br />
costing thousands of dollars for the best results. Your Pioneer EX will still<br />
function in these conditions, but will usually require operation at reduced<br />
sensitivity levels. If you receive constant false signals, reduce the<br />
sensitivity or move to another area.<br />
SAND: Dry beach sands are no problem for the Pioneer EX. if the sand<br />
is damp with saltwater, however, follow the precautions outlined under<br />
saltwater above.<br />
HOT AND COLD: Be patient if moving immediately between hot and<br />
cold environments, like taking your detector from your air-conditioned<br />
home into a blazing summer sun. The search coil is constructed of<br />
copper wire which will expand and contract with temperature change.<br />
Your detector may require 10 to 15 minutes to stabilize to the ambient<br />
temperature.<br />
12
AUDIO TARGET IDENTIFICATION<br />
While the LCD (Liquid Crystal Display) is very accurate in identifying<br />
buried objects, the user in the field does not always maintain the display<br />
screen in his field of vision. Therefore, we have incorporated an audio<br />
feedback mechanism to alert the user to the nature of buried objects.<br />
This audio feedback system first alerts the user to the presence and<br />
classification of objects, whose nature and location can be confirmed<br />
using the LCD display.<br />
The detector will sound one of three different tones, depending on the<br />
type of metal detected.<br />
BASS TONE<br />
Ferrous objects, such as iron and steel, will induce a bass tone.<br />
The smallest gold objects can also induce a bass tone.<br />
MEDIUM TONE<br />
Pull-tabs, newer pennies (post-1982), larger gold objects, zinc,<br />
small brass objects, and most bottle screw caps will induce<br />
medium tones. Many recent vintage foreign currencies will<br />
induce medium tones. Medium tone objects will illuminate the<br />
two center target indicators.<br />
HIGH TONE<br />
Silver and copper coins, larger brass objects, older pennies (pre-<br />
1982), and highly oxidized metals will induce high tones.<br />
Quarters, dimes and other precious coins fall into this category.<br />
LOW TONE<br />
MEDIUM TONE<br />
HIGH TONE<br />
Nails, Bottle Caps,<br />
& Smaller Gold<br />
Old & New Pull Tabs, Zinc<br />
Pennies (Post 1982), Nickel,<br />
Larger Gold Objects<br />
Copper, Silver & Brass<br />
Copper Pennies (Pre 1982)<br />
Audio Target Identification (ATI) classifies metals into four categories.<br />
13
14<br />
DEPTH SELECT (Sensitivity Adjustment)<br />
Upon power-up, the detector defaults to 3/4 sensitivity. To increase to full<br />
sensitivity, press the DEPTH SELECT touchpad once.<br />
ELECTROMAGNETIC INTERFERENCE<br />
The principle use for the Sensitivity Control is to eliminate<br />
Electromagnetic Interference (EMI).<br />
A hobby metal detector is an extremely sensitive device; the search coil<br />
creates its own magnetic field and acts like an antenna. If your detector<br />
beeps erratically when the search coil is motionless, the unit is probably<br />
detecting another electromagnetic field.<br />
Common sources of EMI are electric power lines, both suspended and<br />
buried, motors, and household appliances like computers and<br />
microwave ovens. Some indoor electronic devices, such as dimmer<br />
switches used on household lighting, produce severe EMI and can cause<br />
the detector to beep erratically. Other metal detectors also produce their<br />
own electromagnetic fields; so if detecting with a friend, keep two metal<br />
detectors at least 20 feet apart.<br />
If the detector beeps erratically, REDUCE THE SENSITIVITY by using the<br />
Depth Select Control.<br />
SEVERE GROUND CONDITIONS<br />
A secondary use for the Sensitivity Control is to reduce false detection<br />
signals caused by severe ground conditions. While your Pioneer EX<br />
contains circuitry to eliminate the signals caused by most naturally<br />
occurring ground minerals, 100% of all ground conditions cannot be<br />
anticipated. Highly magnetic soils found in mountainous and goldprospecting<br />
locations can cause the detector to emit tones when metal<br />
objects are not present. High saline content soils and sands can also<br />
cause the detector to false.<br />
If the detector emits false, non-repeatable, signals, REDUCE THE<br />
SENSITIVITY.<br />
MULTIPLE TARGETS<br />
If you suspect the presence<br />
of deeper targets beneath a<br />
shallower target, reduce the<br />
sensitivity to eliminate the<br />
detection of the deeper<br />
targets, in order to properly<br />
locate and identify the<br />
shallower target.
IN THE FIELD TECHNIQUES<br />
PINPOINTING<br />
COIL MOVEMENT<br />
Accurate pinpointing takes practice<br />
and is best accomplished by<br />
“X-ing” the target area.<br />
1. Once a buried target is indicated<br />
by a good tone response,<br />
continue sweeping the coil over<br />
the target in a narrowing<br />
side-to-side pattern.<br />
2. Take visual note of the place on<br />
the ground where the “beep”<br />
sounds.<br />
3. Stop the coil directly over this<br />
spot on the ground.<br />
4. Now move the coil straight<br />
forward and straight back<br />
towards you a couple of times.<br />
5. Again make visual note of the<br />
spot on the ground at which<br />
the “beep” sounds.<br />
6. If needed, “X” the target at<br />
different angles to “zero in” on<br />
the exact spot on the ground at<br />
which the “beep” sounds.<br />
When swinging the coil, be<br />
careful to keep it level with the<br />
ground about 1/2 inch from the<br />
surface. Never swing the coil like<br />
a pendulum.<br />
WRONG<br />
CORRECT<br />
TARGET DEPTH ESTIMATION<br />
After verifying a desirable<br />
target, pass the coil again, but<br />
raise the coil 1” over the<br />
ground, progressively higher<br />
with each sweep. Note the coil<br />
elevation at which the signal<br />
disappears. With practice, you<br />
will be able to approximate<br />
target depth.<br />
When pinpointing a target, try drawing an “X”,<br />
as illustrated, over where the tone is induced.<br />
15
IN THE FIELD TECHNIQUES (continued)<br />
Swing the search coil slowly,<br />
overlapping each sweep as you<br />
move forward. It is important to<br />
sweep the coil at a consistent speed<br />
over the ground as you search.<br />
After identifying a target, your<br />
sweep technique can help in<br />
identifying both the location and the<br />
nature of the target. If you<br />
encounter a weak signal, try<br />
moving the coil in short, rapid<br />
sweeps over the target zone; such a<br />
short rapid sweep may<br />
provide a more consistent<br />
target identification.<br />
Most worthwhile<br />
objects will respond<br />
with a repeatable<br />
tone. If the<br />
signal does not<br />
repeat after<br />
sweeping<br />
the coil<br />
directly<br />
over the<br />
suspected target a few times, it is<br />
more than likely trash metal.<br />
Crossing the target zone with<br />
multiple intersecting sweeps at<br />
multiple angles is another way to<br />
verify the repeatability of the signal,<br />
and the potential of the buried<br />
target. To use this method, walk<br />
around the target area in a circle,<br />
sweeping the coil across the target<br />
repeatedly, every 30 to 40 degrees<br />
of the circle, about ten different<br />
angles as you walk completely<br />
around the target. If a high-tone<br />
target completely disappears from<br />
detection at a given angle, chances<br />
are that you are detecting oxidized<br />
ferrous metals, rather than a silver<br />
or copper object. If the tone<br />
changes at different angles, you<br />
many have encountered multiple<br />
objects. If you are new to the<br />
hobby, you may want to dig all<br />
targets at first. With practice in the<br />
field, you will learn to better discern<br />
the nature of buried objects by the<br />
nature of the detector’s response.<br />
WHAT<br />
READS<br />
LIKE THIS<br />
…MAY<br />
ACTUALLY<br />
BE THIS<br />
16
IN THE FIELD TECHNIQUES (continued)<br />
You may encounter some false<br />
signals as you proceed. False<br />
signals occur when the detector<br />
beeps, but no metal target is<br />
present. False signals can be<br />
induced by electromagnetic<br />
interference, oxidation, or highly<br />
mineralized ground soils. If the<br />
detector beeps once, but does not<br />
repeat the signal with several<br />
additional sweeps over the same<br />
spot, there is probably no target<br />
present.<br />
When searching very trashing<br />
ground, it is best to scan small<br />
areas with slow, short sweeps.<br />
You will be surprised just how<br />
much trash metal and foil you will<br />
find in some areas. The trashiest<br />
areas have been frequented by the<br />
most people, and frequently hold<br />
the most promise for finding the<br />
most lost valuables. To make<br />
searching easier in very trashy<br />
areas, consider purchasing the<br />
Bounty Hunter 4-inch Search Coil.<br />
The 4-inch coil’s narrower<br />
detection field can better<br />
distinguish between two objects in<br />
close proximity.<br />
Also maintain the search coil<br />
positioned just above the surface<br />
of the ground, without making<br />
contact with the ground. Making<br />
contact with the ground can cause<br />
false signals.<br />
USING HEADPHONES<br />
Using headphones (not supplied) improves battery life, and prevents the<br />
sounds from annoying bystanders.<br />
It also allows you to hear subtle changes in the sound more clearly,<br />
particularly if searching in a noisy location. For safety reasons, do not use<br />
headphones near traffic or where other dangers are present. This device is<br />
to be used with interconnecting cables/headphone cables shorter than three<br />
meters.<br />
17
TROUBLE SHOOTING<br />
TROUBLE SHOOTING GUIDE<br />
SYMPTOM CAUSE SOLUTION<br />
Detector chatters • Using detector • Use detector<br />
or beeps erratically indoors outdoors only<br />
• Using detector near • Move away<br />
power lines from power lines<br />
• Using 2 detectors in • Keep 2 detectors<br />
close proximity at least 20’ apart<br />
• Highly oxidized • Only dig up<br />
buried object repeatable<br />
signals<br />
• Environmental • Reduce sensitivity<br />
electromagnetic until erratic<br />
interference signals cease<br />
Constant low tone • Discharged batteries • Replace batteries<br />
or constant repeating<br />
tones • Wrong type of • Use only 9V<br />
batteries<br />
alkaline batteries<br />
LCD does not lock • Multiple targets • Move coil slowly<br />
on to one target ID present at different angles<br />
or detector emits • Highly oxidized<br />
multiple tones target<br />
• Sensitivity set • Reduce sensitivity<br />
too high<br />
No power, no • Dead batteries • Replace batteries<br />
sounds • Poor battery • Check connections<br />
contact<br />
• Cord not connected<br />
securely<br />
18
METAL DETECTING APPLICATIONS<br />
COIN SHOOTING:<br />
The most popular metal detecting activity.<br />
Find coins where people congregate frequently. Many detectorists revisit the<br />
same areas again and again to find a never-ending treasure trove as people<br />
continue to lose valuables every day. Parks, fairgrounds, and play ares are<br />
good choices. The most valuable old coins are frequently found in abandoned<br />
home sites, or if you live on an older property, maybe in your own backyard.<br />
Control settings required. Target-Rejected al least 2-Xs to eliminate iron,<br />
foil, and old pull tabs. Target-Rejected all 3-Xs if you want to find only<br />
copper and silver. If you search for nickels, remember that you will also<br />
encounter some newer pull-tabs. Some newer pull-tabs have a magnetic<br />
signal indistinguishable from nickel.<br />
RELIC HUNTING:<br />
The most effective relic hunting is best accomplished after conducting historical<br />
research. Visit your local library, or check the internet, for historical events in<br />
your area. You can target specific areas and gain valuable insight into your local<br />
history. Remember to ask permission and respect laws regarding private and<br />
government property.<br />
Control settings required. No X’s should be displayed. Do not<br />
discriminate out any types of metals as many of the oldest relics contain<br />
iron.<br />
JEWELRY HUNTING:<br />
This is the most challenging treasure hunt. Gold rings will register in the same<br />
range as pull-tabs. Necklaces will register with zinc and foils. You will dig up<br />
many trash items in your search for jewelry, but jewelry hunting holds the<br />
most potential for reward. Please pick up ant throw away those pull-tabs to<br />
help clean the environment.<br />
Control settings required. Target-Reject only the 1st X; eliminate IRON<br />
only.<br />
JEWELRY HUNTING:<br />
A cache, pronounced “cash,” is a buried or hidden valuable stored inside a<br />
case, can, strong gox, or bag. A cache could be the loot from a bank robbery<br />
or someone’s life savings. Caches can be hidden in floors or walls of an old<br />
house, or buried nearby.<br />
Control settings required. No X’s should be display. The container<br />
holding the treasure will frequently be a ferrous object, so you want to<br />
detect all types of metal objects.<br />
19
TREASURE HUNTER’S CODE OF ETHICS:<br />
• Always check Federal, State, County and local laws before searching.<br />
• Respect private property and do not enter private property without the owner’s permission.<br />
• Take care to refill all holes and try not to leave any damage.<br />
• Remove and dispose of any and all trash and litter found.<br />
• Appreciate and protect our inheritance of natural resources, wildlife and private property.<br />
• Act as an ambassador for the hobby, use thoughtfulness, consideration and courtesy at all times.<br />
• Never destroy historical or archaeological treasures.<br />
• All treasure hunters may be judged by the example you set; always conduct yourself with<br />
courtesy and consideration of others<br />
FIRST TEXAS PRODUCTS, LLC<br />
1-YEAR LIMITED WARRANTY<br />
The Bounty Hunter Pioneer Ex is warranted against defects<br />
in workmanship or materials under normal use for one year<br />
from date of purchase to the original user. Liability in all<br />
events is limited to the purchase price paid. Liability under<br />
this Warranty is limited to replacing or repairing, at our<br />
option, any Bounty Hunter Detector returned, shipping cost<br />
prepaid, to First Texas Products, LLC. Damage due to<br />
neglect, accidental damage or misuse of this product is not<br />
covered by this warranty.<br />
Proof of purchase is required to make a claim under this warranty.<br />
NOTE TO FOREIGN COUNTRY CUSTOMERS<br />
This warranty may vary in other countries, check with your distributor for details.<br />
Factory warranty follows the channel of distribution.<br />
Warranty does not cover shipping costs.<br />
Copyright© 2009 by First Texas Products, L.L.C.<br />
All rights reserved, including the right to reproduce this book, or parts thereof, in any form.<br />
Published by First Texas Products, L.L.C.<br />
Bounty Hunter ® is a registered trademark of First Texas Products, L.L.C.<br />
The BOUNTY HUNTER PIONEER series of metal detectors is not associated or connected in any way<br />
with Pioneer Corporation or its PIONEER brand audio and video products or other products<br />
www.detecting.com<br />
First Texas Products, LLC<br />
1465-H Henry Brennan<br />
El Paso, TX 79936<br />
(915) 633-8354 MEXB 070109