â3-Pieceâ Rear Shock Link - lesrouleuxdewailly
â3-Pieceâ Rear Shock Link - lesrouleuxdewailly
â3-Pieceâ Rear Shock Link - lesrouleuxdewailly

You also want an ePaper? Increase the reach of your titles
YUMPU automatically turns print PDFs into web optimized ePapers that Google loves.
Service Tech Diagram Notes<br />
Publication Title<br />
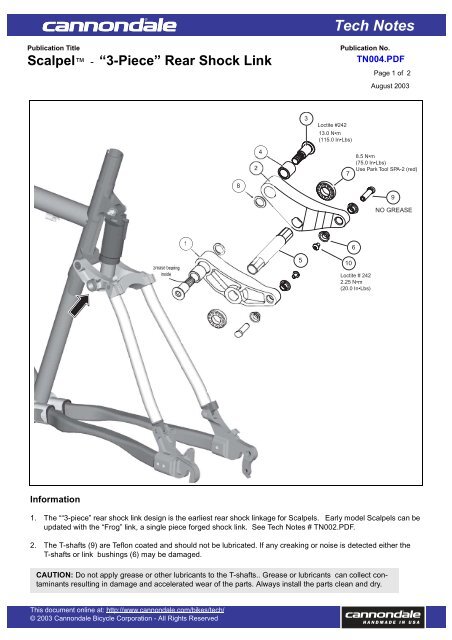
Scalpel -“3-Piece” <strong>Rear</strong> <strong>Shock</strong> <strong>Link</strong><br />
Publication No.<br />
TN004.PDF<br />
Page 1 of 2<br />
August 2003<br />
3<br />
Loctite #242<br />
13.0 N•m<br />
(115.0 In•Lbs)<br />
8<br />
4<br />
7<br />
8.5 N•m<br />
(75.0 In•Lbs)<br />
Use Park Tool SPA-2 (red)<br />
9<br />
NO GREASE<br />
1<br />
6<br />
5<br />
10<br />
Loctite # 242<br />
2.25 N•m<br />
(20.0 In•Lbs)<br />
Information<br />
1. The ““3-piece” rear shock link design is the earliest rear shock linkage for Scalpels. Early model Scalpels can be<br />
updated with the “Frog” link, a single piece forged shock link. See Tech Notes # TN002.PDF.<br />
2. The T-shafts (9) are Teflon coated and should not be lubricated. If any creaking or noise is detected either the<br />
T-shafts or link bushings (6) may be damaged.<br />
CAUTION: Do not apply grease or other lubricants to the T-shafts.. Grease or lubricants can collect contaminants<br />
resulting in damage and accelerated wear of the parts. Always install the parts clean and dry.<br />
This document online at: http://www.cannondale.com/bikes/tech/<br />
© 2003 Cannondale Bicycle Corporation - All Rights Reserved
Service Tech Diagram Notes<br />
Publication Title<br />
Scalpel -“3-Piece” <strong>Rear</strong> <strong>Shock</strong> <strong>Link</strong><br />
Publication No.<br />
TN004.PDF<br />
Page 2 of 2<br />
August 2003<br />
3. The flange bushings (6) are a press fit into the link sides. They can be removed to install replacements. To<br />
remove, carefully locate the punch and drive out. These flange bushings should be inspected often and replaced<br />
when necessary.<br />
4. The T-shaft screws (10) should be checked for tightness periodically. Loose screws can result in play detected in<br />
the seatstay. When installing the screws, be sure to apply Loctite #242 to the threads and tighten to 2.25 N•m<br />
(20.0 In•Lbs).<br />
CAUTION: Do not over-tighten the T-shaft screws. Over-tightening will result in damage to the flange bushings<br />
Parts<br />
The following table is for reference only.<br />
REF QTY BPCS DESC<br />
1 1 112558LA Left link<br />
2 1 112557RA Right link<br />
3 2 112502 Pivot bolt<br />
4 2 112679 Bearing<br />
5 1 113005 AXLE,SHOCK,SCALPEL,SS<br />
6 4 112677 BUSHING,Flanged,6mmIDx5.5mmL<br />
7 2 113127AA Lockring<br />
8 2 114668 WASHER,Acetal,.551x.394x.04<br />
9 2 112636 NUT,T-Shaft,for Scalpel<br />
10 2 103218 SCREW,M4x.7x8mmSOC HEADCAP,SS<br />
Replacement/ Renewal Kits<br />
The following replacement parts and kits are available only through an authorized Cannondale Dealer.<br />
CANNONDALE<br />
KIT #<br />
REF/QTY<br />
KF041/ 5<br />
KF040/ 7<br />
KF038/ 1,6(4),4<br />
KF039/ 2, 6(4), 4<br />
DESCRIPTION<br />
Kit, <strong>Shock</strong> Axle - Scalpel<br />
Kit, Lock Ring - <strong>Shock</strong>,Scalpel<br />
Kit, Rigth <strong>Link</strong> -Alum. Scalpel<br />
Kit, Rigth <strong>Link</strong> -Alum. Scalpel