Routing setup guide - Mizu Voip
Routing setup guide - Mizu Voip
Routing setup guide - Mizu Voip

You also want an ePaper? Increase the reach of your titles
YUMPU automatically turns print PDFs into web optimized ePapers that Google loves.
<strong>Routing</strong> <strong>setup</strong> <strong>guide</strong><br />
Last update: January 04, 2014<br />
About<br />
With the <strong>Mizu</strong> softswitch you can build sophisticated routing scenarios. The routing is usually based on traffic<br />
direction and time. Load balancing, LCR and BRS and failowering are available.<br />
For the inbound routing usually there are no special settings. You just have to create one or more traffic sender<br />
users and set its authentication properly. On incoming call the mizu voip server will do the followings:<br />
-firewalling, dos attack protection checks and other maintenance works<br />
-caller authentication<br />
-if there is a local enduser match, than the call will be routed to it (or call forwarding, voicemail, etc)<br />
-otherwise the call is sent to another voip server based on the outbound routing rules.<br />
The outbound routing is influenced by the followings:<br />
-User settings (max lines settings is the most important here. All other settings –like user priority- should be<br />
avoided on user level because almost all routing pattern can be defined using the “<strong>Routing</strong>” form)<br />
-<strong>Routing</strong> settings (pattern match and the destination priority list/pattern)<br />
-Load balancing, LCR or BRS for the directions with the same priority<br />
-All prioritization can be overwritten by failowering on bad statistics conditions<br />
Step by Step <strong>setup</strong><br />
1. First you need one or more servers (other carriers) where you will route your traffic. These are called ‘SIP<br />
Servers’ (or H323 gateway if you are using the H323 protocol)<br />
SIP Servers can be created and configured in the MManage -> Users and Devices -> SIP Server: Click on the<br />
‘sipserver_template’ -> click ‘New User’ button -> popup window: click ‘Yes’.<br />
Now we have the new server in the ‘edit’ window, where we will configure it: fill in the ‘Username’ field<br />
accordingly and the most important, the ‘IP’ field, which is the address where the server will direct calls. This field<br />
can also contain a domain name instead of IP address. In most cases the rest of the settings are better to be left as<br />
they are. And finally save these settings.<br />
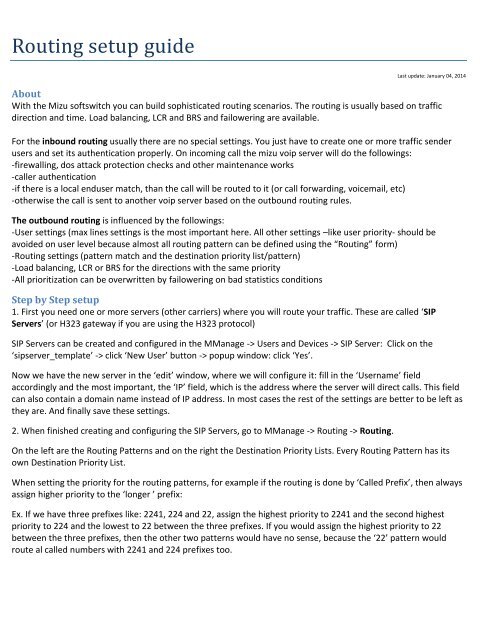
2. When finished creating and configuring the SIP Servers, go to MManage -> <strong>Routing</strong> -> <strong>Routing</strong>.<br />
On the left are the <strong>Routing</strong> Patterns and on the right the Destination Priority Lists. Every <strong>Routing</strong> Pattern has its<br />
own Destination Priority List.<br />
When setting the priority for the routing patterns, for example if the routing is done by ‘Called Prefix’, then always<br />
assign higher priority to the ‘longer ’ prefix:<br />
Ex. If we have three prefixes like: 2241, 224 and 22, assign the highest priority to 2241 and the second highest<br />
priority to 224 and the lowest to 22 between the three prefixes. If you would assign the highest priority to 22<br />
between the three prefixes, then the other two patterns would have no sense, because the ‘22’ pattern would<br />
route al called numbers with 2241 and 224 prefixes too.
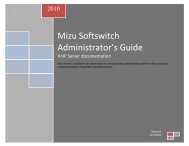
1 – (re)load existing patterns<br />
2 – click to add new pattern<br />
3 – give it a suggestive name<br />
4 – define its priority among the patterns<br />
5 – set the direction definition; in our case it’s the called<br />
prefix, but the direction could be: group, caller, caller<br />
prefix or tech prefix.<br />
6 – set the time definition when the routing pattern is<br />
applied (in most cases ‘All times’)<br />
7 – save this pattern<br />
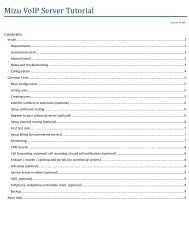
After a pattern is created, its destination priority list<br />
must be defined.<br />
1 – select a pattern<br />
2 – click to add a new destination<br />
3 – set the Priority, Direction Type and Direction (most<br />
of the cases the direction type is ‘SIP Proxy’. After you<br />
set this option, in the Direction field you can select from<br />
the SIP Servers created earlier.)<br />
4 – click to save settings<br />
<strong>Routing</strong> in the Priority List between servers can be done by setting different priorities(ex. 20, 15, 10…) or by setting<br />
same priority to all servers.<br />
If the priority in the list is the same for all servers, then the routing rule is defined by a global configuration option<br />
named ‘brs_lcr’. This option can be set in the MManage -> Other-> Configurations.
Depending on the value of ‘brs_lcr’ the routing rule is:<br />
0 – Load balancing– in this case the <strong>Mizu</strong> server will try to send the same amount of traffic to each server<br />
1 – only ‘lcr’ for not gsm (‘lcr’ = least cost routing – price lists most be set to work properly)<br />
2 – lcr - least cost routing<br />
3 – ‘brs’ for not gsm (‘brs’ = best route selection)<br />
4 – brs - best route selection<br />
5 – brs + lcr<br />
To learn more about how the BRS works, open the BRS form and click on the “Show Demo” button.<br />
The routing process can also be influenced by the failowering rules. If one route (SIP server) is set as failover, then its priority<br />
is lowered regardless of the routing priority. You can find the details about the failowering in the AdminGuide.<br />
For more details use the Admin Guide or contact our support.<br />
Copyright © 2014 <strong>Mizu</strong>tech SRL