The Outlaw's Guide to the SMS-1 - Outlaw Audio
The Outlaw's Guide to the SMS-1 - Outlaw Audio
The Outlaw's Guide to the SMS-1 - Outlaw Audio

Create successful ePaper yourself
Turn your PDF publications into a flip-book with our unique Google optimized e-Paper software.
THE OUTLAW’S GUIDE TO THE <strong>SMS</strong>-1<br />
On-Screen Display<br />
“One of <strong>the</strong> <strong>Outlaw</strong> bosses<br />
has this cat, and one day <strong>the</strong> boss<br />
<strong>to</strong>ld us his cat had figured out how <strong>to</strong><br />
type. We didn’t think much of this<br />
announcement, until <strong>the</strong> cat e-mailed<br />
us this guide entry a few weeks later.<br />
Now we’re not sure whe<strong>the</strong>r <strong>to</strong> be<br />
impressed or just scared…<br />
”<br />
14<br />
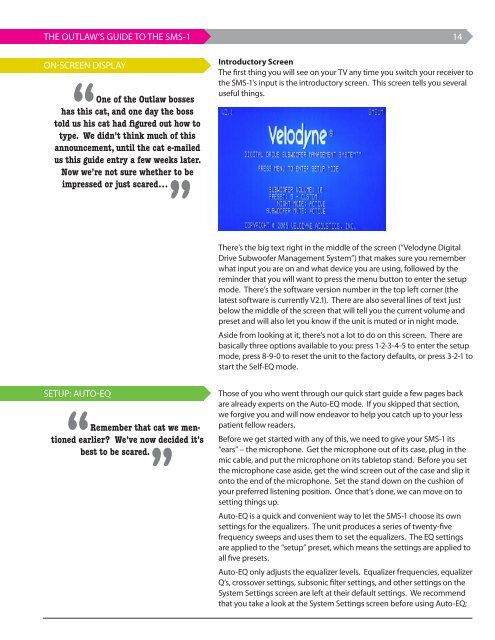
Introduc<strong>to</strong>ry Screen<br />
<strong>The</strong> first thing you will see on your TV any time you switch your receiver <strong>to</strong><br />
<strong>the</strong> <strong>SMS</strong>-1’s input is <strong>the</strong> introduc<strong>to</strong>ry screen. This screen tells you several<br />
useful things.<br />
<strong>The</strong>re’s <strong>the</strong> big text right in <strong>the</strong> middle of <strong>the</strong> screen (“Velodyne Digital<br />
Drive Subwoofer Management System”) that makes sure you remember<br />
what input you are on and what device you are using, followed by <strong>the</strong><br />
reminder that you will want <strong>to</strong> press <strong>the</strong> menu but<strong>to</strong>n <strong>to</strong> enter <strong>the</strong> setup<br />
mode. <strong>The</strong>re’s <strong>the</strong> software version number in <strong>the</strong> <strong>to</strong>p left corner (<strong>the</strong><br />
latest software is currently V2.1). <strong>The</strong>re are also several lines of text just<br />
below <strong>the</strong> middle of <strong>the</strong> screen that will tell you <strong>the</strong> current volume and<br />
preset and will also let you know if <strong>the</strong> unit is muted or in night mode.<br />
Aside from looking at it, <strong>the</strong>re’s not a lot <strong>to</strong> do on this screen. <strong>The</strong>re are<br />
basically three options available <strong>to</strong> you: press 1-2-3-4-5 <strong>to</strong> enter <strong>the</strong> setup<br />
mode, press 8-9-0 <strong>to</strong> reset <strong>the</strong> unit <strong>to</strong> <strong>the</strong> fac<strong>to</strong>ry defaults, or press 3-2-1 <strong>to</strong><br />
start <strong>the</strong> Self-EQ mode.<br />
Setup: Au<strong>to</strong>-EQ<br />
“Remember that cat we mentioned<br />
earlier? We’ve now decided it’s<br />
best <strong>to</strong> be scared.<br />
”<br />
Those of you who went through our quick start guide a few pages back<br />
are already experts on <strong>the</strong> Au<strong>to</strong>-EQ mode. If you skipped that section,<br />
we forgive you and will now endeavor <strong>to</strong> help you catch up <strong>to</strong> your less<br />
patient fellow readers.<br />
Before we get started with any of this, we need <strong>to</strong> give your <strong>SMS</strong>-1 its<br />
“ears” – <strong>the</strong> microphone. Get <strong>the</strong> microphone out of its case, plug in <strong>the</strong><br />
mic cable, and put <strong>the</strong> microphone on its table<strong>to</strong>p stand. Before you set<br />
<strong>the</strong> microphone case aside, get <strong>the</strong> wind screen out of <strong>the</strong> case and slip it<br />
on<strong>to</strong> <strong>the</strong> end of <strong>the</strong> microphone. Set <strong>the</strong> stand down on <strong>the</strong> cushion of<br />
your preferred listening position. Once that’s done, we can move on <strong>to</strong><br />
setting things up.<br />
Au<strong>to</strong>-EQ is a quick and convenient way <strong>to</strong> let <strong>the</strong> <strong>SMS</strong>-1 choose its own<br />
settings for <strong>the</strong> equalizers. <strong>The</strong> unit produces a series of twenty-five<br />
frequency sweeps and uses <strong>the</strong>m <strong>to</strong> set <strong>the</strong> equalizers. <strong>The</strong> EQ settings<br />
are applied <strong>to</strong> <strong>the</strong> “setup” preset, which means <strong>the</strong> settings are applied <strong>to</strong><br />
all five presets.<br />
Au<strong>to</strong>-EQ only adjusts <strong>the</strong> equalizer levels. Equalizer frequencies, equalizer<br />
Q’s, crossover settings, subsonic filter settings, and o<strong>the</strong>r settings on <strong>the</strong><br />
System Settings screen are left at <strong>the</strong>ir default settings. We recommend<br />
that you take a look at <strong>the</strong> System Settings screen before using Au<strong>to</strong>-EQ;