The Outlaw's Guide to the SMS-1 - Outlaw Audio
The Outlaw's Guide to the SMS-1 - Outlaw Audio
The Outlaw's Guide to the SMS-1 - Outlaw Audio

Create successful ePaper yourself
Turn your PDF publications into a flip-book with our unique Google optimized e-Paper software.
THE OUTLAW’S GUIDE TO THE <strong>SMS</strong>-1<br />
26<br />
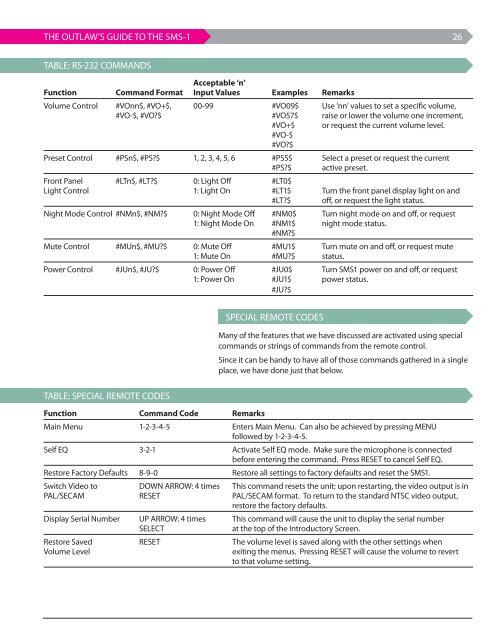
Table: RS-232 commands<br />
Acceptable ‘n’<br />
Function Command Format Input Values Examples Remarks<br />
Volume Control #VOnn$, #VO+$, 00-99 #VO09$ Use ‘nn’ values <strong>to</strong> set a specific volume,<br />
#VO-$, #VO?$ #VO57$ raise or lower <strong>the</strong> volume one increment,<br />
#VO+$ or request <strong>the</strong> current volume level.<br />
#VO-$<br />
#VO?$<br />
Preset Control #PSn$, #PS?$ 1, 2, 3, 4, 5, 6 #PS5$ Select a preset or request <strong>the</strong> current<br />
#PS?$ active preset.<br />
Front Panel #LTn$, #LT?$ 0: Light Off #LT0$<br />
Light Control 1: Light On #LT1$ Turn <strong>the</strong> front panel display light on and<br />
#LT?$ off, or request <strong>the</strong> light status.<br />
Night Mode Control #NMn$, #NM?$ 0: Night Mode Off #NM0$ Turn night mode on and off, or request<br />
1: Night Mode On #NM1$ night mode status.<br />
#NM?$<br />
Mute Control #MUn$, #MU?$ 0: Mute Off #MU1$ Turn mute on and off, or request mute<br />
1: Mute On #MU?$ status.<br />
Power Control #JUn$, #JU?$ 0: Power Off #JU0$ Turn <strong>SMS</strong>1 power on and off, or request<br />
1: Power On #JU1$ power status.<br />
#JU?$<br />
Special Remote Codes<br />
Many of <strong>the</strong> features that we have discussed are activated using special<br />
commands or strings of commands from <strong>the</strong> remote control.<br />
Since it can be handy <strong>to</strong> have all of those commands ga<strong>the</strong>red in a single<br />
place, we have done just that below.<br />
Table: SPECIAL REMOTE CODES<br />
Function Command Code Remarks<br />
Main Menu 1-2-3-4-5 Enters Main Menu. Can also be achieved by pressing MENU<br />
followed by 1-2-3-4-5.<br />
Self Eq -2-1 Activate Self EQ mode. Make sure <strong>the</strong> microphone is connected<br />
before entering <strong>the</strong> command. Press RESET <strong>to</strong> cancel Self EQ.<br />
Res<strong>to</strong>re Fac<strong>to</strong>ry Defaults 8-9-0 res<strong>to</strong>re all settings <strong>to</strong> fac<strong>to</strong>ry defaults and reset <strong>the</strong> <strong>SMS</strong>1.<br />
Switch Video <strong>to</strong> DOWN ARROW: 4 times This command resets <strong>the</strong> unit; upon restarting, <strong>the</strong> video output is in<br />
PAL/SECAM rESET pAL/SECAM format. To return <strong>to</strong> <strong>the</strong> standard NTSC video output,<br />
res<strong>to</strong>re <strong>the</strong> fac<strong>to</strong>ry defaults.<br />
Display Serial Number UP ARROW: 4 times This command will cause <strong>the</strong> unit <strong>to</strong> display <strong>the</strong> serial number<br />
SELECT<br />
at <strong>the</strong> <strong>to</strong>p of <strong>the</strong> Introduc<strong>to</strong>ry Screen.<br />
Res<strong>to</strong>re Saved rESET <strong>The</strong> volume level is saved along with <strong>the</strong> o<strong>the</strong>r settings when<br />
Volume Level<br />
exiting <strong>the</strong> menus. Pressing RESET will cause <strong>the</strong> volume <strong>to</strong> revert<br />
<strong>to</strong> that volume setting.