The Outlaw's Guide to the SMS-1 - Outlaw Audio
The Outlaw's Guide to the SMS-1 - Outlaw Audio
The Outlaw's Guide to the SMS-1 - Outlaw Audio

Create successful ePaper yourself
Turn your PDF publications into a flip-book with our unique Google optimized e-Paper software.
THE OUTLAW’S GUIDE TO THE <strong>SMS</strong>-1<br />
22<br />
but can be adjusted in 1Hz increments from 15Hz <strong>to</strong> 120Hz <strong>to</strong> move any<br />
channel closer <strong>to</strong> a dip or peak that needs help. Lastly, <strong>the</strong>re is <strong>the</strong> Q setting.<br />
<strong>The</strong> default setting for Q is 4.3, but it can be adjusted in 0.1 increments<br />
from 0.3 <strong>to</strong> 20.0. Q defines how wide a section of <strong>the</strong> curve is affected by<br />
<strong>the</strong> equalizer channel. <strong>The</strong> default of 4.3 represents approximately 1/3 of<br />
an octave, while <strong>the</strong> minimum of 0.3 represents about 3.5 octaves and <strong>the</strong><br />
maximum of 20 represents 1/12 of an octave. Adjusting Q can help if you<br />
need <strong>to</strong> place two channels very close <strong>to</strong>ge<strong>the</strong>r without having <strong>the</strong>m overlap<br />
(such as might be necessary <strong>to</strong> apply two different level settings over a<br />
small range of <strong>the</strong> curve) or if you want <strong>to</strong> apply a single level change over<br />
a wide portion of <strong>the</strong> curve. <strong>The</strong> ability <strong>to</strong> narrow <strong>the</strong> range of influence by<br />
increasing a channel’s Q value will prove useful when we discuss some of<br />
<strong>the</strong> hazards of equalization shortly.<br />
<strong>The</strong> goal of applying equalization, as we’ve already said, is <strong>to</strong> get a<br />
smooth frequency response. That means getting <strong>the</strong> frequency response<br />
curve as flat as possible. In doing this, it is possible <strong>to</strong> get a bit carried<br />
away with <strong>the</strong> equalizer settings and create conditions that could place<br />
dangerous demands on your equipment. <strong>The</strong> biggest danger <strong>to</strong> watch<br />
out for is stacking equalizers. Stacking refers <strong>to</strong> setting two equalizers at<br />
<strong>the</strong> same frequency or at very close frequencies and applying a significant<br />
boost <strong>to</strong> both equalizers. This can place very exaggerated demands on<br />
<strong>the</strong> subwoofer and may lead <strong>to</strong> dis<strong>to</strong>rtion or damage <strong>to</strong> your speaker. If<br />
you need <strong>to</strong> place two equalizers close <strong>to</strong>ge<strong>the</strong>r and set <strong>the</strong> level <strong>to</strong> a<br />
positive value, <strong>the</strong> equalizers’ Q values should be set as high as possible<br />
<strong>to</strong> limit interaction between <strong>the</strong> two equalizers. (Stacking is a one-way<br />
street, as two closely-spaced equalizers that both have <strong>the</strong>ir levels set <strong>to</strong> a<br />
negative value will not place <strong>the</strong> subwoofer at risk.)<br />
Room Equalization Example<br />
At this point, you should be ready <strong>to</strong> use <strong>the</strong> <strong>SMS</strong>-1’s system settings, test<br />
<strong>to</strong>nes, system response curve, and parametric equalizers <strong>to</strong> perform a<br />
very effective room equalization in your space. We realize, however, that<br />
this can be a daunting task, even for an outlaw such as yourself. With that<br />
in mind, we wanted <strong>to</strong> take a few pages <strong>to</strong> show you a simple example of<br />
room equalization.<br />
<strong>The</strong> first step in a manual equalization is <strong>to</strong> take a look at what you have <strong>to</strong><br />
work with. We will assume for a moment that you have spent some time<br />
in <strong>the</strong> System Settings screen getting crossover, subsonic filter, phase,<br />
and o<strong>the</strong>r settings adjusted <strong>to</strong> your liking and that you’ve adjusted all<br />
<strong>the</strong> volume levels and crossover settings. With all that done, we start out<br />
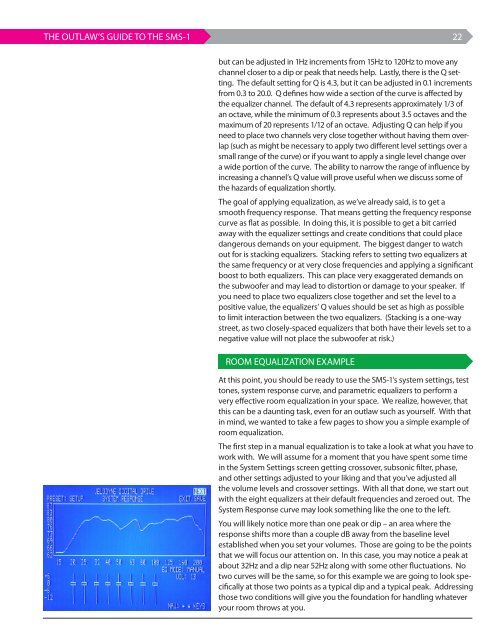
with <strong>the</strong> eight equalizers at <strong>the</strong>ir default frequencies and zeroed out. <strong>The</strong><br />
System Response curve may look something like <strong>the</strong> one <strong>to</strong> <strong>the</strong> left.<br />
You will likely notice more than one peak or dip – an area where <strong>the</strong><br />
response shifts more than a couple dB away from <strong>the</strong> baseline level<br />
established when you set your volumes. Those are going <strong>to</strong> be <strong>the</strong> points<br />
that we will focus our attention on. In this case, you may notice a peak at<br />
about 32Hz and a dip near 52Hz along with some o<strong>the</strong>r fluctuations. No<br />
two curves will be <strong>the</strong> same, so for this example we are going <strong>to</strong> look specifically<br />
at those two points as a typical dip and a typical peak. Addressing<br />
those two conditions will give you <strong>the</strong> foundation for handling whatever<br />
your room throws at you.