The Outlaw's Guide to the SMS-1 - Outlaw Audio
The Outlaw's Guide to the SMS-1 - Outlaw Audio
The Outlaw's Guide to the SMS-1 - Outlaw Audio

You also want an ePaper? Increase the reach of your titles
YUMPU automatically turns print PDFs into web optimized ePapers that Google loves.
THE OUTLAW’S GUIDE TO THE <strong>SMS</strong>-1<br />
17<br />
Once you’ve checked out <strong>the</strong> subwoofer trim at <strong>the</strong> amp and receiver (or<br />
not), let’s take a minute <strong>to</strong> set <strong>the</strong> volume for <strong>the</strong> receiver and <strong>the</strong> <strong>SMS</strong>-1.<br />
This won’t take much. Earlier, you turned <strong>the</strong> receiver’s volume down and<br />
muted <strong>the</strong> <strong>SMS</strong>-1. <strong>The</strong> <strong>SMS</strong>-1 has been playing its test <strong>to</strong>ne ever since<br />
you entered <strong>the</strong> System Response screen, but it’s been at low volume.<br />
Go ahead and start turning up <strong>the</strong> volume on <strong>the</strong> receiver. As you do so,<br />
<strong>the</strong> right side of <strong>the</strong> response curve will start <strong>to</strong> rise. Keep increasing <strong>the</strong><br />
volume until <strong>the</strong> right side is up <strong>to</strong> somewhere around 80dB (a little more<br />
than halfway up <strong>the</strong> screen). Next, un-mute <strong>the</strong> <strong>SMS</strong>-1. This will bring<br />
<strong>the</strong> subwoofer in<strong>to</strong> <strong>the</strong> mix. Adjust <strong>the</strong> <strong>SMS</strong>-1’s volume up or down until<br />
<strong>the</strong> left side of <strong>the</strong> curve matches up reasonably well with <strong>the</strong> right side<br />
of <strong>the</strong> curve. Don’t mind <strong>the</strong> dips and peaks in <strong>the</strong> curve – we’ll get <strong>to</strong><br />
those shortly. <strong>The</strong>re are some slick tricks that you can do with <strong>the</strong> System<br />
Response screen (covered in our Tips and Tricks section on page 27), and<br />
of course we’ll return <strong>to</strong> this screen in a few pages <strong>to</strong> smooth out that<br />
curve for you. For <strong>the</strong> moment, though, we’re more interested in <strong>the</strong><br />
System Settings screen.<br />
Highlight <strong>the</strong> “NEXT” but<strong>to</strong>n on <strong>the</strong> <strong>to</strong>p right corner of <strong>the</strong> System<br />
Response screen (it is probably already highlighted) and press “SELECT”<br />
on <strong>the</strong> remote <strong>to</strong> move from <strong>the</strong> System Response screen <strong>to</strong> <strong>the</strong> System<br />
Settings screen. <strong>The</strong>re’s no test <strong>to</strong>ne here, but we make up for that with a<br />
whole lot of settings <strong>to</strong> play with.<br />
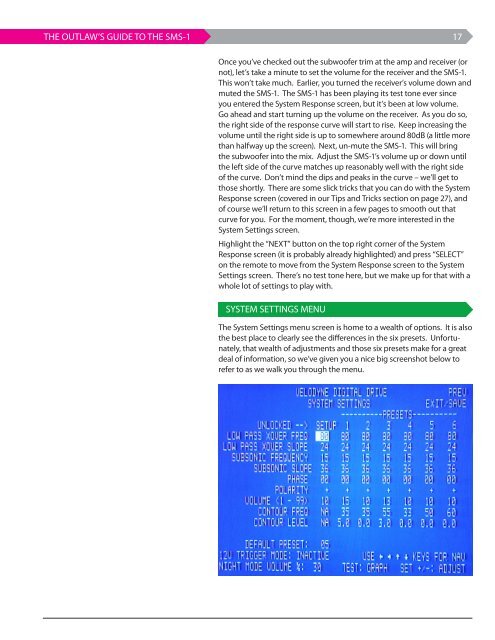
System Settings Menu<br />
<strong>The</strong> System Settings menu screen is home <strong>to</strong> a wealth of options. It is also<br />
<strong>the</strong> best place <strong>to</strong> clearly see <strong>the</strong> differences in <strong>the</strong> six presets. Unfortunately,<br />
that wealth of adjustments and those six presets make for a great<br />
deal of information, so we’ve given you a nice big screenshot below <strong>to</strong><br />
refer <strong>to</strong> as we walk you through <strong>the</strong> menu.