AP Lab 02 - Biology Lab Skills
AP Lab 02 - Biology Lab Skills
AP Lab 02 - Biology Lab Skills

You also want an ePaper? Increase the reach of your titles
YUMPU automatically turns print PDFs into web optimized ePapers that Google loves.
Name: ______________________________ <strong>AP</strong> <strong>Biology</strong> – <strong>Lab</strong> <strong>02</strong><br />
Micropipeting and Microquantity Measurement<br />
This part of the lab introduces sterile pipeting and micropipeting techniques used often in<br />
molecular and microbiology protocols. Mastery of these techniques will be important for good<br />
results in these applications. Most microchemical protocols involve very small volumes of DNA<br />
and other reagents. These require you to use an adjustable micropipette that measures as little<br />
as one microliter (L) a millionth of a liter, compared to millileters (mL) which are only one<br />
thousandth of a liter.<br />
Using a Glass Pipette<br />
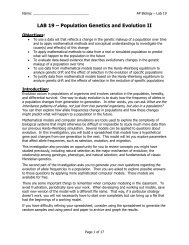
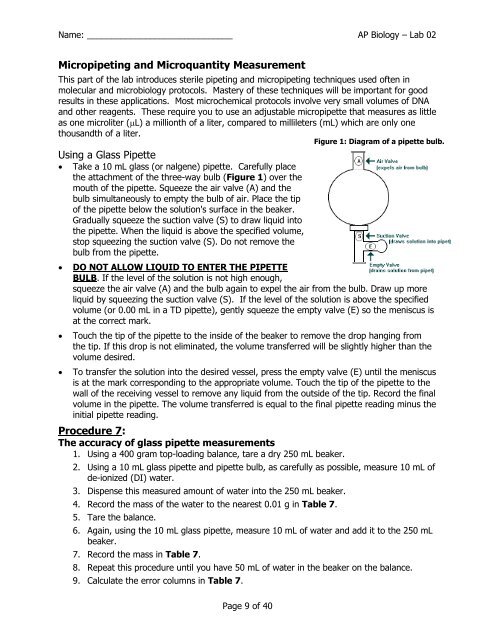
Take a 10 mL glass (or nalgene) pipette. Carefully place<br />
the attachment of the three-way bulb (Figure 1) over the<br />
mouth of the pipette. Squeeze the air valve (A) and the<br />
bulb simultaneously to empty the bulb of air. Place the tip<br />
of the pipette below the solution's surface in the beaker.<br />
Gradually squeeze the suction valve (S) to draw liquid into<br />
the pipette. When the liquid is above the specified volume,<br />
stop squeezing the suction valve (S). Do not remove the<br />
bulb from the pipette.<br />
<br />
<br />
<br />
DO NOT ALLOW LIQUID TO ENTER THE PIPETTE<br />
BULB. If the level of the solution is not high enough,<br />
squeeze the air valve (A) and the bulb again to expel the air from the bulb. Draw up more<br />
liquid by squeezing the suction valve (S). If the level of the solution is above the specified<br />
volume (or 0.00 mL in a TD pipette), gently squeeze the empty valve (E) so the meniscus is<br />
at the correct mark.<br />
Touch the tip of the pipette to the inside of the beaker to remove the drop hanging from<br />
the tip. If this drop is not eliminated, the volume transferred will be slightly higher than the<br />
volume desired.<br />
To transfer the solution into the desired vessel, press the empty valve (E) until the meniscus<br />
is at the mark corresponding to the appropriate volume. Touch the tip of the pipette to the<br />
wall of the receiving vessel to remove any liquid from the outside of the tip. Record the final<br />
volume in the pipette. The volume transferred is equal to the final pipette reading minus the<br />
initial pipette reading.<br />
Procedure 7:<br />
The accuracy of glass pipette measurements<br />
1. Using a 400 gram top-loading balance, tare a dry 250 mL beaker.<br />
2. Using a 10 mL glass pipette and pipette bulb, as carefully as possible, measure 10 mL of<br />
de-ionized (DI) water.<br />
3. Dispense this measured amount of water into the 250 mL beaker.<br />
4. Record the mass of the water to the nearest 0.01 g in Table 7.<br />
5. Tare the balance.<br />
6. Again, using the 10 mL glass pipette, measure 10 mL of water and add it to the 250 mL<br />
beaker.<br />
7. Record the mass in Table 7.<br />
8. Repeat this procedure until you have 50 mL of water in the beaker on the balance.<br />
9. Calculate the error columns in Table 7.<br />
Figure 1: Diagram of a pipette bulb.<br />
Page 9 of 40