

QUILTsocial | Issue 03 Spring 2015
FREE issue of QUILTsocial Magazine! Featuring a full 68 pages packed with tips, projects, and quilting know-how! Take it all off!! This issue reveals the quilts created by Elaine Theriault and Jennifer Houlden for What's good for the gal, is good for the guy Quilt Challenge. Not to miss! Plus...7 design elements that add personality to your quilts; Quilting with templates; Sewing applique shapes; and Thread painting with DecoBob thread! And did I mention the awesome projects?... It's a must-read issue! Spread the news about QUILTsocial...don't forget to share / post / tweet / pin to let your friends in on all the fun! And don't forget to follow our blog at www.QUILTsocial.com for daily tips and techniques.
FREE issue of QUILTsocial Magazine! Featuring a full 68 pages packed with tips, projects, and quilting know-how!
Take it all off!! This issue reveals the quilts created by Elaine Theriault and Jennifer Houlden for What's good for the gal, is good for the guy Quilt Challenge. Not to miss! Plus...7 design elements that add personality to your quilts; Quilting with templates; Sewing applique shapes; and Thread painting with DecoBob thread! And did I mention the awesome projects?... It's a must-read issue!
Spread the news about QUILTsocial...don't forget to share / post / tweet / pin to let your friends in on all the fun! And don't forget to follow our blog at www.QUILTsocial.com for daily tips and techniques.

You also want an ePaper? Increase the reach of your titles
YUMPU automatically turns print PDFs into web optimized ePapers that Google loves.
Sewing<br />
the<br />
applique shapes<br />
After spending a couple days going through the different decorative<br />
stitches on the PFAFF Creative 4.5 sewing machine and finally made a<br />
decision on which stitch to use when sewing the applique shapes to<br />
the What’s Good For the Gal is Good For the Guy quilt.<br />
Certainly it hasn't been easy to choose from the extensive selection of<br />
decorative stiches. Narrowing it down to a 'manly' stitch helped, but<br />
nonetheless. "Please give a standing ovation and round of applause<br />
to the winner: The Satin Stitch!" The satin stitch is elegant and neutral,<br />
and used on the applique for this particular quilt, represents a clean<br />
and logical personality. Of all the stitches I auditioned, this one will<br />
stand up to daily wear and tear, when used daily in a university dorm.<br />
Sewing around the shapes<br />
The next decision was choosing a color of thread to use for stitching<br />
around each applique shape. I decided on a taupe color, which blends<br />
with some of the Eclectic Elements fabric and stands out on others.<br />
All in all, I do believe it’s a good balance. The applique shapes can be<br />
seen, but don’t jump off the quilt saying: “look at me, here I am!”<br />
The stitch width was set at 3.0 and the length at 1.0 to create a fairly<br />
dense stitch.<br />
TIP When sewing a dense satin stitch do not try to push or pull<br />
the fabric along as this causes gaps in the stitching. Just let the<br />
machine feed the fabric along and the stitching will be nice and<br />
even.<br />
To help create a great looking stitch, I used an open toed foot with<br />
the IDT system engaged. I also added a leave-in fusible fleece stabilizer<br />
behind the applique shapes on the back of the quilt. These three<br />
elements allow the stitches to look their best.<br />
Once the sewing was complete on the shapes, the next step is to sew<br />
the quilt top together. I sewed the sections together row-by-row. As<br />
the rows were sewn together, other hexagons needed to be added.<br />
But, with the large throat space on the PFAFF Creative 4.5, it was easy<br />
to maneuver the quilt to stitch around those few shapes.<br />
Just because I like to tease, I’m only going to show part of the quilt<br />
sewn together.<br />
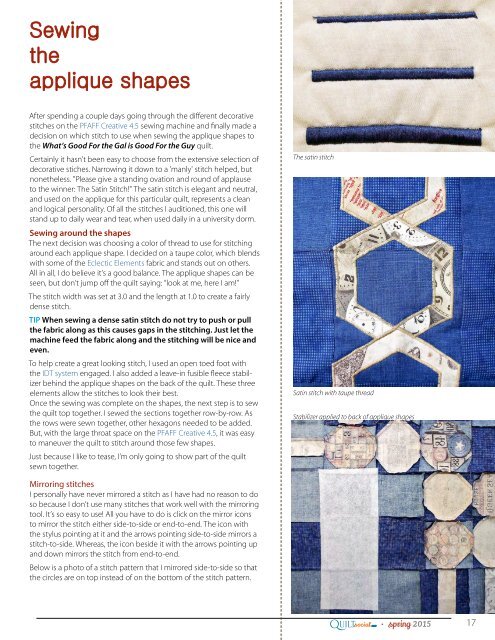
The satin stitch<br />
Satin stitch with taupe thread<br />
Stabilizer applied to back of applique shapes<br />
Mirroring stitches<br />
I personally have never mirrored a stitch as I have had no reason to do<br />
so because I don’t use many stitches that work well with the mirroring<br />
tool. It’s so easy to use! All you have to do is click on the mirror icons<br />
to mirror the stitch either side-to-side or end-to-end. The icon with<br />
the stylus pointing at it and the arrows pointing side-to-side mirrors a<br />
stitch-to-side. Whereas, the icon beside it with the arrows pointing up<br />
and down mirrors the stitch from end-to-end.<br />
Below is a photo of a stitch pattern that I mirrored side-to-side so that<br />
the circles are on top instead of on the bottom of the stitch pattern.<br />
Q<br />
UILTsocial<br />
.com<br />
●<br />
spring <strong>2015</strong><br />
17


