

QUILTsocial | Issue 03 Spring 2015
FREE issue of QUILTsocial Magazine! Featuring a full 68 pages packed with tips, projects, and quilting know-how! Take it all off!! This issue reveals the quilts created by Elaine Theriault and Jennifer Houlden for What's good for the gal, is good for the guy Quilt Challenge. Not to miss! Plus...7 design elements that add personality to your quilts; Quilting with templates; Sewing applique shapes; and Thread painting with DecoBob thread! And did I mention the awesome projects?... It's a must-read issue! Spread the news about QUILTsocial...don't forget to share / post / tweet / pin to let your friends in on all the fun! And don't forget to follow our blog at www.QUILTsocial.com for daily tips and techniques.
FREE issue of QUILTsocial Magazine! Featuring a full 68 pages packed with tips, projects, and quilting know-how!
Take it all off!! This issue reveals the quilts created by Elaine Theriault and Jennifer Houlden for What's good for the gal, is good for the guy Quilt Challenge. Not to miss! Plus...7 design elements that add personality to your quilts; Quilting with templates; Sewing applique shapes; and Thread painting with DecoBob thread! And did I mention the awesome projects?... It's a must-read issue!
Spread the news about QUILTsocial...don't forget to share / post / tweet / pin to let your friends in on all the fun! And don't forget to follow our blog at www.QUILTsocial.com for daily tips and techniques.

Create successful ePaper yourself
Turn your PDF publications into a flip-book with our unique Google optimized e-Paper software.
Once I was happy with the text, I placed the quilt top in the<br />
embroidery hoop and hit START. It’s moments like these that<br />
you hope everything goes well. There was no turning back. I<br />
breathed a huge sigh of relief when that part was completed.<br />
Again, I wanted this poem to be subtle. Almost like I didn’t want<br />
it to be seen unless the observer ‘felt’ the words. It was hard to<br />
choose a color of thread that would completely blend in, but I’m<br />
happy with the results. And for someone who doesn’t do a lot<br />
of embroidery, I hooped it pretty straight!<br />
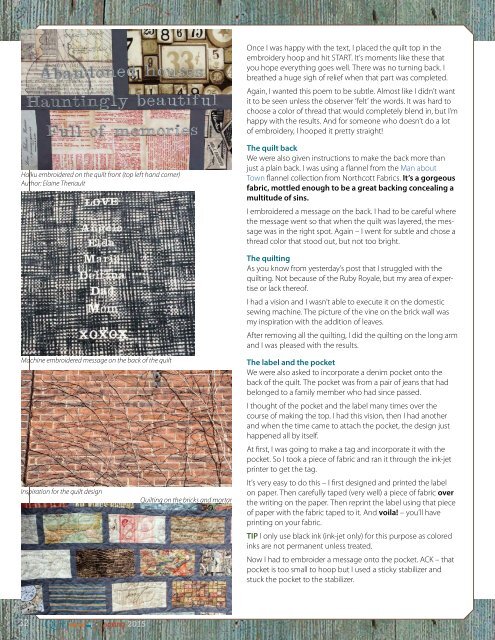
Haiku embroidered on the quilt front (top left hand corner)<br />
Author: Elaine Theriault<br />
The quilt back<br />
We were also given instructions to make the back more than<br />
just a plain back. I was using a flannel from the Man about<br />
Town flannel collection from Northcott Fabrics. It’s a gorgeous<br />
fabric, mottled enough to be a great backing concealing a<br />
multitude of sins.<br />
I embroidered a message on the back. I had to be careful where<br />
the message went so that when the quilt was layered, the message<br />
was in the right spot. Again – I went for subtle and chose a<br />
thread color that stood out, but not too bright.<br />
The quilting<br />
As you know from yesterday’s post that I struggled with the<br />
quilting. Not because of the Ruby Royale, but my area of expertise<br />
or lack thereof.<br />
I had a vision and I wasn’t able to execute it on the domestic<br />
sewing machine. The picture of the vine on the brick wall was<br />
my inspiration with the addition of leaves.<br />
After removing all the quilting, I did the quilting on the long arm<br />
and I was pleased with the results.<br />
Machine embroidered message on the back of the quilt<br />
Inspiration for the quilt design<br />
Quilting on the bricks and mortar<br />
The label and the pocket<br />
We were also asked to incorporate a denim pocket onto the<br />
back of the quilt. The pocket was from a pair of jeans that had<br />
belonged to a family member who had since passed.<br />
I thought of the pocket and the label many times over the<br />
course of making the top. I had this vision, then I had another<br />
and when the time came to attach the pocket, the design just<br />
happened all by itself.<br />
At first, I was going to make a tag and incorporate it with the<br />
pocket. So I took a piece of fabric and ran it through the ink-jet<br />
printer to get the tag.<br />
It’s very easy to do this – I first designed and printed the label<br />
on paper. Then carefully taped (very well) a piece of fabric over<br />
the writing on the paper. Then reprint the label using that piece<br />
of paper with the fabric taped to it. And voila! – you’ll have<br />
printing on your fabric.<br />
TIP I only use black ink (ink-jet only) for this purpose as colored<br />
inks are not permanent unless treated.<br />
Now I had to embroider a message onto the pocket. ACK – that<br />
pocket is too small to hoop but I used a sticky stabilizer and<br />
stuck the pocket to the stabilizer.<br />
Q<br />
32 ●<br />
.com spring <strong>2015</strong><br />
UILTsocial


