

QUILTsocial | Issue 02 Winter 2014-15
FREE quilting magazine! Welcome to the QUILTsocial winter issue, brought to you by the publishers of A Needle Pulling Thread Magazine and the www.QUILTsocial.com daily blog. This issue is a great resource for a lesson on threads, sewing machine tension tips, decorative stitches, snowflake quilt block, paper piecing in 3D and the quilt-as-you-go method! It includes fun things you can make like quilted runners and mug rugs, a banner, a snowman and quilted snowflakes, to name a few. Don't miss the Mug Rug Challenge and the introduction to the What's Good for the Gal, is Good for the Guy, a quilt challenge with a twist! Don't miss out on daily tips, techniques, reviews, and projects on the companion blog at www.QUILTsocial.com.
FREE quilting magazine! Welcome to the QUILTsocial winter issue, brought to you by the publishers of A Needle Pulling Thread Magazine and the www.QUILTsocial.com daily blog. This issue is a great resource for a lesson on threads, sewing machine tension tips, decorative stitches, snowflake quilt block, paper piecing in 3D and the quilt-as-you-go method! It includes fun things you can make like quilted runners and mug rugs, a banner, a snowman and quilted snowflakes, to name a few. Don't miss the Mug Rug Challenge and the introduction to the What's Good for the Gal, is Good for the Guy, a quilt challenge with a twist! Don't miss out on daily tips, techniques, reviews, and projects on the companion blog at www.QUILTsocial.com.

Create successful ePaper yourself
Turn your PDF publications into a flip-book with our unique Google optimized e-Paper software.
Prior to starting on the main project I always check my tension<br />
on a test piece. I had to fiddle around a bit until the stitches<br />
looked even on both sides. Doing a test piece is a good practice<br />
to get into because ripping out free motion quilting is<br />
no fun at all – just ask my husband.<br />
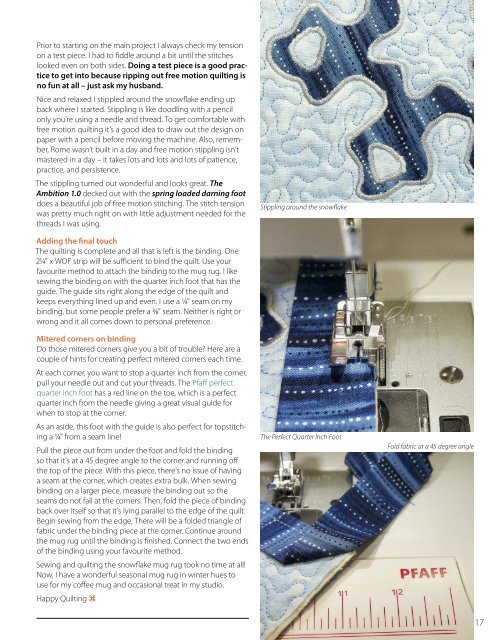
Nice and relaxed I stippled around the snowflake ending up<br />
back where I started. Stippling is like doodling with a pencil<br />
only you’re using a needle and thread. To get comfortable with<br />
free motion quilting it’s a good idea to draw out the design on<br />
paper with a pencil before moving the machine. Also, remember,<br />
Rome wasn’t built in a day and free motion stippling isn’t<br />
mastered in a day – it takes lots and lots and lots of patience,<br />
practice, and persistence.<br />
The stippling turned out wonderful and looks great. The<br />
Ambition 1.0 decked out with the spring loaded darning foot<br />
does a beautiful job of free motion stitching. The stitch tension<br />
was pretty much right on with little adjustment needed for the<br />
threads I was using.<br />
Stippling around the snowflake<br />
Adding the final touch<br />
The quilting is complete and all that is left is the binding. One<br />
2¼" x WOF strip will be sufficient to bind the quilt. Use your<br />
favourite method to attach the binding to the mug rug. I like<br />
sewing the binding on with the quarter inch foot that has the<br />
guide. The guide sits right along the edge of the quilt and<br />
keeps everything lined up and even. I use a ¼" seam on my<br />
binding, but some people prefer a 3⁄8" seam. Neither is right or<br />
wrong and it all comes down to personal preference.<br />
Mitered corners on binding<br />
Do those mitered corners give you a bit of trouble? Here are a<br />
couple of hints for creating perfect mitered corners each time.<br />
At each corner, you want to stop a quarter inch from the corner,<br />
pull your needle out and cut your threads. The Pfaff perfect<br />
quarter inch foot has a red line on the toe, which is a perfect<br />
quarter inch from the needle giving a great visual guide for<br />
when to stop at the corner.<br />
As an aside, this foot with the guide is also perfect for topstitching<br />
a ¼" from a seam line!<br />
Pull the piece out from under the foot and fold the binding<br />
so that it's at a 45 degree angle to the corner and running off<br />
the top of the piece. With this piece, there’s no issue of having<br />
a seam at the corner, which creates extra bulk. When sewing<br />
binding on a larger piece, measure the binding out so the<br />
seams do not fall at the corners. Then, fold the piece of binding<br />
back over itself so that it’s lying parallel to the edge of the quilt.<br />
Begin sewing from the edge. There will be a folded triangle of<br />
fabric under the binding piece at the corner. Continue around<br />
the mug rug until the binding is finished. Connect the two ends<br />
of the binding using your favourite method.<br />
Sewing and quilting the snowflake mug rug took no time at all!<br />
Now, I have a wonderful seasonal mug rug in winter hues to<br />
use for my coffee mug and occasional treat in my studio.<br />
Happy Quilting z<br />
The Perfect Quarter Inch Foot<br />
Fold fabric at a 45 degree angle<br />
17


