

QUILTsocial | Issue 02 Winter 2014-15
FREE quilting magazine! Welcome to the QUILTsocial winter issue, brought to you by the publishers of A Needle Pulling Thread Magazine and the www.QUILTsocial.com daily blog. This issue is a great resource for a lesson on threads, sewing machine tension tips, decorative stitches, snowflake quilt block, paper piecing in 3D and the quilt-as-you-go method! It includes fun things you can make like quilted runners and mug rugs, a banner, a snowman and quilted snowflakes, to name a few. Don't miss the Mug Rug Challenge and the introduction to the What's Good for the Gal, is Good for the Guy, a quilt challenge with a twist! Don't miss out on daily tips, techniques, reviews, and projects on the companion blog at www.QUILTsocial.com.
FREE quilting magazine! Welcome to the QUILTsocial winter issue, brought to you by the publishers of A Needle Pulling Thread Magazine and the www.QUILTsocial.com daily blog. This issue is a great resource for a lesson on threads, sewing machine tension tips, decorative stitches, snowflake quilt block, paper piecing in 3D and the quilt-as-you-go method! It includes fun things you can make like quilted runners and mug rugs, a banner, a snowman and quilted snowflakes, to name a few. Don't miss the Mug Rug Challenge and the introduction to the What's Good for the Gal, is Good for the Guy, a quilt challenge with a twist! Don't miss out on daily tips, techniques, reviews, and projects on the companion blog at www.QUILTsocial.com.

You also want an ePaper? Increase the reach of your titles
YUMPU automatically turns print PDFs into web optimized ePapers that Google loves.
18 19<br />
20 21<br />
22<br />
23<br />
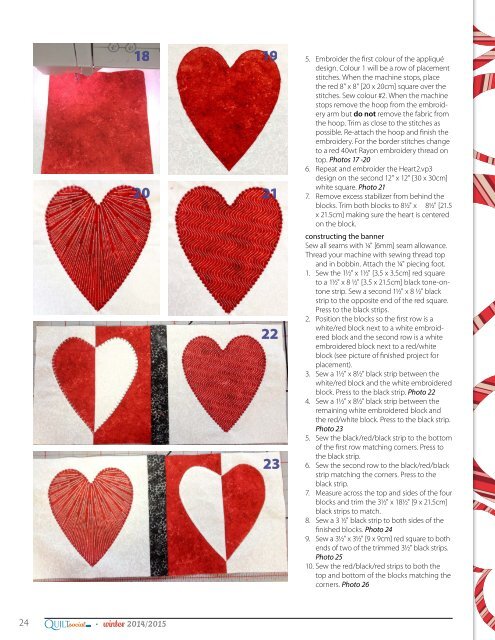
5. Embroider the first colour of the appliqué<br />
design. Colour 1 will be a row of placement<br />
stitches. When the machine stops, place<br />
the red 8" x 8" [20 x 20cm] square over the<br />
stitches. Sew colour #2. When the machine<br />
stops remove the hoop from the embroidery<br />
arm but do not remove the fabric from<br />
the hoop. Trim as close to the stitches as<br />
possible. Re-attach the hoop and finish the<br />
embroidery. For the border stitches change<br />
to a red 40wt Rayon embroidery thread on<br />
top. Photos 17 -20<br />
6. Repeat and embroider the Heart2.vp3<br />
design on the second 12" x 12" [30 x 30cm]<br />
white square. Photo 21<br />
7. Remove excess stabilizer from behind the<br />
blocks. Trim both blocks to 8½" x 8½" [21.5<br />
x 21.5cm] making sure the heart is centered<br />
on the block.<br />
constructing the banner<br />
Sew all seams with ¼" [6mm] seam allowance.<br />
Thread your machine with sewing thread top<br />
and in bobbin. Attach the ¼" piecing foot.<br />
1. Sew the 1½" x 1½" [3.5 x 3.5cm] red square<br />
to a 1½" x 8 ½" [3.5 x 21.5cm] black tone-ontone<br />
strip. Sew a second 1½" x 8 ½" black<br />
strip to the opposite end of the red square.<br />
Press to the black strips.<br />
2. Position the blocks so the first row is a<br />
white/red block next to a white embroidered<br />
block and the second row is a white<br />
embroidered block next to a red/white<br />
block (see picture of finished project for<br />
placement).<br />
3. Sew a 1½" x 8½" black strip between the<br />
white/red block and the white embroidered<br />
block. Press to the black strip. Photo 22<br />
4. Sew a 1½" x 8½" black strip between the<br />
remaining white embroidered block and<br />
the red/white block. Press to the black strip.<br />
Photo 23<br />
5. Sew the black/red/black strip to the bottom<br />
of the first row matching corners. Press to<br />
the black strip.<br />
6. Sew the second row to the black/red/black<br />
strip matching the corners. Press to the<br />
black strip.<br />
7. Measure across the top and sides of the four<br />
blocks and trim the 3½" x 18½" [9 x 21.5cm]<br />
black strips to match.<br />
8. Sew a 3 ½" black strip to both sides of the<br />
finished blocks. Photo 24<br />
9. Sew a 3½" x 3½" [9 x 9cm] red square to both<br />
ends of two of the trimmed 3½" black strips.<br />
Photo 25<br />
10. Sew the red/black/red strips to both the<br />
top and bottom of the blocks matching the<br />
corners. Photo 26<br />
24<br />
Q<br />
UILTsocial<br />
.com<br />
●<br />
winter <strong>2014</strong>/20<strong>15</strong>


