

QUILTsocial | Issue 02 Winter 2014-15
FREE quilting magazine! Welcome to the QUILTsocial winter issue, brought to you by the publishers of A Needle Pulling Thread Magazine and the www.QUILTsocial.com daily blog. This issue is a great resource for a lesson on threads, sewing machine tension tips, decorative stitches, snowflake quilt block, paper piecing in 3D and the quilt-as-you-go method! It includes fun things you can make like quilted runners and mug rugs, a banner, a snowman and quilted snowflakes, to name a few. Don't miss the Mug Rug Challenge and the introduction to the What's Good for the Gal, is Good for the Guy, a quilt challenge with a twist! Don't miss out on daily tips, techniques, reviews, and projects on the companion blog at www.QUILTsocial.com.
FREE quilting magazine! Welcome to the QUILTsocial winter issue, brought to you by the publishers of A Needle Pulling Thread Magazine and the www.QUILTsocial.com daily blog. This issue is a great resource for a lesson on threads, sewing machine tension tips, decorative stitches, snowflake quilt block, paper piecing in 3D and the quilt-as-you-go method! It includes fun things you can make like quilted runners and mug rugs, a banner, a snowman and quilted snowflakes, to name a few. Don't miss the Mug Rug Challenge and the introduction to the What's Good for the Gal, is Good for the Guy, a quilt challenge with a twist! Don't miss out on daily tips, techniques, reviews, and projects on the companion blog at www.QUILTsocial.com.

Create successful ePaper yourself
Turn your PDF publications into a flip-book with our unique Google optimized e-Paper software.
embroidering the words Be My<br />
Valentine<br />
1. Using the built-in embroidery fonts<br />
on your embroidery machine, pick<br />
a font approximately 30mm in size.<br />
Type in the words Be My.<br />
2. Hoop a piece of Tear-A-Way stabilizer<br />
in the embroidery hoop and<br />
attach to the embroidery arm.<br />
3. Place the top border of the banner<br />
over the stabilizer and use the<br />
baste feature of the machine to<br />
baste the border to the stabilizer.<br />
4. Thread the embroidery machine<br />
with 40wt rayon thread on top and<br />
bobbin thread in the bobbin.<br />
5. Embroider the words Be My in the<br />
upper left corner of the border.<br />
6. Repeat with the word Valentine<br />
and embroider it in the lower right<br />
hand corner of the border.<br />
quilting the banner<br />
1. Place the 26" x 26" [66 x 66cm]<br />
black tone-on-tone fabric face<br />
down on a surface. Tape in place.<br />
Place the 26" x 26" piece of quilt<br />
batting over the fabric and centre<br />
your banner over the quilt batting.<br />
2. Use your favourite method to<br />
baste the banner.<br />
3. Thread the machine with invisible<br />
thread on top and black thread in<br />
the bobbin.<br />
4. Attach the Stitch in the Ditch foot.<br />
Engage the IDT system or walking<br />
foot.<br />
5. Stitch in the ditch along the sashing<br />
strips making sure the backing<br />
and quilt top are smooth.<br />
6. Thread the machine with white<br />
40wt rayon embroidery thread<br />
on top and black thread in the<br />
bobbin.<br />
7. Attach the free motion foot.<br />
8. Set the machine for free motion<br />
quilting.<br />
9. Stipple quilt around each heart on<br />
the white fabric. Change to red<br />
thread for the red fabric and black<br />
thread for the black border fabric.<br />
10. Sew a triple zigzag around the outside<br />
edge and trim the backing/<br />
batting to the banner size making<br />
sure the banner is square.<br />
making the sleeve and binding the<br />
banner<br />
Use the remaining fabric to make the<br />
hanging sleeve using your favourite<br />
method and sew it to the back<br />
top of the banner.<br />
1. Sew the 2½" x WOF [6cm x WOF]<br />
red tone-on-tone fabric strips<br />
together mitring the join. Trim to<br />
¼" [6mm] and press open.<br />
2. Fold the strip in half wrong sides<br />
together and press.<br />
3. Attach the standard sewing foot.<br />
4. Thread with sewing thread to<br />
match the binding.<br />
5. Match the raw edges. Start sewing<br />
the binding from the wrong<br />
side of the bottom of the banner<br />
approximately 6" [<strong>15</strong>cm] from one<br />
corner and leave a 6" tail. Stop 3⁄8"<br />
[9.5mm] from the corner, pivot<br />
and sew off to the corner. Fold<br />
back the binding and create a<br />
mitred corner. Continue sewing<br />
the binding around the banner<br />
mitring at each corner.<br />
6. Finish the ends of the binding<br />
with your favourite method.<br />
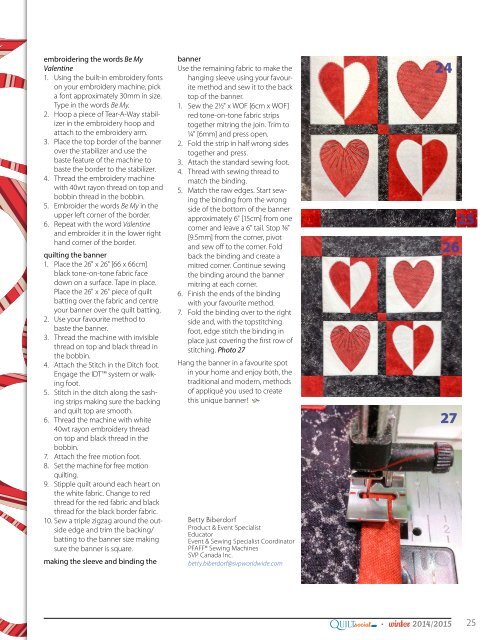
7. Fold the binding over to the right<br />
side and, with the topstitching<br />
foot, edge stitch the binding in<br />
place just covering the first row of<br />
stitching. Photo 27<br />
Hang the banner in a favourite spot<br />
in your home and enjoy both, the<br />
traditional and modern, methods<br />
of appliqué you used to create<br />
this unique banner! <br />
Betty Biberdorf<br />
Product & Event Specialist<br />
Educator<br />
Event & Sewing Specialist Coordinator<br />
PFAFF® Sewing Machines<br />
SVP Canada Inc.<br />
betty.biberdorf@svpworldwide.com<br />
24<br />
25<br />
26<br />
27<br />
Q<br />
UILTsocial<br />
.com<br />
●<br />
winter <strong>2014</strong>/20<strong>15</strong><br />
25


