Zest LOCATOR ROOT ATTACH.qxd - Proscan
Zest LOCATOR ROOT ATTACH.qxd - Proscan
Zest LOCATOR ROOT ATTACH.qxd - Proscan

You also want an ePaper? Increase the reach of your titles
YUMPU automatically turns print PDFs into web optimized ePapers that Google loves.
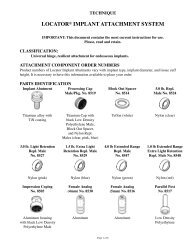
White Block-OutSpacer & ProcessingCap Male#8519 PackageDenture BaseFig. 6Male Removal Tool/Locator Core Tool#8393Fig. 9Male Seating Tool/Locator Core Tool#8393Fig. 104. Prepare a recess in the denture to accommodate the protruding Processing Cap Male.There must be no contact between the denture and the titanium cap. If the denture rests onthe metal cap, excess pressure on the root will be the result.5. Use the Chairside Lightcure Acrylic Resin Kit (<strong>Zest</strong> order #9403) to light cure bond theProcessing Cap Male into the denture (Fig. 7 and 8), or mix a permanent self-curingacrylic and place a small amount in the recess of the denture and around the metal cap ofthe Processing Cap Male.Fig. 7Fig. 86. Insert the denture into position in the oral cavity. Guide the patient into occlusion,maintaining a proper relationship with the opposing arch. Maintain the denture in apassive condition, without compression of the soft tissue while the acrylic sets.Excessive occlusal pressure during the setting time may cause tissue recoil againstthe denture base and could contribute to dislodging and wear of the nylon males.7. After the acrylic resin has cured, remove the denture and discard the white spacer. Use abur to remove excess acrylic and polish the denture base before changing to the final male.8. Use the <strong>LOCATOR</strong> Male Removal Tool (attached to the Locator Core Tool, <strong>Zest</strong> order#8393) to remove the Black Processing Male from the metal denture cap. The sharpcircular edge on the end of the removal tool should be wedged tightly down into the verybottom of the plastic male so that it will catch the inside of the black plastic insert to pullit at an angle out of the metal housing. (Fig. 9) To discard the nylon male from the newtip on the Core Tool, point the tool down and away from you and tighten the new MaleRemoval Tool clockwise back onto the Core Tool. This will activate the removal pin anddislodge the nylon male from the tip end of the Male Removal Tool.9. The <strong>LOCATOR</strong> Male Seating Tool (contained in Locator Core Tool, <strong>Zest</strong> order #8393) isused to firmly push a <strong>LOCATOR</strong> Replacement Male into the empty metal denture cap.(Fig. 10) The replacement male must seat securely into place, level with the rim of thecap. (Fig. 11) Use of multiple Locator attachments (3 or more) in the same dental archmay require use of the 3.0 lbs. (light retention) pink colored Replacement Male No. 8527or 1.5 lbs. (extra light retention) blue colored Replacement Male No. 8529, for easierremoval of the prosthesis by the patient.NOTE: The Replacement Male will not stay on the tool when it is turned upside downdue to the varying sizes of males available. It is best to hold the denture with the baseside down and snap the male into the metal denture cap.10. Instruct the patient in the path of insertion. Have the patient insert and remove theappliance several times.C. <strong>LOCATOR</strong> MALE PLACEMENT BY THE LABORATORY3. Take an impression using a firm body impression material, exercising caution notto compress the soft tissue. (Fig. 12) When the impression is withdrawn, theProcessing Cap Males will remain on the cemented females.4. Remove the Processing Cap Male from each female and snap it onto a <strong>LOCATOR</strong>Female Analog (<strong>Zest</strong> order #8516). Reposition this assembly back into the impressionmaking sure it is fully seated. (Fig. 13)In the Laboratory:5. Pour the master cast. Upon separation, the Female Analog is a part of the master castreplicating the position of the cemented <strong>LOCATOR</strong> Female in the oral cavity.6. Before waxing and processing the appliance place a <strong>LOCATOR</strong> Cap with BlackProcessing Male into each Female Analog in the master cast (Fig. 14). Make sure themale is fully seated.7. Set the teeth and wax the appliance. Proceed with the processing technique of yourchoice through the boil-out step.8. After the boil-out, remove the Processing Cap Male. Place a White Block-Out Spacer(<strong>Zest</strong> order #8519 Package) over the head of each Female Analog. The spacer isused to block out the remaining exposed surfaces of the root, so that the processedacrylic will not come in contact with the root. The space created between the rootand the denture base will allow the full resilient function of the pivoting metal denturecap over the <strong>LOCATOR</strong> Male.9. Re-insert the <strong>LOCATOR</strong> Black Processing Cap Male onto each Female Analog, leavingthe White Block-Out Spacer beneath it. The Black Processing Male will maintain theoverdenture in the upper limit of its vertical resiliency during the processing procedure.10. Complete the processing and discard the white spacer. Avoid damage to the final maleby polishing the denture base before changing to the final male.11. Use the <strong>LOCATOR</strong> Male Removal Tool (attached to the Locator Core Tool, <strong>Zest</strong> order#8393) to remove the Black Processing Male from the metal denture cap. The sharpcircular edge on the end of the removal tool should be wedged tightly down into thevery bottom of the plastic male so that it will catch the inside of the black plastic insertto pull it at an angle out of the metal housing. (Fig. 15)12. The <strong>LOCATOR</strong> Male Seating Tool (contained in Locator Core Tool, <strong>Zest</strong> order #8393)is used to firmly push a <strong>LOCATOR</strong> Replacement Male into the empty metal denturecap. (Fig. 16) The replacement male must seat securely into place, level with the rim ofthe cap. (Fig. 17) Use of multiple Locator attachments (3 or more) in the same dentalarch may require use of the 3.0 lbs. (light retention) pink colored Replacement MaleNo. 8527 or 1.5 lbs. (extra light retention) blue colored Replacement Male No. 8529,for easier removal of the prosthesis by the patient.NOTE: The Replacement Male will not stay on the tool when it is turned upsidedown due to the varying sizes of males available. It is best to hold the denture withthe base side down and snap the male into the metal denture cap.Processing CapMale #8519PackageImpressionMaterialFig. 12Female Analog(5mm) #8516Fig. 13Denture BaseProcessingModelFig. 14Fig. 11In the Operatory:1. Cementing of the <strong>LOCATOR</strong> Females and the final root contouring must be completedbefore beginning the procedure for placement of the <strong>LOCATOR</strong> Male.2. Insert a <strong>LOCATOR</strong> Cap with Black Processing Male (<strong>Zest</strong> order #8519 Package) intoeach cemented female. The built-in spacer of the Black Processing Male will maintain theoverdenture in its upper limit of vertical resiliency during the processing procedure.Fig. 15Page 4 of 8 Fig. 16Page 5 of 8Fig. 17