

Sport Bike Carrier Installation Instructions - ProRac
Sport Bike Carrier Installation Instructions - ProRac
Sport Bike Carrier Installation Instructions - ProRac

Create successful ePaper yourself
Turn your PDF publications into a flip-book with our unique Google optimized e-Paper software.
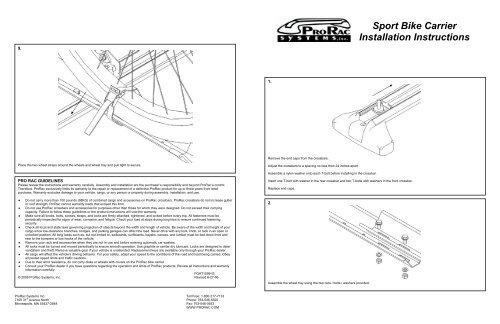
9.<strong>Sport</strong> <strong>Bike</strong> <strong>Carrier</strong><strong>Installation</strong> <strong>Instructions</strong>1.Remove the end caps from the crossbars.Place the two wheel straps around the wheels and wheel tray and pull tight to secure.Adjust the crossbars to a spacing no less then 24 inches apart.Assemble a nylon washer onto each T-bolt before installing in the crossbar.PRO RAC GUIDELINESPlease review the instructions and warranty carefully. Assembly and installation are the purchaser’s responsibility and beyond <strong>ProRac</strong>’s control.Therefore, <strong>ProRac</strong> exclusively limits its warranty to the repair or replacement of a defective <strong>ProRac</strong> product for up to three years from retailpurchase. Warranty excludes damage to your vehicle, cargo, or any person or property during assembly, installation, and use.♦ Do not carry more than 150 pounds (68KG) of combined cargo and accessories on <strong>ProRac</strong> crossbars. <strong>ProRac</strong> crossbars do not increase gutteror roof strength. <strong>ProRac</strong> cannot warranty loads that exceed this limit.♦ Do not use <strong>ProRac</strong> crossbars and accessories for purposes other than those for which they were designed. Do not exceed their carryingcapacity. Failure to follow these guidelines or the product instructions will void the warranty.♦ Make sure all knobs, bolts, screws, straps, and locks are firmly attached, tightened, and locked before every trip. All fasteners must beperiodically inspected for signs of wear, corrosion, and fatigue. Check your load at stops during long trips to ensure continued fasteningsecurity.♦ Check all local and state laws governing projection of objects beyond the width and length of vehicle. Be aware of the width and height of yourcargo since low-clearance branches, bridges, and parking garages can affect the load. Never drive with any lock, knob, or rack in an open orunlocked position. All long loads such as, but not limited to, sailboards, surfboards, kayaks, canoes, and lumber must be tied down front andrear to the bumpers or tow hooks of the vehicle.♦ Remove your rack and accessories when they are not in use and before entering automatic car washes.♦ All locks must be turned and moved periodically to ensure smooth operation. Use graphite or similar dry lubricant. Locks are designed to detervandalism and theft. Remove valuable gear if your vehicle is unattended. Replacement keys are available only through your <strong>ProRac</strong> dealer.♦ All cargo will affect the vehicle’s driving behavior. For your safety, adapt your speed to the conditions of the road and load being carried. Obeyall posted speed limits and traffic cautions.♦ Due to their wind resistance, do not carry disks or wheels with covers on the <strong>ProRac</strong> bike carrier.♦ Consult your <strong>ProRac</strong> dealer if you have questions regarding the operation and limits of <strong>ProRac</strong> products. Review all instructions and warrantyinformation carefully.FGAT1599-IS© 2006 <strong>ProRac</strong> Systems, Inc. Revised 6-27-06Insert one T-bolt with washer in the rear crossbar and two T-bolts with washers in the front crossbar.Replace end caps.2.Assemble the wheel tray using the two nuts / bolts / washers provided.<strong>ProRac</strong> Systems Inc. Toll Free: 1-800-217-71337109 31 st Avenue North Phone: 763-546-5620Minneapolis, MN 55427-2848 Fax: 763-546-0933WWW.PRORAC.COM
3.5.7.Assemble the bike support arm bracket to the wheel tray using the two nuts/ bolts/ washers provided.It is important that the bike sits centered with the wheels roughly equal distance from the wheel tray ends with the bike support arm clamped intoposition on your bike down tube.If bike is not centered on the wheel tray, adjust by moving the bike support bracket along the wheel tray. Make sure the nuts are firmly tightened.Slip on plastic end protector.Adjust the rear crossbar so that the t-bolt lines up with the bracket.Place the rear bracket over the t-bolt.Tighten with knob6.Insert the rubber cushions into the bike clamp jaws.8.4.Black coated nutAssemble the wheel tray to the bracket using one nut, washer, and bolt provided.Slip on plastic end protector.Adjust the front crossbar so that the t-bolts line up with the frontholes on the bike support arm bracket.Place the bike support arm bracket over the t-bolts.Place the knobs onto the T-bolts and tighten.Place the bike into position and attach the clamp to the bike’s front downtube.The angle between the support arm and the bike should be approximately90° (right angle)The knob should be firmly tightened.Remove the key and secure.<strong>ProRac</strong> Systems Inc. Toll Free: 1-800-217-71337109 31 st Avenue North Phone: 763-546-5620Minneapolis, MN 55427-2848 Fax: 763-546-0933WWW.PRORAC.COM


