Manual OCS XZ.pdf - Vetek Scales
Manual OCS XZ.pdf - Vetek Scales
Manual OCS XZ.pdf - Vetek Scales

You also want an ePaper? Increase the reach of your titles
YUMPU automatically turns print PDFs into web optimized ePapers that Google loves.
Table of contents1. Overview………………………………………………………………………22. Features & Specifications………………………………………………………23. Keypad Operation…………………………. ………………………. …………34. General Scale Operations………………………………………………………45. Battery Charging…………………………………………………. ……………56. Precautions………………………………………………………………………57. Calibration Method……………………………………………………………. 68. Sub-menu Function Setup…………………………………………………….. 69. Displays…………………………………………. ………………………. ……710. Schematics………………………………………. ………………………. ……8-9
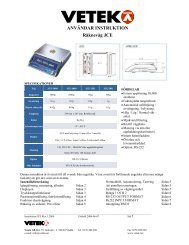
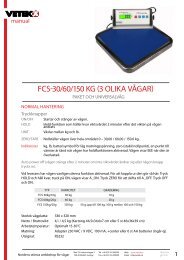
Overview<strong>OCS</strong>-<strong>XZ</strong>-GSE/GSC series electronic crane scale combines reliable, advanced electrical hardwarewith good software. Using AT-89 series micro-processor and high speed, high precision A/Dconversion technology, the GSE series of scale has a specially designed jittering compensationcircuitry so they can reach steady state quickly with strong anti-interference capability. Thisseries of scales can be used for weighing application in commercial trade, mines, storage andtransportations.SpecificationsProduct Execute Standard GB/T11883-2002Accuracy GradeIIITime to Stable Reading 10 SecondsMaximum Safe Load 150% Full ScaleDisplay Specifications 5-digit 15 mm Super High Brightness 15 mm red LED displayOr 5-digit 20 mm LCD display with back lightingHanging Fixture360-degree swirl safe hook & shackleOperating Temperature -10℃ ~ +40℃Operating Humidity 30% ~ 90% RHLow Voltage Indicator Low voltage indicator turns on when the scale power supply voltage islow.Power SupplyFour (4) AA/1.5V Alkaline batteries – StandardOption 1: Four (4) 1.2V Nickel-H rechargeable batteriesOption 2: 7.4V/2AH Lithium rechargeable Battery (self contained)Auto Power Off30 minutes after the scale inactive or at extreme low power supplyScale casingEngineering plastic, corrosion safe, anti-static and light weightKeypadLight touch keypadKeypad FunctionsThe keypad includes those keys such as ON,OFF,RST(only available the scale with LEDdisplay),DIVISION CONVERSION,ZERO.(Note: the above keys can be used in sub-menu to set up Kg-lb conversion, Beeper On/Off,Zeroing and indicator exchange, etc.)ModelMax. Capacity Mini. Weight(kg)(kg)Measured Division Selectable Div.<strong>OCS</strong>-<strong>XZ</strong>-003 30 0.2 0.01 0.005<strong>OCS</strong>-<strong>XZ</strong>-005 50 0.4 0.02 0.01<strong>OCS</strong>-<strong>XZ</strong>-010 100 1.0 0.05 0.02<strong>OCS</strong>-<strong>XZ</strong>-015 150 1.0 0.05 0.02<strong>OCS</strong>-<strong>XZ</strong>-020 200 2.0 0.10 0.05<strong>OCS</strong>-<strong>XZ</strong>-030 300 2.0 0.10 0.05
Keypad Function/OperationLEDLCD1. [ON]: With the main switch on the back of the scale is at ON position, press this key toturn on the scale.2. [RST]: Regardless the status of the scale, press this key for reset operation (applicable tothe scale with LED display).3. [OFF]: Under weighing condition, when this key is pressed to display “OFF”. Press itagain to turn off the power. The scale enters Stand-by mode.Press the main switch on theback to completely cut off the power.4. [ ] : Press this key to change between Measured Division and Selectable Division.5. [ ]: Press this key to set the current display to zero. Under weighing mode ofoperation to turn on/off the display backlighting (applicable to the scale with LCD display)General Scale Operation1. Turn On the Scalea) Open the back cover of the scale casing (see Figure 3).b) Install 4 AA batteries and set the sliding switch to “B” position. In case the scale iswith rechargeable lithium battery (purchased option), set the sliding switch to “A”position.c) Close the back cover.d) Press the mechanical switch located on the back of scale. Then press ON key to turn onthe scale. The scale’s maximum weighing capacity is first shown, and then the scale
goes through a self-check sequence.e) After 0.0 is displayed and zeroing indicator (for GSE model) or symbol (for GSC model)is lit, the scale is ready for weighing operation. (Note: it is recommended to allowscale 3~5 minutes of warm-up time before starting weighing operation).2. Zeroinga) In general, the scale shows “0.0kg” or “0.00kg” after it is turned on. In case thedisplay is showing numerical value other than “0”, press “Net” to set the display to “0”.b) For GSC series crane scale, when “Aut” is set to “0” in the sub-menu, the backlightingis turned on after “Net” key is pressed and hold for more than 3 seconds. Press andhold “Net” key for another 3 seconds, the backlighting is turned off. If “Aut” in thesub-menu is set to “1”, the backlighting is turn on automatically when there is loadadded to the scale and off after the weight being removed.3. Weight Measurementa) Once the load is suspended completely, the display shows the weight value of the load.When the “Stable” indicator is lit, weight value can be recorded.b) In case there is tare such as cable, load the tare and press “Net” to zero the display to“0”kg. The weight value after this will be the net weight. This will not change untilthe tare change or the scale being turned off.4. Turn Off the Scalea) After weighing operation, the scale should be turned off. Press the Off key twice toturn off the display.b) Press the mechanical switch on the back of the scale case to shut off the power to thescale completely to prevent the leakage of the battery.Battery Charging Method1. Lithium Battery (self contained)a) Open the scale back cover (see Figure 3) to connect the charger adaptor. And thenconnect the power for the adaptor.b) When the lithium battery is fully charged, the indicator on the charger adaptor ischanged from color red (during the charging process) to green, indicating thecompletion of the charge process.c) For optimized charging efficiency, it is recommended that the charging to be done withthe scale turned Off. According to the lab testing results, with a fully charged7.4V/2AH lithium battery, GSE series scale can operate over 20 hours and GSC seriesscale 40 hours (without backlighting).d) For optimal battery life time, it is recommended to charge the battery for every 12-hourof scale operation.2. Nickel – H Batterya) Insert the rechargeable batteries into the charger. Connect the power to the charger andfollowing the instruction of the Nickel-H battery charger.Scale Care
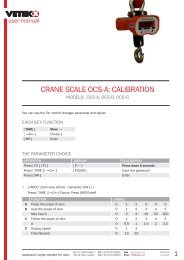
1. The alkaline batteries with the Standard Option are not rechargeable battery. Do not attemptto charge them.2. Customer can select either the 7.4V/2AH high power lithium rechargeable battery withDC8.4V/500mA charger or the 4 Nickel-H rechargeable battery/charger packages. Please donot use the rechargeable battery package other than those provided by fty. The use of thirdparty product may void any fty guarantee.3. For weighing operation, please load the scale with weight load exceeding the scale’smaximum capacity.4. Perform routine inspection and maintenance to ensure operation safety for these basic items:a) Check for loose bolts.b) Check hook and shackle for deformation, wearing and tearing.c) Check other scale component for signs of metal fatigue.d) Check for missing hook latch.e) Avoid hitting, bumping the display window.f) Do not use the scale in the rain or heavily polluted environment.g) Please remove the AA battery when scale is not used for extended period of time.For problem “a” through “d”, please stop using the scale and send it back to authorized BlueArrow dealer or Blue Arrow for repair or replacement of problem parts.Calibration MethodPlease do not attempt to calibrate the scale without standard weightStep Operation Display Remarks1 Press & Hold SPEN Enter the calibration procedure. Scale should bewith no load[ ]Key to poweron2SET Confirm zero point, when stable, display “00000”Press[ ]Key000003 Press [∧] Key to add 150.00 Load the scale. The closer to full capacity thebetter. For example, 150kgPress [ ]Key tomove the digit left4Hold To store the result once the weighing becomesPress[ ] Keystable5 ------ 150.00 System goes back to weighing mode after severalseconds.
Low voltage indicator. When this symbol is lit, the system is at low power status.Exchange indicator. When this symbol is lit, indicating the display value is at selectabledivision status.Stable indicator. When this symbol is lit, the weighing process is stable and customer cantake record of the weight.AUTO Auto <strong>Manual</strong> or Auto backlighting. When this symbol is lit, indicating the backlightingwill be on during the weighing process.
Schematics