Educator guide in PDF format - SpEd Forms Inc.
Educator guide in PDF format - SpEd Forms Inc.
Educator guide in PDF format - SpEd Forms Inc.

You also want an ePaper? Increase the reach of your titles
YUMPU automatically turns print PDFs into web optimized ePapers that Google loves.
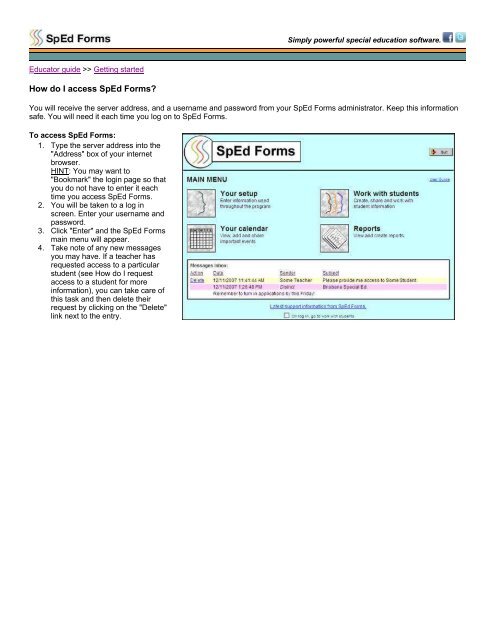
Simply powerful special education software.<strong>Educator</strong> <strong>guide</strong> >> Gett<strong>in</strong>g startedHow do I access <strong>SpEd</strong> <strong>Forms</strong>?You will receive the server address, and a username and password from your <strong>SpEd</strong> <strong>Forms</strong> adm<strong>in</strong>istrator. Keep this <strong>in</strong><strong>format</strong>ionsafe. You will need it each time you log on to <strong>SpEd</strong> <strong>Forms</strong>.To access <strong>SpEd</strong> <strong>Forms</strong>:1. Type the server address <strong>in</strong>to the"Address" box of your <strong>in</strong>ternetbrowser.HINT: You may want to"Bookmark" the log<strong>in</strong> page so thatyou do not have to enter it eachtime you access <strong>SpEd</strong> <strong>Forms</strong>.2. You will be taken to a log <strong>in</strong>screen. Enter your username andpassword.3. Click "Enter" and the <strong>SpEd</strong> <strong>Forms</strong>ma<strong>in</strong> menu will appear.4. Take note of any new messagesyou may have. If a teacher hasrequested access to a particularstudent (see How do I requestaccess to a student for more<strong>in</strong><strong>format</strong>ion), you can take care ofthis task and then delete theirrequest by click<strong>in</strong>g on the "Delete"l<strong>in</strong>k next to the entry.
Simply powerful special education software.<strong>Educator</strong> <strong>guide</strong> >> Gett<strong>in</strong>g startedHow do I change my password?Your password can be changed on your profile page.To navigate to your profile:1. Navigate to the "Ma<strong>in</strong> Menu".2. Click the "Your setup" button.3. On the "Your Setup" menu,click on "Profile".4. F<strong>in</strong>d the "Log<strong>in</strong> In<strong>format</strong>ion"section.5. Enter your new password <strong>in</strong>tothe "Password" field.6. Re-enter the new password<strong>in</strong>to the "Confirm" field.7. Click the "Save" button whenyou are f<strong>in</strong>ished mak<strong>in</strong>gchanges.8. Quit <strong>SpEd</strong> <strong>Forms</strong> and log<strong>in</strong>aga<strong>in</strong>.The <strong>SpEd</strong> <strong>Forms</strong> password policyis:1. Passwords must be at least 6characters.2. Preferably with letters andnumbers3. Can not conta<strong>in</strong> the follow<strong>in</strong>g: First name Last name User name District ID School ID District name School name
Simply powerful special education software.<strong>Educator</strong> <strong>guide</strong> >> Gett<strong>in</strong>g startedHow do I change th<strong>in</strong>gs <strong>in</strong> my profile?Your user profile is <strong>in</strong>itially set-up by the <strong>SpEd</strong> <strong>Forms</strong> adm<strong>in</strong>istrator for your district. You can change some of this profile<strong>in</strong><strong>format</strong>ion or add <strong>in</strong><strong>format</strong>ion that the adm<strong>in</strong>istrator did not enter.To Navigate to your user profile:1. Navigate to the "Ma<strong>in</strong> Menu".2. Click on the "Your setup"button.3. On the "Your Setup" menu,click on "Profile".4. Make the necessary changesand/or type <strong>in</strong> any new<strong>in</strong><strong>format</strong>ion.5. Click the "Save" button whenyou are f<strong>in</strong>ished mak<strong>in</strong>gchanges.
Simply powerful special education software.<strong>Educator</strong> <strong>guide</strong> >> Gett<strong>in</strong>g startedHow do I manage my custom materials and procedures list?After your commonly used materials, procedures and evaluators are entered <strong>in</strong>to <strong>SpEd</strong> <strong>Forms</strong>, you can attach them to any"Notice of an Educational Evaluation/Reevaluation Plan" without retyp<strong>in</strong>g them.To navigate to your custom materials and procedures:1. Navigate to the "Ma<strong>in</strong> Menu".2. Click the "Your setup" button.3. On the "Your setup" menu, click on"Commonly used Materials andProcedures".To add new materials and procedures:1. Enter the evaluation area,materials/procedures andevaluators <strong>in</strong> the blank spacesprovided next to the word "(Add)".HINT: If the area you need is notlisted <strong>in</strong> the "Evaluation Area" list,enter it <strong>in</strong> the "Other Area" field.2. The new custom area(s) will beadded when the "Save" button ispressed.HINT: More blank spaces will alsobe added when the "Save" buttonis clicked.To edit exist<strong>in</strong>g materials andprocedures:1. Make changes to any of the exist<strong>in</strong>g values as needed.2. Changes to the custom area(s) will be saved when the "Save" button is clicked.To remove exist<strong>in</strong>g materials and procedures:1. Put a check <strong>in</strong> the (Remove) checkbox next to the custom area you want to remove.2. The custom area(s) will be removed when the "Save" button is clicked.
Simply powerful special education software.<strong>Educator</strong> <strong>guide</strong> >> Gett<strong>in</strong>g startedHow do I manage my personal drop down lists?Most of the drop down lists <strong>in</strong> <strong>SpEd</strong> <strong>Forms</strong> are managed by the super adm<strong>in</strong>istrator. The super adm<strong>in</strong>istrator can also choose toallow users to add items to any of these lists. When you are allowed to add to a specific drop down list, a l<strong>in</strong>k will be provided onthe "Drop Down Lists" page. When you add entries to a specific list, the additional entries will only be available to you. No otheruser will be able to see your personal entries or manage them.HINT: In the <strong>in</strong>set (at the bottom right),notice the additional choices are added tothis user's drop down list, after a set ofdashes, for "Course to be taken".To Navigate to your drop down lists:1. Navigate to the "Ma<strong>in</strong> Menu".2. Click on the "Your setup" button.3. Click on "Edit drop down lists".To add to a specific drop down list:1. Enter the order, value and displaytext <strong>in</strong> the blank spaces providednext to the word "(Add)".HINT: The "Value" is what is saved<strong>in</strong>to the <strong>SpEd</strong> <strong>Forms</strong> database.Sometimes the value needs toconform to a specific <strong>format</strong> (anumber, no more than twocharacters, must match what is <strong>in</strong>Display, for example). Pleasecontact your <strong>SpEd</strong> <strong>Forms</strong>adm<strong>in</strong>istrator if you need additionalassistance determ<strong>in</strong><strong>in</strong>g the valuesett<strong>in</strong>g.2. The new drop down list entries willbe added when the "Save" buttonis clicked. More blank spaces willalso be added when the "Save"button is clicked.To edit exist<strong>in</strong>g drop down lists:1. Make changes to any of theexist<strong>in</strong>g values as needed.2. Changes to the drop down lists willbe saved when the "Save" buttonis clicked.To remove exist<strong>in</strong>g drop down list entries:1. Put a check <strong>in</strong> the (Remove) checkbox next to the drop down list entry(s) you wish to remove.2. The drop down list entry(s) will be removed when the "Save" button is clicked.
Simply powerful special education software.<strong>Educator</strong> <strong>guide</strong> >> Gett<strong>in</strong>g started
Simply powerful special education software.<strong>Educator</strong> <strong>guide</strong> >> Gett<strong>in</strong>g startedHow do I manage my personal credentials?You can keep track of your education license <strong>in</strong><strong>format</strong>ion, it's numerical code and expiration date <strong>in</strong> <strong>SpEd</strong> <strong>Forms</strong>.To navigate to your personalcredentials:1. Navigate to the "Ma<strong>in</strong> Menu".2. Click on the "Your setup" button.3. Click on "Credentials".To add a new credential:1. Enter the new credential<strong>in</strong><strong>format</strong>ion, it's numerical code andexpiration date <strong>in</strong> the providedfields next to the word "(Add)".2. The new credential(s) will beadded when the "Save" button isclicked.HINT: More blank spaces will alsobe added when the "Save" buttonis clicked.To edit an exist<strong>in</strong>g credential:1. Make changes to any of theexist<strong>in</strong>g values as needed.2. Changes to the credential(s) will be saved when the "Save" button is clicked.To remove an exist<strong>in</strong>g credential:1. Put a check <strong>in</strong> the (Remove) checkbox next to the credential you want to remove.2. The credential(s) will be removed when the "Save" button is clicked.
Simply powerful special education software.<strong>Educator</strong> <strong>guide</strong> >> Gett<strong>in</strong>g startedHow do I manage my personal measures?Enter commonly used measures <strong>in</strong>to yourpersonal measures bank. Thesemeasures can be used to track and graphthe progress of any goal objective.To navigate to your personalmeasures bank:1. Navigate to the "Ma<strong>in</strong> Menu".2. Click the "Your setup" button.3. Click on "Measures".To add a new measure:1. Enter the measure name and maxscore <strong>in</strong> the spaces provided nextto the word "(Add)".2. The new measure(s) will be addedonce the "Save" button is clicked.More blank spaces will be addedafter you click "Save".3. F<strong>in</strong>d the date you want to add an event to and click on the "Add" l<strong>in</strong>k next to the date.To edit an exist<strong>in</strong>g measure:1. Make changes to any of the exist<strong>in</strong>g values as needed.2. Changes to the measure(s) will be saved when the "Save" button is clicked.To remove an exist<strong>in</strong>g measure:1. Put a check <strong>in</strong> the (Remove) checkbox next to the measure you want removed.2. The measure(s) will be removed when the "Save" button is clicked.
Simply powerful special education software.<strong>Educator</strong> <strong>guide</strong> >> Gett<strong>in</strong>g startedHow do I manage my personal team member list?Enter commonly used team members <strong>in</strong>to your personal team member list. You can use the list to quickly and easily add teammembers <strong>in</strong>to sections of forms, such as the IEP and the "Notice of a Team Meet<strong>in</strong>g".To Navigate to your personal teammember list:1. Navigate to the "Ma<strong>in</strong> Menu".2. Click on the "Your setup" button.3. Click on "Team Member List".To add a new team member:1. Enter the team member's<strong>in</strong><strong>format</strong>ion <strong>in</strong>to the blank spacesprovided <strong>in</strong> a section with the word"(Add)".2. The new team member(s) will beadded when the "Save" button isclickedHINT: More blank sections will beadded when you click "Save".To edit an exist<strong>in</strong>g team member:1. Make changes to any of theexist<strong>in</strong>g values as needed.2. Changes to the team member(s)will be saved when the "Save"button is clicked.To remove an exist<strong>in</strong>g team member:1. Put a check <strong>in</strong> the (Remove) checkbox next to the team member(s) you wish to remove.2. The team member(s) will be removed when the "Save" button is clicked.
Simply powerful special education software.<strong>Educator</strong> <strong>guide</strong> >> Gett<strong>in</strong>g startedHow do I use my personal goal bank?Each <strong>SpEd</strong> <strong>Forms</strong> user has their own personal goal bank. When you enter goals, they will be available on any goal page whenyou click on "Choose Goal" and then specify "My Goal Bank" as the goal bank.To navigate to your personal goalbank:1. Navigate to the "Ma<strong>in</strong> Menu".2. Click on the "Your setup" button.3. Click on "Goals".To add a new goal:1. Click on "Add Goal" from the "MyGoal Bank" menu.2. Choose a "Category", then a"Subcategory".HINT: subcategories will changewhen the category is changed.3. Fill <strong>in</strong> the "Goal" and add as many"Objectives" as you'd like.HINT: If you use the lettercomb<strong>in</strong>ation CHLD <strong>in</strong> place of thestudent's name, when you importone of these goals <strong>in</strong>to your goal page, the letter comb<strong>in</strong>ation "CHLD" will be automatically replaced with the student's firstname!4. Click the "Save" button when you are f<strong>in</strong>ished mak<strong>in</strong>g changes.To edit an exist<strong>in</strong>g goal:1. Navigate to the "My Goal Bank"menu and click on "My Goal List".The "Goal List" shows all of yourpersonal goals.2. Click on the "Edit" button next tothe goal you want to change.3. Change the goal where necessaryby chang<strong>in</strong>g the category,subcategory, goal or objectives. You can also add or delete objectives.4. Click the "Save" button when you are f<strong>in</strong>ished mak<strong>in</strong>g changes.To delete an exist<strong>in</strong>g goal:1. Navigate to the "My Goal Bank" menu and click on "My Goal List". The "Goal List" shows all of your custom goals.2. Click on the "Delete" button next to the goal you want to delete.3. The goal will be deleted and the list will be refreshed.
Simply powerful special education software.<strong>Educator</strong> <strong>guide</strong>How do I f<strong>in</strong>d student forms?To navigate to the student "<strong>Forms</strong> Menu"<strong>Educator</strong>s:1. Locate student forms from your "Ma<strong>in</strong> Menu" by click<strong>in</strong>g "Work with Students".2. Or use the "Go to..." drop down menu and select "Student List - <strong>SpEd</strong> <strong>Forms</strong>".3. When your student caseload list appears, click "Work on this Record" next to the student'sname you are work<strong>in</strong>g on.Adm<strong>in</strong>istrators:1. Locate student forms from your "Adm<strong>in</strong>istration Menu" by click<strong>in</strong>g "Students".2. Or use the "Go to..." drop down menu and select "Adm<strong>in</strong> Students".3. Use the search criteria to f<strong>in</strong>d the student(s) record you would like to work on.4. When the student list appears, click "View" next to the student's name.Work<strong>in</strong>g with the "<strong>Forms</strong> Menu"The <strong>Forms</strong> Menu is comprised of head<strong>in</strong>gs for eachsection of forms.Each section can be expanded by plac<strong>in</strong>g a check mark<strong>in</strong> the box to the right of each Section Head<strong>in</strong>g.Check mark<strong>in</strong>g the head<strong>in</strong>g of a section will expand theforms list to view the forms with<strong>in</strong> that section.HINT: Once you've expanded a section to see the list offorms, that section will stay expanded anytime youcome back to that student's form menu, untl a user unchecksthe section head<strong>in</strong>g.HINT: At the top of the <strong>Forms</strong> Menu, choose which ServicePlan you are work<strong>in</strong>g on for this student. The forms listed willbe dependent on the selection made here.HINT: Not all forms may be available on the <strong>Forms</strong> Menudepend<strong>in</strong>g on the preferences set by your <strong>SpEd</strong> <strong>Forms</strong> Adm<strong>in</strong>istrator.For "IEP" Service Plans:Select "Enrollment and attendance" to work with theseforms:1. Special education data sheet2. Service Log3. Enrollment4. AttendanceSelect "Referal and evaluation" to work withthese forms:1. Referral Review and AssessmentDeterm<strong>in</strong>ation2. Notice of a Team Meet<strong>in</strong>g3. Review of Exist<strong>in</strong>g Data4. Record of a Team Meet<strong>in</strong>g5. Evaluation/Reevaluation Plan PriorWritten Notice6. Parental Consent/Objection7. Procedural Safeguards8. Evaluation Report9. MA Release of In<strong>format</strong>ion10. MA Parental Consent
Select "Service plan" to work with theseforms:1. Notice of a Team Meet<strong>in</strong>g2. Record of a Team Meet<strong>in</strong>g3. Agreement Regard<strong>in</strong>g IEP TeamMember Attendance4. Procedural Safeguards5. Prior Written Notice6. Parental Consent/Objection7. Individualized Education Program (IEP)8. Behavior Intervention Plan (BIP)9. Positive Behavior Support Plan10. ESY Services11. ESY Checklist12. Transfer Parent Rights13. MA Release of In<strong>format</strong>ion14. MA Parental ConsentSelect "Restrictive procedures" to workwith these forms:1. Restrictive Procedures Plan2. Use of Restrictive Procedures:Physical Hold<strong>in</strong>g3. Use of Restrictive Procedures:Seclusion4. Staff debrief<strong>in</strong>g meet<strong>in</strong>g5. Critical <strong>in</strong>cidence report6. Oversight committee reviewSelect "Dismissal" to work with these forms:1. Summary of Performance2. Revocation of Consent3. Prior Written Notice4. Prior Written Notice5. Withdrawal of ConsentSelect "Other forms and logs" towork with these forms:1. Record Access Log2. Manifestation Determ<strong>in</strong>ation3. Communication Log4. Authorization for Release ofIn<strong>format</strong>ion5. Parent Notification of Transfer toa Non-Public School6. Due Process Hear<strong>in</strong>g Request7. Student Acknowledgement AndTuition Agreement8. Compla<strong>in</strong>t Form9. Manifestation Determ<strong>in</strong>ation10. Alternate Behavior InterventionPlan11. Emergency Health In<strong>format</strong>ionSelect "Shared Files" to access files that Adm<strong>in</strong>istrators have shared on allstudent's Form Menus.Use this l<strong>in</strong>k to f<strong>in</strong>d out more about Shar<strong>in</strong>g Files (Adm<strong>in</strong> Only).Select "Form Letters" to create, view, delete or add a custom Form Letter for thisstudentUse this l<strong>in</strong>k to f<strong>in</strong>d out more about us<strong>in</strong>g Form Letters.
Simply powerful special education software.<strong>Educator</strong> <strong>guide</strong>Where do I go for support?Step 1: Consult the <strong>Educator</strong>'s Guide or the Adm<strong>in</strong>istrator Guide. Most support questions are from users who have notcompleted browser setup for Internet Explorer, Safari or Opera. Answers to most other questions asked by teachers canbe found <strong>in</strong> the Frequently Asked Questions.Step 2: Contact your <strong>SpEd</strong> <strong>Forms</strong> Adm<strong>in</strong>istrator. Your <strong>SpEd</strong> <strong>Forms</strong> Adm<strong>in</strong>istrator is responsible for adm<strong>in</strong>ister<strong>in</strong>g <strong>SpEd</strong><strong>Forms</strong> for your school district. This person will be able to answer most questions about the program. Your designated<strong>SpEd</strong> <strong>Forms</strong> Adm<strong>in</strong>istrator qualifies for technical support from <strong>SpEd</strong> <strong>Forms</strong>.HINT: Be sure to give your <strong>SpEd</strong> <strong>Forms</strong> Adm<strong>in</strong>istrator clear and concise <strong>in</strong><strong>format</strong>ion. The better <strong>in</strong><strong>format</strong>ion you provide,the more likely your problem will be solved <strong>in</strong> a timely manner.Step 3: Contact a Coord<strong>in</strong>ator or Special Education Director. If the <strong>SpEd</strong> <strong>Forms</strong> Adm<strong>in</strong>istrator is unavailable, pleasecontact your Special Education Coord<strong>in</strong>ator or Director. These people also qualify for technical support from <strong>SpEd</strong> <strong>Forms</strong>.HINT: <strong>SpEd</strong> <strong>Forms</strong> ONLY provides technical support to designated <strong>SpEd</strong> <strong>Forms</strong> Adm<strong>in</strong>istrators, Special EducationCoord<strong>in</strong>ators and Directors. Your school district or organizational unit may have its own procedures which you shouldfollow first. For example, most service cooperatives require questions to be directed to the <strong>SpEd</strong> <strong>Forms</strong> Adm<strong>in</strong>istrator.If your district or organizational unit does not have a designated <strong>SpEd</strong> <strong>Forms</strong> Adm<strong>in</strong>istrator, please contact your SpecialEducation Director. Your Director can contact <strong>SpEd</strong> <strong>Forms</strong> to designate a <strong>SpEd</strong> <strong>Forms</strong> Adm<strong>in</strong>istrator. Your <strong>SpEd</strong> <strong>Forms</strong>Adm<strong>in</strong>istrator does not need special tra<strong>in</strong><strong>in</strong>g but should be accessible to teachers. Their role is to answer commonquestions and verify issues before contact<strong>in</strong>g <strong>SpEd</strong> <strong>Forms</strong> technical support.