PRODUCT GUIDE MODEL 463247412 - Char-Broil Grills
PRODUCT GUIDE MODEL 463247412 - Char-Broil Grills
PRODUCT GUIDE MODEL 463247412 - Char-Broil Grills
Create successful ePaper yourself
Turn your PDF publications into a flip-book with our unique Google optimized e-Paper software.
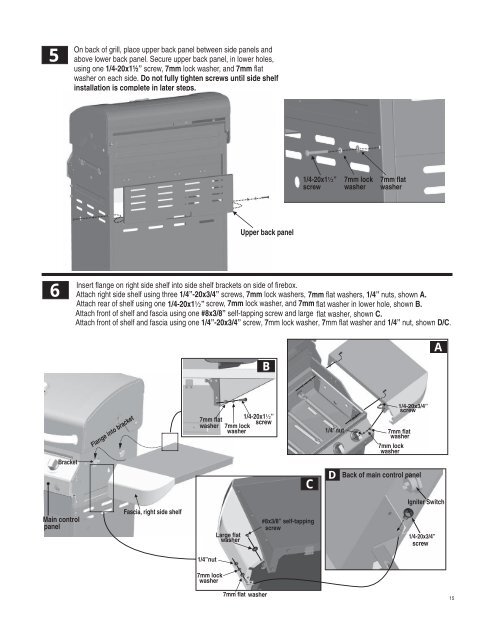
5On back of grill, place upper back panel between side panels andabove lower back panel. Secure upper back panel, in lower holes,using one 1/4-20x1½” screw, 7mm lock washer, and 7mm flatwasher on each side. Do not fully tighten screws until side shelfinstallation is complete in later steps.1/4-20x1½”screw7mm lockwasher7mm flatwasherUpper back panel6Insert flange on right side shelf into side shelf brackets on side of firebox.Attach right side shelf using three 1/4”-20x3/4” screws, 7mm lock washers, 7mm flat washers, 1/4” nuts, shown A.Attach rear of shelf using one 1/4-20x1½” screw, 7mm lock washer, and 7mm flat washer in lower hole, shown B.Attach front of shelf and fascia using one #8x3/8” self-tapping screw and large flat washer, shown C.Attach front of shelf and fascia using one 1/4”-20x3/4” screw, 7mm lock washer, 7mm flat washer and 1/4” nut, shown D/C.BAFlange into bracket7mm flatwasher1/4-20x1½”screw7mm lockwasher1/4”nut7mm flatwasher7mm lockwasher1/4-20x3/4”screwBracketCD Back of main control panelMain controlpanelFascia, right side shelfLarge flatwasher#8x3/8” self-tappingscrewIgniter Switch1/4-20x3/4”screw1/4”nut7mm lockwasher7mm flat washer15


