Series CHL/CHH - Warden Fluid Dynamics
Series CHL/CHH - Warden Fluid Dynamics
Series CHL/CHH - Warden Fluid Dynamics

Create successful ePaper yourself
Turn your PDF publications into a flip-book with our unique Google optimized e-Paper software.
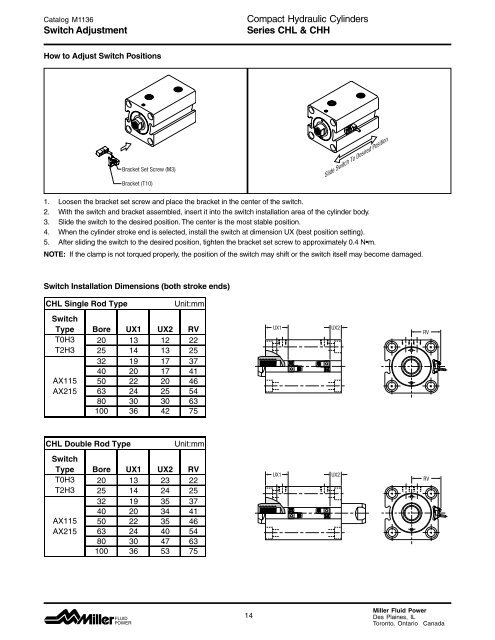
Catalog M1136Switch AdjustmentCompact Hydraulic Cylinders<strong>Series</strong> <strong>CHL</strong> & <strong>CHH</strong>How to Adjust Switch PositionsBracket Set Screw (M3)Bracket (T10)Slide Switch To Desired Position1. Loosen the bracket set screw and place the bracket in the center of the switch.2. With the switch and bracket assembled, insert it into the switch installation area of the cylinder body.3. Slide the switch to the desired position. The center is the most stable position.4. When the cylinder stroke end is selected, install the switch at dimension UX (best position setting).5. After sliding the switch to the desired position, tighten the bracket set screw to approximately 0.4 N•m.NOTE: If the clamp is not torqued properly, the position of the switch may shift or the switch itself may become damaged.Switch Installation Dimensions (both stroke ends)<strong>CHL</strong> Single Rod TypeUnit:mmSwitchTypeT0H3T2H3AX115AX215Bore UX1 UX2 RV20 13 12 2225 14 13 2532 19 17 3740 20 17 4150 22 20 4663 24 25 5480 30 30 63100 36 42 75UX1UX2RV<strong>CHL</strong> Double Rod TypeUnit:mmSwitchType Bore UX1 UX2 RVT0H3 20 13 23 22T2H3 25 14 24 2532 19 35 3740 20 34 41AX115 50 22 35 46AX215 63 24 40 5480 30 47 63100 36 53 75UX1UX2RV14Miller <strong>Fluid</strong> PowerDes Plaines, ILToronto, Ontario Canada