Epoxy Application Guide - Loctite.ph
Epoxy Application Guide - Loctite.ph
Epoxy Application Guide - Loctite.ph

You also want an ePaper? Increase the reach of your titles
YUMPU automatically turns print PDFs into web optimized ePapers that Google loves.
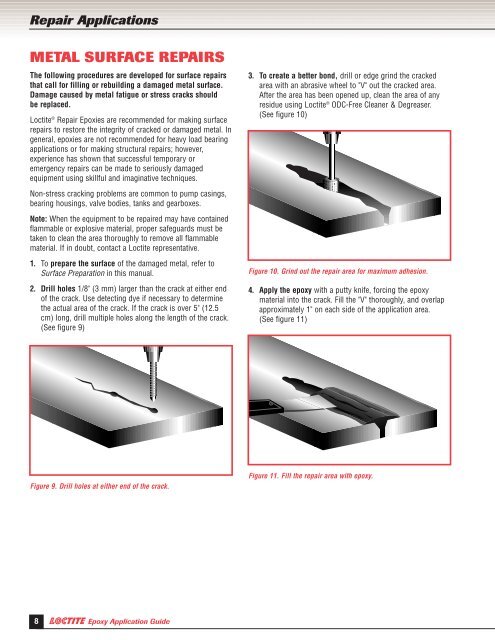
Repair <strong>Application</strong>sMETAL SURFACE REPAIRSThe following procedures are developed for surface repairsthat call for filling or rebuilding a damaged metal surface.Damage caused by metal fatigue or stress cracks shouldbe replaced.<strong>Loctite</strong> ® Repair Epoxies are recommended for making surfacerepairs to restore the integrity of cracked or damaged metal. Ingeneral, epoxies are not recommended for heavy load bearingapplications or for making structural repairs; however,experience has shown that successful temporary oremergency repairs can be made to seriously damagedequipment using skillful and imaginative techniques.Non-stress cracking problems are common to pump casings,bearing housings, valve bodies, tanks and gearboxes.Note: When the equipment to be repaired may have containedflammable or explosive material, proper safeguards must betaken to clean the area thoroughly to remove all flammablematerial. If in doubt, contact a <strong>Loctite</strong> representative.1. To prepare the surface of the damaged metal, refer toSurface Preparation in this manual.2. Drill holes 1/8" (3 mm) larger than the crack at either endof the crack. Use detecting dye if necessary to determinethe actual area of the crack. If the crack is over 5" (12.5cm) long, drill multiple holes along the length of the crack.(See figure 9)3. To create a better bond, drill or edge grind the crackedarea with an abrasive wheel to "V" out the cracked area.After the area has been opened up, clean the area of anyresidue using <strong>Loctite</strong> ® ODC-Free Cleaner & Degreaser.(See figure 10)Figure 10. Grind out the repair area for maximum adhesion.4. Apply the epoxy with a putty knife, forcing the epoxymaterial into the crack. Fill the "V" thoroughly, and overlapapproximately 1" on each side of the application area.(See figure 11)Figure 9. Drill holes at either end of the crack.Figure 11. Fill the repair area with epoxy.8 <strong>Epoxy</strong> <strong>Application</strong> <strong>Guide</strong>