Epoxy Application Guide - Loctite.ph
Epoxy Application Guide - Loctite.ph
Epoxy Application Guide - Loctite.ph

Create successful ePaper yourself
Turn your PDF publications into a flip-book with our unique Google optimized e-Paper software.
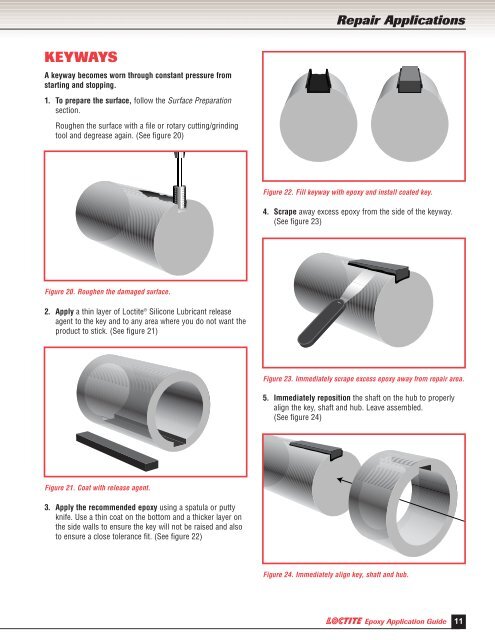
Repair <strong>Application</strong>sKEYWAYSA keyway becomes worn through constant pressure fromstarting and stopping.1. To prepare the surface, follow the Surface Preparationsection.Roughen the surface with a file or rotary cutting/grindingtool and degrease again. (See figure 20)Figure 22. Fill keyway with epoxy and install coated key.4. Scrape away excess epoxy from the side of the keyway.(See figure 23)Figure 20. Roughen the damaged surface.2. Apply a thin layer of <strong>Loctite</strong> ® Silicone Lubricant releaseagent to the key and to any area where you do not want theproduct to stick. (See figure 21)Figure 23. Immediately scrape excess epoxy away from repair area.5. Immediately reposition the shaft on the hub to properlyalign the key, shaft and hub. Leave assembled.(See figure 24)Figure 21. Coat with release agent.3. Apply the recommended epoxy using a spatula or puttyknife. Use a thin coat on the bottom and a thicker layer onthe side walls to ensure the key will not be raised and alsoto ensure a close tolerance fit. (See figure 22)Figure 24. Immediately align key, shaft and hub.<strong>Epoxy</strong> <strong>Application</strong> <strong>Guide</strong>11