Repair <strong>Application</strong>sPIPE AND DUCTINGREPAIRSPipes are used for transporting all compositions of fluids,slurries, gases, and solids. Wear, corrosion, abrasion andchemical attack can lead to progressive damage to pipewalls, leading to eventual piping failure.Industries such as coal-fired power plants, sewagetreatment plants, pulp and paper processors, and aggregatesites are particularly vulnerable to pipe abrasion due tocaustic and abrasive media carried in the piping system.The areas of piping most subject to wear and damage areelbows, t-junctions, reduction fittings and weld spots in bothseams and joints. Flange faces can also suffer erosion,preventing effective gasket sealing.The problem of pipe damage can be as simple as a leakypipe or as severe as a total plant shutdown, servicecontamination, or fire damage; but good plant maintenancedepends on keeping equipment, such as piping systems,running smoothly and efficiently. The following informationis intended to identify possible problem areas that can besuccessfully protected or repaired with <strong>Loctite</strong> ® epoxies inorder to reduce downtime and equipment failure.Note: Before starting any pipe repair, the line pressure mustbe removed.3. For large, low pressure pipes (diameter > 3" or 7.6 cmand pressure less than 100 psi or 0.70 mpa), prepare thepipe as above. Inspect the damaged area to see if thefracture or crack is under stress. If so, relieve by drillingthe ends and "V"-ing out the crack.Apply the epoxy to the prepared area forcing the productinto the crack. Also apply epoxy to the inside radius of thebacking plate. Press the backing plate firmly over the repairarea. (See figures 4 & 5) Force out any air, and removeexcess epoxy. Use ties, clamps, or wire to hold the repairfirmly in place. After the epoxy has cured, the clamps maybe removed and the patch coated with more product forreinforcement of the repair. (See figure 6)EXTERIOR REPAIR – FRACTURES AND PINHOLES1. To prepare the application, plug the hole or fracture withFIXMASTER ® Metal Magic Steel, an epoxy in stick formthat hardens in just 10 minutes. Or use a wooden dowel,putty or plasticine. If the wall thickness is insufficient tosupport a mechanical plug, use a rubber patch and anadhesive such as FIXMASTER ® 4-Minute <strong>Epoxy</strong>.Figure 4. Force epoxy into the damaged area.Abrasive blast, grind, or file off all deposits, paint, rust, andmillscale. The area must be prepared with an extensionborder of 3" (7, 6 cm) around the damaged area. Degreasethe application area completely with <strong>Loctite</strong> ® ODC-FreeCleaner & Degreaser.2. For repairs to large diameter pipes, weeping pipework,and high-pressure pipes, use a half section of pipe with aslightly larger diameter than the pipe to be repaired. Acurved aluminum or steel backing plate that extends 2" (5cm) radially and axially beyond the damaged area will alsowork to reinforce the repair.Abrade the inside and outside of the backing plate anddegrease thoroughly with ODC-Free Cleaner & Degreaser.Figure 5. Press backing plate over the damaged repair area.6 <strong>Epoxy</strong> <strong>Application</strong> <strong>Guide</strong>
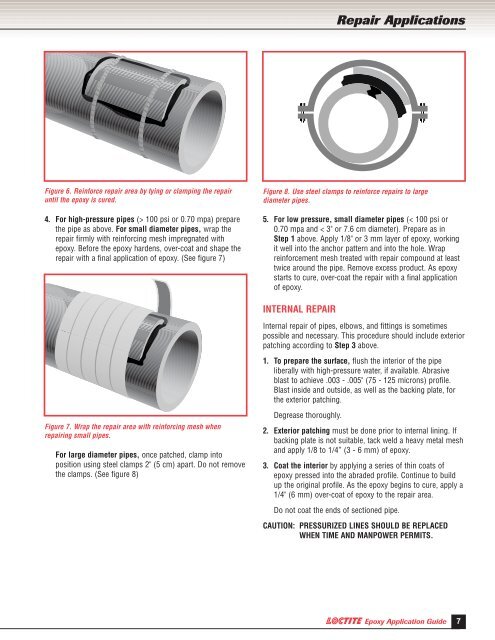
Repair <strong>Application</strong>sFigure 6. Reinforce repair area by tying or clamping the repairuntil the epoxy is cured.4. For high-pressure pipes (> 100 psi or 0.70 mpa) preparethe pipe as above. For small diameter pipes, wrap therepair firmly with reinforcing mesh impregnated withepoxy. Before the epoxy hardens, over-coat and shape therepair with a final application of epoxy. (See figure 7)Figure 8. Use steel clamps to reinforce repairs to largediameter pipes.5. For low pressure, small diameter pipes (< 100 psi or0.70 mpa and < 3" or 7.6 cm diameter). Prepare as inStep 1 above. Apply 1/8" or 3 mm layer of epoxy, workingit well into the anchor pattern and into the hole. Wrapreinforcement mesh treated with repair compound at leasttwice around the pipe. Remove excess product. As epoxystarts to cure, over-coat the repair with a final applicationof epoxy.INTERNAL REPAIRInternal repair of pipes, elbows, and fittings is sometimespossible and necessary. This procedure should include exteriorpatching according to Step 3 above.1. To prepare the surface, flush the interior of the pipeliberally with high-pressure water, if available. Abrasiveblast to achieve .003 - .005" (75 - 125 microns) profile.Blast inside and outside, as well as the backing plate, forthe exterior patching.Figure 7. Wrap the repair area with reinforcing mesh whenrepairing small pipes.For large diameter pipes, once patched, clamp intoposition using steel clamps 2" (5 cm) apart. Do not removethe clamps. (See figure 8)Degrease thoroughly.2. Exterior patching must be done prior to internal lining. Ifbacking plate is not suitable, tack weld a heavy metal meshand apply 1/8 to 1/4” (3 - 6 mm) of epoxy.3. Coat the interior by applying a series of thin coats ofepoxy pressed into the abraded profile. Continue to buildup the original profile. As the epoxy begins to cure, apply a1/4" (6 mm) over-coat of epoxy to the repair area.Do not coat the ends of sectioned pipe.CAUTION: PRESSURIZED LINES SHOULD BE REPLACEDWHEN TIME AND MANPOWER PERMITS.<strong>Epoxy</strong> <strong>Application</strong> <strong>Guide</strong>7