Epoxy Application Guide - Loctite.ph
Epoxy Application Guide - Loctite.ph
Epoxy Application Guide - Loctite.ph

You also want an ePaper? Increase the reach of your titles
YUMPU automatically turns print PDFs into web optimized ePapers that Google loves.
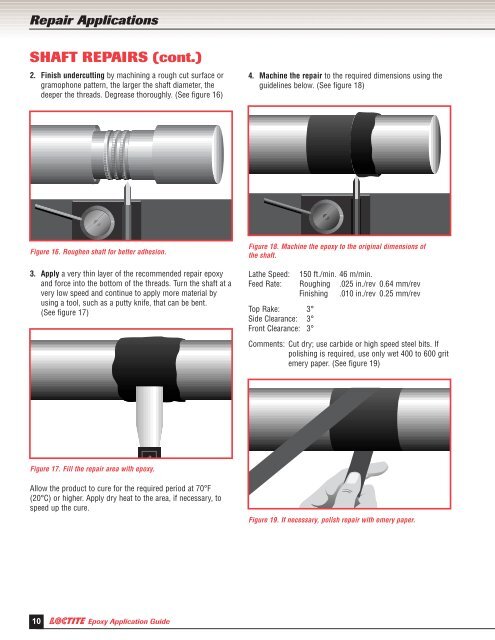
Repair <strong>Application</strong>sSHAFT REPAIRS (cont.)2. Finish undercutting by machining a rough cut surface orgramo<strong>ph</strong>one pattern, the larger the shaft diameter, thedeeper the threads. Degrease thoroughly. (See figure 16)4. Machine the repair to the required dimensions using theguidelines below. (See figure 18)Figure 16. Roughen shaft for better adhesion.3. Apply a very thin layer of the recommended repair epoxyand force into the bottom of the threads. Turn the shaft at avery low speed and continue to apply more material byusing a tool, such as a putty knife, that can be bent.(See figure 17)Figure 18. Machine the epoxy to the original dimensions ofthe shaft.Lathe Speed: 150 ft./min. 46 m/min.Feed Rate: Roughing .025 in./rev 0.64 mm/revFinishing .010 in./rev 0.25 mm/revTop Rake: 3°Side Clearance: 3°Front Clearance: 3°Comments: Cut dry; use carbide or high speed steel bits. Ifpolishing is required, use only wet 400 to 600 gritemery paper. (See figure 19)Figure 17. Fill the repair area with epoxy.Allow the product to cure for the required period at 70°F(20°C) or higher. Apply dry heat to the area, if necessary, tospeed up the cure.Figure 19. If necessary, polish repair with emery paper.10 <strong>Epoxy</strong> <strong>Application</strong> <strong>Guide</strong>