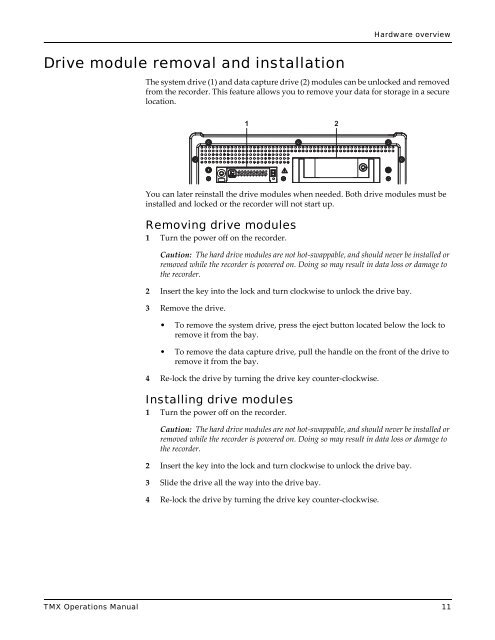
- Page 1: Multi-Channel High Speed Data Acqui
- Page 4 and 5: Copyright © 2011 Astro-Med, Inc. T
- Page 6 and 7: To obtain warranty services, contac
- Page 8 and 9: Declaration of Conformity Declarati
- Page 10 and 11: Contents Chapter: 4 Optional hardwa
- Page 12 and 13: Contents Setting up a Window trigge
- Page 14 and 15: Contents Modifying IP information .
- Page 16 and 17: Contents viii TMX Operations Manual
- Page 18 and 19: Getting started can be used while c
- Page 20 and 21: Getting started Help features funct
- Page 22 and 23: Getting started Viewing the softwar
- Page 24 and 25: Hardware overview Left side view 1
- Page 28 and 29: Hardware overview Utility / DIO por
- Page 30 and 31: Hardware overview Pin Type 22 Outpu
- Page 32 and 33: Hardware overview Pin Type 44 Input
- Page 34 and 35: Hardware overview Using the display
- Page 36 and 37: Hardware overview TMX-R Front view
- Page 38 and 39: Hardware overview # Description 10
- Page 40 and 41: Input modules 1 2 3 # Description I
- Page 42 and 43: Input modules # Description 1 Black
- Page 44 and 45: Input modules NIDV-16 Differential
- Page 46 and 47: Input modules # Description 1 Black
- Page 48 and 49: Input modules E Ni-Cr alloy versus
- Page 50 and 51: Optional hardware External monitor
- Page 52 and 53: Optional hardware Note: The default
- Page 54 and 55: Optional hardware TMX-E The TMX-E i
- Page 56 and 57: Optional hardware Connecting the TM
- Page 58 and 59: Optional hardware TMX-IRIG/GPS 3 En
- Page 60 and 61: Optional hardware Connecting a time
- Page 62 and 63: Optional hardware 6 Choose the Star
- Page 64 and 65: Optional hardware 48 TMX Operations
- Page 66 and 67: Menus and icons Control panel Icon
- Page 68 and 69: Menus and icons Control panel setup
- Page 70 and 71: Menus and icons 54 TMX Operations M
- Page 72 and 73: Channel setup After engineering uni
- Page 74 and 75: Channel setup Signal inputs The ter
- Page 76 and 77:
Channel setup • Graphical view -
- Page 78 and 79:
Channel setup 8 Use the Attenuator
- Page 80 and 81:
Channel setup 4 Choose the Filter c
- Page 82 and 83:
Channel setup signal would be full
- Page 84 and 85:
Channel setup 2 Choose the Amplifie
- Page 86 and 87:
Channel setup 5 Choose whether to d
- Page 88 and 89:
Channel setup • The math operatio
- Page 90 and 91:
Channel setup 4 Choose whether to d
- Page 92 and 93:
Channel setup 6 Enter a scale for t
- Page 94 and 95:
Channel setup Signal setup files 3
- Page 96 and 97:
Channel setup 80 TMX Operations Man
- Page 98 and 99:
Display setup Grids Channel wavefor
- Page 100 and 101:
Display setup 2 Choose Move. The ch
- Page 102 and 103:
Display setup 2 Select the event in
- Page 104 and 105:
Display setup View setup files 3 To
- Page 106 and 107:
Display setup 90 TMX Operations Man
- Page 108 and 109:
Realtime mode Note: A selection pat
- Page 110 and 111:
Realtime mode Global setup files Pr
- Page 112 and 113:
Realtime mode Loading global setup
- Page 114 and 115:
Data capture Arm Arming starts the
- Page 116 and 117:
Data capture Setting up a data capt
- Page 118 and 119:
Data capture 7 Select the channels
- Page 120 and 121:
Data capture 3 Choose Enable Video
- Page 122 and 123:
Data capture 2 Choose the Main Or t
- Page 124 and 125:
Data capture AND/OR triggers/aborts
- Page 126 and 127:
Data capture 2 Choose the Base Chan
- Page 128 and 129:
Data capture • If using slew drop
- Page 130 and 131:
Data capture 2 Choose the Event Inp
- Page 132 and 133:
Data capture Setting up a Periodic
- Page 134 and 135:
Data capture When a trigger occurs,
- Page 136 and 137:
Data capture Saving capture setup f
- Page 138 and 139:
Data capture Saving trigger setup f
- Page 140 and 141:
Data capture Formatting the data ca
- Page 142 and 143:
Data capture 126 TMX Operations Man
- Page 144 and 145:
Scope mode The track view displays
- Page 146 and 147:
Scope mode Scope captures Icon Desc
- Page 148 and 149:
Scope mode 8 Choose OK. Related Top
- Page 150 and 151:
Scope mode # Description 1 Transien
- Page 152 and 153:
Scope mode 16 Arm the scope capture
- Page 154 and 155:
Scope mode 138 TMX Operations Manua
- Page 156 and 157:
Review mode 2 Select a file to anal
- Page 158 and 159:
Review mode Loading the next/previo
- Page 160 and 161:
Review mode Review mode default con
- Page 162 and 163:
Review mode • Page Back scrolls t
- Page 164 and 165:
Review mode Note: Very large data c
- Page 166 and 167:
Review mode 2 Review and edit notes
- Page 168 and 169:
Review mode Viewing embedded scope
- Page 170 and 171:
Review mode Review mode channel set
- Page 172 and 173:
Review mode This section describes
- Page 174 and 175:
Review mode Note: If you modify der
- Page 176 and 177:
Review mode 160 TMX Operations Manu
- Page 178 and 179:
Analysis tools 2 Choose Analysis >>
- Page 180 and 181:
Analysis tools Channel meters Chann
- Page 182 and 183:
Analysis tools 2 Select a meter typ
- Page 184 and 185:
Analysis tools 3 Select a color sch
- Page 186 and 187:
Analysis tools XYY plot templates X
- Page 188 and 189:
Analysis tools Loading XYY plot tem
- Page 190 and 191:
Analysis tools 5 Choose a window we
- Page 192 and 193:
Analysis tools 3 Choose OK in the S
- Page 194 and 195:
Networking and communications 2 Cho
- Page 196 and 197:
Networking and communications Using
- Page 198 and 199:
Networking and communications 182 T
- Page 200 and 201:
Utilities and service options 2 Cho
- Page 202 and 203:
Utilities and service options 3 Tou
- Page 204 and 205:
Utilities and service options 9 Whe
- Page 206 and 207:
Utilities and service options 3 Cho
- Page 208 and 209:
Utilities and service options 4 Spe
- Page 210 and 211:
Utilities and service options 194 T
- Page 212 and 213:
TMX offline software Selecting offl
- Page 214 and 215:
Specifications Sample Rate 800 KHz
- Page 216 and 217:
Specifications NIDV-16 module Input
- Page 218 and 219:
Specifications IHVM-6 module Period
- Page 220 and 221:
Specifications ITCU-12 Connector Ty
- Page 222 and 223:
Specifications Power Optional DC po
- Page 224 and 225:
Specifications TMX-IRIG/GPS Option
- Page 226 and 227:
Icon descriptions Icon Description
- Page 228 and 229:
Icon descriptions Scope mode contro
- Page 230 and 231:
Icon descriptions Icon Description
- Page 232 and 233:
Icon descriptions Icon Description
- Page 234 and 235:
Icon descriptions Icon Description
- Page 236 and 237:
Icon descriptions 220 TMX Operation
- Page 238 and 239:
Index G Global setup files 94 Loadi
- Page 240:
Index 224 TMX Operations Manual


