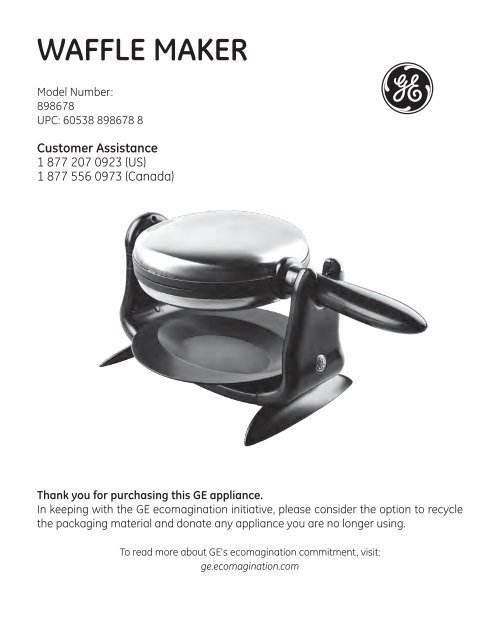
Waffle maker - GE :: Housewares
Waffle maker - GE :: Housewares
Waffle maker - GE :: Housewares

You also want an ePaper? Increase the reach of your titles
YUMPU automatically turns print PDFs into web optimized ePapers that Google loves.
IMPORTANT SAFEGUARDS• It is recommended that you use an insulated hot pad underneath the appliance toavoid any heat damage to your counter or furniture.• This appliance is not intended for use by persons (including children) with reducedphysical, sensory or mental capabilities or lack of experience and knowledgeunless they have been given initial supervision or instruction concerning use of theappliance by a person responsible for their safety.• Children shall be supervised to ensure that they do not play with the appliance.• To avoid a circuit overload, do not operate this appliance on the same circuit withanother high wattage appliance.• The appliance must not be left unattended while it is connected to the wall outlet.• The appliance should never be used in the open position.Save these instructions!3111348-<strong>GE</strong>-11 (EN+ES).indb 38/5/10 5:04:49 PM
Additional SafeguardsThis appliance is for HOUSEHOLD USE ONLY.DO NOT OPERATE THE APPLIANCE IF THE LINE CORD SHOWS ANY DAMA<strong>GE</strong> OR IF THEAPPLIANCE WORKS INTERMITTENTLY OR STOPS WORKING ENTIRELY.EXTENSION CORDSA short power-supply cord is to be provided to reduce the risk resulting from becomingentangled in or tripping over a longer cord. Extension cords are available and may beused if care is exercised in their use. If an extension cord is used,1) The extension cord should be a grounding-type 3-wire cord.2) If an extension cord is absolutely necessary, an extension cord rated a minimumof 15 ampere, 14 gage cord should be used. Cords rated for less amperage mayoverheat.3) An extension cord with the power cord must be arranged so that it will not drapeover the countertop or tabletop where they can be pulled on by children or trippedover accidentally.GROUNDING INSTRUCTIONSThis appliance must be grounded while in use.CAUTION: To ensure continued protection against risk of electric shock, connect toproperly grounded outlets only.GROUNDING INSTRUCTIONS – US ONLYThe appliance has a plug that looks like Figure A. An adaptor, as shown in Figure B,should be used for connecting a 3-prong grounding plug to a 2-wire receptacle. Thegrounding tab, which extends from the adaptor, must be connected to a permanentground such as a properly grounded receptacle as shown in Figure C, using a metalscrew.Circuit grounding conductorconnected properly(A)Adapter(B)(C)Metal mountingscrewGrounding prongGrounding means4Cover of groundedoutlet box111348-<strong>GE</strong>-11 (EN+ES).indb 48/5/10 5:04:49 PM
PARTS1 21098121171365431 Power indicator(on the surface of upper cover)2 Ready indicator(on the surface of upper cover)3 Power plug with power cord4 Tie5 Base6 Collection tray7 Lower waffle plate8 Upper waffle plate9 Upper cover10 Handle11 Lower cover12 Ready indicator(on the surface of lower cover)13 Measuring cup5111348-<strong>GE</strong>-11 (EN+ES).indb 58/5/10 5:04:49 PM
ILLUSTRATIONSa b cd e fg h i6111348-<strong>GE</strong>-11 (EN+ES).indb 68/5/10 5:04:52 PM
operationBefore first use• Carefully remove the appliance from the packaging and retain the packaging forfuture use.• Place the appliance on a flat, dry, stable and heat-resistant surface.• Loosen the tie (4) and unwind the power cord (3) completely.• Remove all stickers from the appliance.• Place the collection tray (6) on the base (5) (ill. a ). Make sure the 4 plastic pinslock onto the grooves on the base (5). The collection tray (6) will collect drippingbatter and oil from the waffle plates (7, 8). Do not operate the appliance withoutthe collection tray (6).• Connect the power plug (3) to a suitable wall outlet.• Note: The appliance may produce an odor and emit smoke when switched onfor the first time, as residues from the production process are eliminated. This isnormal and does not indicate a defect or hazard.• When using the appliance for the first time, we recommend to heat it for at least10 minutes without batter, oil, or ingredients ( Operation), until no odor or smokeis present. During baking, ensure ample ventilation.• Warning! Never let the power cord (3) touch the waffle plates (7, 8) (ill. e ).• Let the appliance cool completely.• Clean the appliance ( Cleaning and maintenance).Preparation• Prior to each use clean the appliance with a clean and slightly dampened cloth.• Connect the power plug (3) to a suitable wall outlet to preheat the appliance. Thepower indicator (1) lights up blue. The appliance begins to heat up.• Close the upper cover (9) (ill. d ).• After heating up, the ready indicators (2, 12) light up green.• Note: During use, the ready indicators (2, 12) cycle on and off. This indicates that thewaffle <strong>maker</strong> heats up from time to time to maintain the required temperature.• Lift up the upper cover (9) by the handle (10) (ill. b ). Never touch the waffleplates (7, 8) to check the temperature (ill. c ). Danger of burns!• Slightly brush the hot waffle plates (7, 8) with a thin layer of butter, margarine orsuitable oil. Now the appliance is ready for baking waffles.7111348-<strong>GE</strong>-11 (EN+ES).indb 78/5/10 5:04:52 PM
operation• Note: Some batters may need to settle a while before baking waffles. Prepare thewaffle batter well in advance ( Recipes).Warning! Do not operate appliance with a damaged cord or plug, or afterthe appliance malfunctions or has been dropped or damaged in any manner. Callour toll-free customer assistance number for information on examination, repair, oradjustment.Warning! Unplug from outlet when not in use and before cleaning.Baking waffles• Fill the measuring cup (13) to the 5oz. mark with batter. Pour and spread the batterevenly on the lower waffle plate (7) (ill. f ).• Note: Do not pour too much batter, as excess batter might drip out of the waffleplates (7, 8) during baking process.• Close the upper cover (9) (ill. g ).• Turn the waffle plates (7, 8) clockwise 180 degrees with the handle (10) until theylock into place (ill. h ). This ensures even spreading of the batter on both waffleplates.• Let the appliance run until the green light comes ON or until waffles have thedesired browning or until the appliance stops steaming. This process takes 2 to 3minutes. The result can vary from golden brown to crispy brown baked waffles (7, 8).• Turn the waffle <strong>maker</strong> to its original position. Lift up the upper cover (9) by thehandle (10). Remove the baked waffles with a heat-proof wooden or plastic spatula.We recommend to use oven mittens to protect your hands when opening the hotwaffle <strong>maker</strong>. Escaping steam and the hot waffle plates (7, 8) might cause burns.• Note: If waffles are not to be served immediately, place them on a paper tissueor cooling rack to absorb condensation. When served later, just reheat them( Tips for making waffles).• After removing the waffles, keep the waffle plates (7, 8) closed so that the heatremains inside the appliance for the next set of waffles. Wait until the readyindicators (2, 12) light up again. Then, fill with more waffle batter.8111348-<strong>GE</strong>-11 (EN+ES).indb 88/5/10 5:04:52 PM
operation• After use, remove the power plug (3) from the wall outlet. The power indicator (1)goes off.• Note: The power indicator (1) stays lit continuously until the power plug (3) isdisconnected from the wall outlet.• Let the waffle <strong>maker</strong> cool completely before cleaning and storing.Tips for making waffles• Most waffle batter can be poured directly onto the non-stick waffle plates (7, 8).Use a cooking spray for dessert waffles or any recipe with a lot of sugar.• The ideal baking time for a whole baking cycle depends on many factors, e. g. theamount of batter used ( 1 ⁄2 cup to 3 ⁄4 cup), thickness of batter used, ingredients, etc.• Most waffles are done in about 2 to 3 minutes. If the upper cover (9) is not easilylifted up, let the waffle <strong>maker</strong> run 1 more minute before checking the browninglevel.• Avoid opening the upper cover (9) repeatedly during baking, otherwise the waffleswill stick on the waffle plates (7, 8); or they might not be baked at all.• The ideal browning level will depend on your taste, batter ingredients, baking time,and room temperature as well. Sugary batter, for example, will turn brownishquicker. Please try several times to find your favorite setting.• <strong>Waffle</strong>s can be made ahead of time and stored for future use. Before storing, letthem cool completely and then pack in an airtight container. Store in refrigerator orfreezer. When enjoying later, just reheat them in a microwave oven, a toaster oven,or a regular oven.9111348-<strong>GE</strong>-11 (EN+ES).indb 98/5/10 5:04:52 PM
Recipes• Note: Following is a small selection of waffle recipes. Lots of recipes can be foundin cooking books and on the Internet. True waffle experts can be recognized bytheir desire to experiment; be it sweet or hearty; just try your own filling and battermixtures. Bon appétit!<strong>Waffle</strong>sIngredients:2 cups flour2 tbsp sugar1 tbsp baking powder1 tsp salt1 3 ⁄4 cups milk1⁄3 cup vegetable oil2 eggsWhole wheat & Belgian wafflesIngredients:1 cup whole wheat flour1⁄8 cup sugar4 tsp baking powder1⁄4 tsp salt1 egg1 cup milk1⁄4 cup vegetable oil1⁄2 tsp vanilla extractPreparation:In a large bowl, sift all dry ingredients together:flour, sugar, baking powder and salt. In anotherbowl, whisk all wet ingredients: milk, vegetableoil, and eggs. Gradually add liquid ingredientsto the flour mixture. Stir by hand or with anelectric mixer until even and smooth. Bake withyour waffle <strong>maker</strong> for about 3 minutes.Blueberry waffles: After pouring the batteronto the lower waffle plate (7), spinkle freshblueberries over the batter.Note: You can replace blueberries with anyfruit, e. g. strawberries, raspberries, bananas.Preparation:In a large bowl, sift all dry ingredientstogether: flour, sugar, baking powder, salt andvanilla extract. In another bowl, whisk all wetingredients - milk, vegetable oil, and eggs.Gradually add liquid ingredients to the flourmixture. Stir by hand or with an electric mixeruntil even and smooth. Bake with your waffle<strong>maker</strong> for about 3 minutes.10111348-<strong>GE</strong>-11 (EN+ES).indb 108/5/10 5:04:52 PM
Cleaning and maintenance• After each use and before cleaning, disconnect the appliance from the wall outlet.• Let the appliance cool completely.Cleaning• Remove the collection tray (6) from the base (5) (ill. i ).• Remove any remains from the appliance. To remove sticky batter remnants, use awooden or plastic spatula. Do not use sharp or metallic utensils.• Note: Should batter remnants be difficult to remove, drip a little cooking oil on theremnants. Wait for 5 minutes for the remnants to soften, and then wipe them off.• Clean different parts of the appliance:PartCollection tray (1)Measuring cup (13)<strong>Waffle</strong> plates (7, 8)Covers (9, 11)Base (5)CasingPower plug withpower cord (3)How to clean• Clean by hand or in a dishwasher using a soft clothand some mild detergent.• Wipe with a damp paper towel or with a soft clothand some mild detergent.• Note: Should these parts become very greasy,immerse a cloth in soapy water, wring out and wipeoff the grease. Wipe one more time with a cleanand dampened cloth.• Warning! Never immerse in water or otherliquids.• Do not use abrasive sponges or detergents, steel wool or metallic utensils to cleanthe interior or exterior parts of the appliance.• Dry all parts and replace the collection tray (6) to its original location.Storage• Note: Before storage, always make sure the appliance has cooled and driedcompletely.• Note: To get the longest working life from the appliance, it is best stored in a dry place.• Wind the power cord (3) completely and use the tie (4) to manage it.• Warning! Do not allow the power cord (3) to get between the waffle plates (7, 8)(ill. e ).• Store the appliance on a stable shelf or in a cupboard, preferably in its originalpackaging. To avoid accidents, ensure that both the appliance and its powercord (3) are beyond reach of children or pets.11111348-<strong>GE</strong>-11 (EN+ES).indb 118/5/10 5:04:53 PM
troubleshOotingPROBLEM CAUSE SOLUTIONThe waffles stick onthe waffle plates(7, 8).The readyindicators (2, 12) keepgoing on and off.The batter drips out ofthe waffle plates (7, 8)during operation.The upper cover (9) is openedrepeatedly during bakingprocess.The temperature is beingadjusted by the appliance.Too much batter has beenfilled on the waffle plates(7, 8).Avoid opening the uppercover (9) repeatedly duringoperation.No issue. The waffle <strong>maker</strong>is working normally.Remove some batter fromthe waffle plates (7, 8).If additional assistance is needed, please contact our Customer Assistance at1.877.207.0923 (U.S.) or 1.877.556.0973 (Canada).Rated voltage:Rated power input:Technical data120V~, 60Hz950W12111348-<strong>GE</strong>-11 (EN+ES).indb 128/5/10 5:04:53 PM