
You also want an ePaper? Increase the reach of your titles
YUMPU automatically turns print PDFs into web optimized ePapers that Google loves.
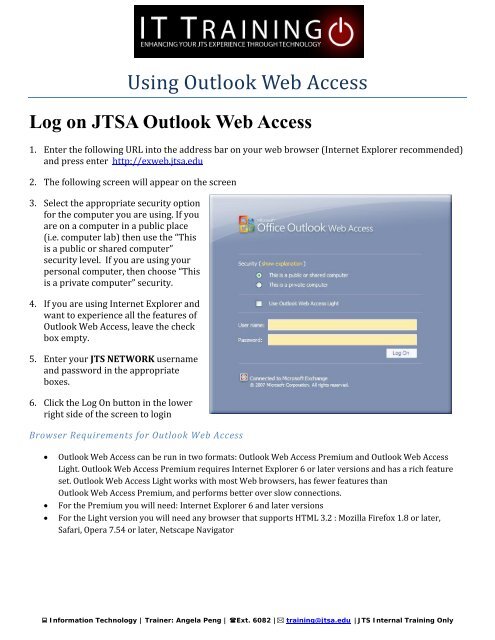
Using <strong>Outlook</strong> <strong>Web</strong> <strong>Access</strong><br />
Log on JTSA <strong>Outlook</strong> <strong>Web</strong> <strong>Access</strong><br />
1. Enter the following URL into the address bar on your web browser (Internet Explorer recommended)<br />
and press enter http://exweb.jtsa.edu<br />
2. The following screen will appear on the<br />
screen<br />
3. Select the appropriate security option<br />
for the computer you are <strong>using</strong>. If you<br />
are on a computer in a public place<br />
(i.e. computer lab) then use the “This<br />
is a public or shared computer”<br />
security level. If you are <strong>using</strong> your<br />
personal computer, then choose “This<br />
is a private computer” security.<br />
4. If you are <strong>using</strong> Internet Explorer and<br />
want to experience all the features of<br />
<strong>Outlook</strong> <strong>Web</strong> <strong>Access</strong>, leave the check<br />
box empty.<br />
5. Enter your JTS NETWORK username<br />
and password in the appropriate<br />
boxes.<br />
6. Click the Log On button in the lower<br />
right side of the screen to login<br />
Browser<br />
Requirements for <strong>Outlook</strong> <strong>Web</strong> <strong>Access</strong><br />
• <strong>Outlook</strong> <strong>Web</strong> <strong>Access</strong> can be run in two formats: <strong>Outlook</strong> <strong>Web</strong> <strong>Access</strong> Premium and <strong>Outlook</strong> <strong>Web</strong> <strong>Access</strong><br />
Light. <strong>Outlook</strong> <strong>Web</strong> <strong>Access</strong> Premium requires Internet Explorer 6 or later versions and has a rich feature<br />
set. <strong>Outlook</strong> <strong>Web</strong> <strong>Access</strong> Light works with most <strong>Web</strong> browsers, has fewer<br />
features than<br />
<strong>Outlook</strong> <strong>Web</strong> <strong>Access</strong> Premium, and performs better over slow connections.<br />
• For the Premium you will need: Internet Explorer 6 and later versions<br />
• For the Light version you will need any browser that supports HTML 3.2 : Mozilla Firefox 1.8 or later,<br />
Safari, Opera 7.54 or later, Netscape Navigator<br />
� Information Technology | Trainer: Angela Peng | �Ext. 6082 |� training@jtsa.edu | JTS Internal Training Only
Change Your Password<br />
1. From the main screen, click the Options button on the toolbar.<br />
2. On the left side of the screen under the Options menu, click the Change Password option.<br />
3. A new window will appear on the screen.<br />
4. Enter your current password in the Old Password box.<br />
5. Enter your new password in the New Password box.<br />
6. Enter your new password again in the Confirm New Password box.<br />
7. Click the Save on the top left of this window.<br />
IMPORTANT NOTE:<br />
Your password to your <strong>Outlook</strong> <strong>Web</strong><br />
<strong>Access</strong> is your JTS network password.<br />
If you change your password here, the<br />
change will also be effective for<br />
Blackboard and your JTS computer<br />
login.<br />
� Information Technology | Trainer: Angela Peng | � Ext. 6082 |� training@jtsa.edu | JTS Internal Training Only
Configuring an away message<br />
In order to setup an away message, you need to use the Out<br />
of Office Assistant in <strong>Outlook</strong>.<br />
1. Click on the Options button on the top of the toolbar.<br />
2. In the window on the left, left click on the Out of Office assistant.<br />
3. A new window will appear on the screen. This is the where you can create and setup your message.<br />
4. Click in the “Send Out of Office auto‐replies” radio button. Enter the auto reply message you wish to send to all<br />
internal mail in the top message box. You can format the font anyway you want as in MS Word.<br />
5. Click in the “Send Out of Office auto‐replies o nly during this time period”. Select the dates and times for when<br />
you want to send the auto reply. The time interval can only be set in 30 minute intervals.<br />
6. If you want to set an auto reply message for external mail, then click in the “Send Out of Office auto‐replies to<br />
External Senders” . You may choose now to send an auto‐reply to either only the users in your contact list or to<br />
all users.<br />
7. Enter the message in the message box. If it is the same as the one for internal users, you can copy and paste<br />
from the internal message box.<br />
8. Once everything has been set, click on the Save icon of a floppy disk at the top left side of the screen to save and<br />
activate your auto reply.<br />
� Information Technology | Trainer: Angela Peng | �Ext. 6082 |� training@jtsa.edu | JTS Internal Training Only
Frequently Asked Questions<br />
1) I d o not see Bcc in my new message window. How do I add Bcc?<br />
a. In a new message<br />
window, click Options<br />
b. Click Show Bcc<br />
2) How do I add a person to my contacts and<br />
edit contacts information?<br />
Adding someone who has emailed you<br />
a. Right click a sender’s email address<br />
b. Click Add to <strong>Outlook</strong> Contacts (You must have pop‐ups<br />
enabled for this site otherwise it<br />
will not work)<br />
c. Fill in their information<br />
accordingly (Optional)<br />
d. Click Save and Close<br />
Adding someone directly<br />
to your contacts<br />
a. Click Contacts in your navigation<br />
pane<br />
b. Click New<br />
c. Edit your contact information<br />
d. Click Save and Close<br />
Editing an existing contact<br />
a. Double click a contact to edit their information.<br />
b. Make sure the EMAIL part ONLY contains their<br />
FULL email<br />
address<br />
(Including @jtsa.edu), no other symbols such as<br />
brackets.<br />
c. Click Save and Close when you’re finished.<br />
3) Ho w do I create a group email (distribution list)? After I create a distribution list, how I do<br />
use it?<br />
a. From the Inbox, click the drop down arrow next to >>New>> and select Distribution List,<br />
b. Name your list.<br />
c. Click Members for anyone who is in your Contact.<br />
d. Double click on their names to add them. The names will appear in the Members box on the<br />
bottom of the screen. Click<br />
OK once you have added all the names you want. Now the<br />
names are in the Members box on the top of the screen<br />
e. Click Add to List button.<br />
f. Click in the Members box and type in the email address to add anyone who is NOT in your<br />
contact list.<br />
g. Click Add to List button.<br />
h. Click Save and Close,<br />
i. Now open a new message<br />
j. Click the To button,<br />
k. In your contacts list, click to select the group you have created.<br />
4) How do I create a new folder?<br />
a. Right click on your Inbox.<br />
b. Left click on Create New Folder…<br />
c. Type the name in the blank box where<br />
the cursor is located.<br />
d. Press Enter when you are finished.<br />
� Information Technology | Trainer: Angela Peng | � Ext. 6082 |� training@jtsa.edu | JTS Internal Training Only
5) How do I move messages to a folder?<br />
a. Right click on an email in the email list<br />
b. Left click on Move To Folder<br />
c. Click to choose which folder to move the email into<br />
d. Click OK<br />
* You can also drag and drop the email into the folder.<br />
** You can also select an email and click on the Move to Folder Icon on the toolbar.<br />
6) How do I sort my emails?<br />
a. Click any of the column headings to sort your emails. E.g. if you want to sort by the sender,<br />
click the heading<br />
FROM<br />
OR<br />
a. Click View<br />
b. Click Arrange By<br />
c. Click to choose which category you want to sort your email by<br />
7) How do I find a specific email?<br />
For Quick Find<br />
a.<br />
Type in key words for your search in<br />
the Search Inbox text box.<br />
b.<br />
Your keyword s will be highlighted<br />
For Advanced Find<br />
a. Click on the double down arrows<br />
b. Type your query in the box where the magnifying glass is to start the search.<br />
8) How do I create a signature?<br />
a. Click Options button on the top toolbar<br />
b. With the Messaging box highlighted in the left hand side box, click the<br />
mouse in the E‐mail<br />
signature box.<br />
c. In the box, type in your signature and format the font and the color.<br />
d. Click in the “Automatically include<br />
my signature in outgoing messages” box.<br />
e. Click Save on top upon finishing.<br />
9) How do I attach a file to my email?<br />
a. While composing an email, click on the paperclip<br />
icon on top to attach a file.<br />
b. Browse to your file location and click Open.<br />
c. Click Attach file<br />
d. Your attached file should show under the To, Cc and Bcc fields.<br />
� Information Technology | Trainer: Angela Peng | �Ext. 6082 |� training@jtsa.edu | JTS Internal Training Only