Router Table Tearout - Woodsmith Woodworking Seminars
Router Table Tearout - Woodsmith Woodworking Seminars
Router Table Tearout - Woodsmith Woodworking Seminars

Create successful ePaper yourself
Turn your PDF publications into a flip-book with our unique Google optimized e-Paper software.
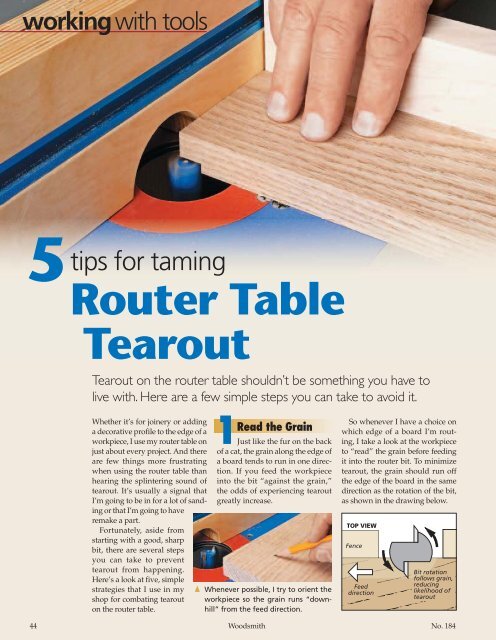
working with tools5tips for taming<strong>Router</strong> <strong>Table</strong><strong>Tearout</strong><strong>Tearout</strong> on the router table shouldn’t be something you have tolive with. Here are a few simple steps you can take to avoid it.Whether it’s for joinery or addinga decorative profile to the edge of aworkpiece, I use my router table onjust about every project. And thereare few things more frustratingwhen using the router table thanhearing the splintering sound oftearout. It’s usually a signal thatI’m going to be in for a lot of sandingor that I’m going to haveremake a part.Fortunately, aside fromstarting with a good, sharpbit, there are several stepsyou can take to preventtearout from happening.Here’s a look at five, simplestrategies that I use in myshop for combating tearouton the router table.1Read the GrainJust like the fur on the backof a cat, the grain along the edge ofa board tends to run in one direction.If you feed the workpieceinto the bit “against the grain,”the odds of experiencing tearoutgreatly increase.FenceFeed{ Whenever possible, I try to orient theworkpiece so the grain runs “downhill”from the feed direction.So whenever I have a choice onwhich edge of a board I’m routing,I take a look at the workpieceto “read” the grain before feedingit into the router bit. To minimizetearout, the grain should run offthe edge of the board in the samedirection as the rotation of the bit,as shown in the drawing below.TOP VIEWdirectionBit rotationfollows grain,reducinglikelihood oftearout44 <strong>Woodsmith</strong> No. 184
2Shallow PassesYou may have noticed thattearout seems to occur more oftenwhen you’re taking a heavy cut.If you try to “hog off” too muchmaterial in one pass, the bit tendsto pull out large chunks from theworkpiece. A good way to avoidthis problem is to rout the profilein multiple, shallow passes.Without a doubt, the worstsituation for tearout on a routertable is when you’re routing acrossend grain. As the bit exits the cut,it’s almost guaranteed to pull largesplinters out of the trailing edge ofthe workpiece, as shown in theupper drawing at right.There are a couple of ways todeal with this problem. If I’mrouting across all four edges ofa workpiece, the easiest solutionis to simply rout the endsof the workpiece first. This way,the areas of end grain tearout onthe workpiece will be cleaned upwhen you rout the long edges.BACKER BOARD. One other methodof avoiding end grain tearout is touse a backer board. This is nothingmore than a scrap piece of woodthat is held against the back edgeof your workpiece as you push itUsually, I’ll set the bit to the correctheight and use the fence to controlthe depth of cut (see drawing). Istart with the fence positioned for alight cut. Then I gradually move thefence back between passes. Takingshallow passes removes less materialat a time, giving you a smoothercut with minimal tearout.past the bit. (I actually rout intothe backer board for about an inchor so, as you can see in the lowerdrawing below.)The backer board supports thewood fibers as the router bit exitsthe cut, preventing tearout.FenceWorkpiecedirectionTOP VIEWFenceWorkpiecedirectionTOP VIEW<strong>Tearout</strong>Backer <strong>Tearout</strong> boardAdjustfencebackbetweenpassesFencethe workpiece as close to the edgeof the bit as possible. Some routertable fences have adjustable facesthat allow you to adjust the size ofthe opening to match the bit you’reusing. But for even more support,you can make a “zero-clearance”auxiliary face for yourrouter table fence.Simply trace the bit profileonto a piece of hardboardand cut it out witha scroll saw or jig saw.Then, attach the auxiliaryface to your router fencewith double-sided tape.The reduced openingprovides back-up supportto the edge of the workpiece,all the way up tothe router bit.SIDE SECTION VIEWMake several light passes,removing a small amountof material at a time3Back It Up 4Reduce the OpeningAnother way to controltearout is to provide support forA zeroclearanceauxiliary fenceprovides extrasupport forthe workpiece. }5 BackroutingOne task that I frequentlyrely on my router table for is cuttingrabbets. And I find that it’s prettycommon to get tearout along theupper shoulder of the rabbet. Thiskind of tearout has a lot to do withthe direction that the workpiece isfed into the router bit.When routing in the “normal”direction on a router table (fromright to left), the cutting edges ofthe bit remove material from theworkpiece as they exit the cut. Asa result, the bit tends to chip fibersalong the edge of the workpiece.But by feeding the workpieceinto the bit from the opposite direction(backrouting), the bit is cuttingas it enters the workpiece. So you’lleliminate most tearout.The only problem with backroutingon a router table is the tendencyfor the bit to grab the workpieceand pull it forward, or kick it outaway from the fence. This is especiallytrue when taking a heavycut using a large bit. However, ifdone safely, there are occasionswhen backrouting can really helpto avoid tearout.The trick to backrouting safelyis to take a very light pass (about1 ⁄ 32 " deep), as shown in the upperdrawing at right. This initial passestablishes a clean, crisp uppershoulder for the rabbet. Once thisis done, you can remove the restof the waste by routing in theopposite direction, just as you seein the lower drawing at right. WSet fence forRout first passes !/32"-deep in cutthe normal directionNOTE: Very lightbackrouting passcuts clean shoulderTake several passesin normal directionto complete rabbetBit set tofull heightNOTE: Backroutedshoulder preventstearouta.!/32"END VIEWWorkpieceFenceFull cutFenceWorkpiecea.END VIEW<strong>Woodsmith</strong>.com <strong>Woodsmith</strong> 45