How to Setup Virtual Audio Cable (VAC) 4.0x with PowerSDR 1.x ...
How to Setup Virtual Audio Cable (VAC) 4.0x with PowerSDR 1.x ...
How to Setup Virtual Audio Cable (VAC) 4.0x with PowerSDR 1.x ...

You also want an ePaper? Increase the reach of your titles
YUMPU automatically turns print PDFs into web optimized ePapers that Google loves.
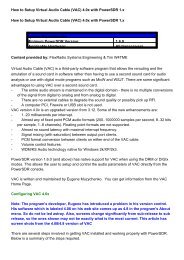
1. Obtain and install <strong>VAC</strong> <strong>4.0x</strong> on the same computer that is running <strong>PowerSDR</strong>2. Configure <strong>VAC</strong> "cables"3. Configure <strong>PowerSDR</strong> <strong>to</strong> utilize <strong>VAC</strong>Step 1. Install <strong>VAC</strong> <strong>4.0x</strong> as per the installation directions. If <strong>VAC</strong> was previously loaded, you mustfirst uninstall all versions before installing a new version of <strong>VAC</strong> <strong>4.0x</strong>Step 2. Once installed, set up a pair of <strong>VAC</strong> audio "cables" for use <strong>with</strong> <strong>PowerSDR</strong> by opening the<strong>VAC</strong> Control Panel.Figure 1 - <strong>VAC</strong> ConsoleStep 3. By default only one audio cable is defined. You will need <strong>to</strong> create two cables by changingthe driver parameters <strong>to</strong> 2 cables then click SET and Restart. Highlight the appropriate cable andchange the values <strong>to</strong> match the figure above. In the "Ms per int" box enter a value between 1 and20 ms. The lower the value, the smaller the <strong>VAC</strong> audio buffer. In the example above, 7 ms wasselected. Depending on your computer setup you may have <strong>to</strong> adjust this value <strong>to</strong> prevent theaudio from dropping out or "popping".You can choose two different Stream limit formats; cable format and cable range. Since<strong>PowerSDR</strong> defines both audio cables' format when <strong>VAC</strong> support is enabled, using the <strong>Cable</strong>Format is recommended. If you decide <strong>to</strong> use the <strong>Cable</strong> Range stream format, one thing <strong>to</strong>consider, when a format conversion occurs, it takes significant CPU resources and it maynoticeably slow your applications causing audio drops outs. Therefore using <strong>Cable</strong> Format as thestream format may help <strong>with</strong> audio drop outs. In the example above, I am using <strong>Cable</strong> Rangebecause it provides the most flexibility and does not adversely affect the performance of<strong>PowerSDR</strong> on the computer I am using.After completing all of the necessary changes, click on Set for each cable when completed.NOTE: Repeat these changes for the second audio cable as well.NOTE: Do NOT check the Volume Control box in the <strong>VAC</strong> control panel. This enables theWindows Mixer and can cause unpredictable results.Step 4. Start up <strong>PowerSDR</strong> version 1.6.0 (or higher). Click <strong>Setup</strong> on the Menu Bar. The<strong>PowerSDR</strong> <strong>Setup</strong> program is displayed. See example below.Figure 2 - <strong>PowerSDR</strong> <strong>Setup</strong> (default page)Step 5. Click on the <strong>Audio</strong> tab and then click on the <strong>VAC</strong> tab.Figure 3 - <strong>VAC</strong> <strong>Setup</strong>