HDM97Pocket Reference Meter Series Safety ... - IBP Medical
HDM97Pocket Reference Meter Series Safety ... - IBP Medical
HDM97Pocket Reference Meter Series Safety ... - IBP Medical

You also want an ePaper? Increase the reach of your titles
YUMPU automatically turns print PDFs into web optimized ePapers that Google loves.
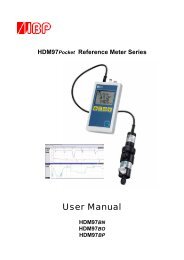
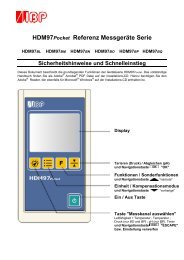
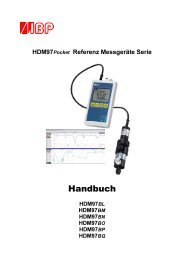
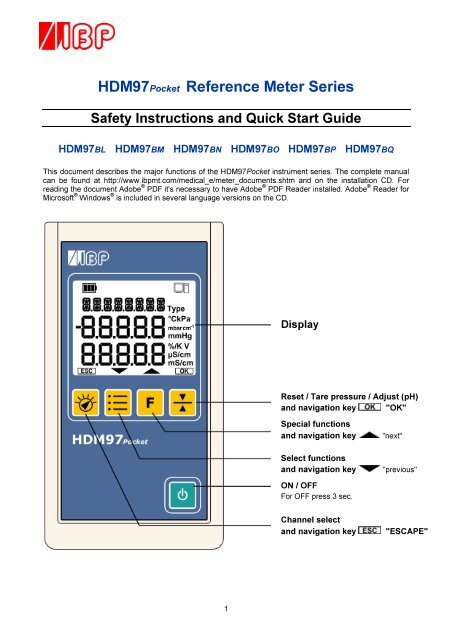
<strong>HDM97Pocket</strong> <strong>Reference</strong> <strong>Meter</strong> <strong>Series</strong><strong>Safety</strong> Instructions and Quick Start GuideHDM97BL HDM97BM HDM97BN HDM97BO HDM97BP HDM97BQThis document describes the major functions of the <strong>HDM97Pocket</strong> instrument series. The complete manualcan be found at http://www.ibpmt.com/medical_e/meter_documents.shtm and on the installation CD. Forreading the document Adobe ® PDF it's necessary to have Adobe ® PDF Reader installed. Adobe ® Reader forMicrosoft ® Windows ® is included in several language versions on the CD.DisplayReset / Tare pressure / Adjust (pH)and navigation key "OK"Special functionsand navigation keySelect functionsand navigation key"next""previous"ON / OFFFor OFF press 3 sec.Channel selectand navigation key"ESCAPE"1
SAFETY INSTRUCTIONSFor your and your patients safety read and follow carefully the safety instructions below• Read the entire manual (not only this guide) carefully before using the <strong>HDM97Pocket</strong>• Keep the instrument away from unauthorized persons.• Only use the <strong>HDM97Pocket</strong> as reference instrument to measure Conductivity, Temperature, Pressure,Flow and pH depending to it's equipped features.• Never use the <strong>HDM97Pocket</strong> as a replacement of sensors of a medical device.• Do not use the <strong>HDM97Pocket</strong> in conjunction with a medical device during a treatment.• Only use the instrument in a dry environment and do not touch it with wet hands.• Make sure that no liquids intrude inside the instrument or it's inlets / outlets.• Always use a clean protection filter for the pressure transducer inlet.• Prevent every mechanical overstraining of electrical wires. Never buckle or pull the cable of theconductivity probe• If the acquired values seem to be not believable, make sure that the <strong>HDM97Pocket</strong> is not defective• Prevent electrostatic discharge on the connectors. This can lead to substantial damage of theinstrument. Make sure to be completely discharged before touching the connectors or cablesconnected to the instrument.• Adjust the meter only, if you are familiar with the consequences of the adjustment. Consider the hintsfor reference solutions in the user manual.• Potentials above 42V against earth ground are dangerous. This potentials can lead to electrical shockand therefore to health hazards. Make sure that none of the connectors has higher voltage thanmentioned before.• The direct connection of earth potential to any connector of the instrument is not applicable for safetypurposes and may substantially damage the instrument. Make sure that the medical device itself isproperly connected to earth ground according to its instruction manual.• Make sure that the instrument never heats over 60°C / 140°F. Prevent direct sunlight.• Never sterilize the instrument using an autoclave. Danger of explosion of the battery!• Never throw the meter into a fire. Danger of explosion of the battery!• Never open the meter. There are no serviceable parts inside.• Never try to replace or repair the internal battery. Handled in the wrong way these part is dangerous.Extreme risk of fire and explosion!2
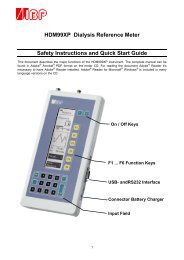
Access connectorsAppliance partHDM97BLHDM97BMFlowPressureHDM97BNHDM97BOHDM97BPConductivityTemperatureHDM97BQPressureConductivityTemperaturepH Pressure ConductivityTemperatureFlow Pressure ConductivityTemperatureHDM97BQ with Option C (Conductivity Probe Connector)Flow Pressure ConductivityTemperatureDepending on the configuration the appliance part consists of a BNC inlet for pH electrode connection, amale connector for pressure transducer inlet, a connector for the flow probe and a directly attached cablewhich leads to the conductivity / temperature probe or connector for the probe. The appliance part is isolatedagainst the USB-Connector withstanding 4000V AC or 6000V DC for one minute minimum according to ISOEN 60601-1.USB connector / charging the batteryThe USB connector is mounted on the right side of the instrument. It is implementedas a Mini-USB-A receptacle. The current consumption of the <strong>HDM97Pocket</strong> (allversions) can be up to 500 mA while charging the battery. The USB connector canbe used to charge the battery and communicate with the instrument at the sametime. The period for charging an empty battery to 100% is approximately 3 hours.ATTENTION: The USB connector is not part of the appliance part.3
Basic settingsAfter switching on the instrument immediately press key to invoke the basic settings menu. Theparameter to change can be selected using the navigation keys and . By pressing thenavigation key you can adjust the value of each parameter.These parameters are as follows:Parameter <strong>Meter</strong> Versions DescriptionAUTO-OFF All Set the delay time fort he auto power off function or disables it.BEEP All enables / disables the keypad acknowledge beepCAL-RESAllLANGUAGE All Selectionof display language.Overwrites the user calibration dataset with the device initialcalibration dataset.PHT BM,BO,BP,BQ Target time adjustment for pressure holt test (PHT)TIMER All enables / disables the stopwatch functionFlow BL, BQ enables / disables the Flow channelpH BP enables / disables the pH channelTEMP BN, BO, BP, BQ enables / disables the sole readout of the temperature channelPR HR-Res BM, BO, BP, BQ enables / disables the high resolution for pressure channel→AUTO-OFF→ OFF → disables function→ 30 MIN → 30 minutes delay→ 60 MIN → 60 minutes delay→ 90 MIN → 90 minutes delayThenorto apply and save this setting,to discard this setting.→BEEP→ ON → keypad beep enabled→ OFF → keypad beep disabledThenorto apply and save this setting,to discard this setting.→CAL-RES→Press 5 seconds until the counter in the display reaches zero.Then a calibration dataset reset will be performed. This takesa couple of seconds. The instrument performs a restart afterwards.→LANGUAGE→ DEUTSCH → German language→ ENGLISH → English languageThenorto apply save this setting,to discard this setting.4
→TIMER→ ON → stopwatch function enabled→ OFF → stopwatch function disabledThenorto apply and save this setting,to discard this setting.→ PHT Pressure hold test→→increases the valuelowers the valueThenorto apply and save this setting,to discard this setting.→ pH only available with version BP→ ON → pH enabled→ OFF → pH disabledThenorto apply save this setting,to discard this setting.→ FLOW only available with version BQ→ ON → FLOW enabled→ OFF → FLOW disabledThenordisabledto apply save this setting,to discard this setting.→ TEMP only available with version BN, BO, BP and BQ→ ON → sole readout of temperature enabled→ OFF → sole readout of temperature disabledThenorto apply and save this setting,to discard this setting.→ PR H-Res only available with version BM, BO, BP and BQ→ ON → High Resolution reading enabled→ OFF → High Resolution reading disabledAttention: The higher resolution does not give a higher measuring accuracy.Thenorto apply and save this setting,to discard this setting.→→EXITSAVEA save dialog will appear, if changes have been made.→ YES to apply and save all settings by exiting→ NO to discard all settings by exitingThen to exit the basic settings dialog,orto return to the basic settings dialog.5