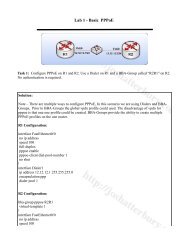
GNS3 on Windows 7 the IPexpert Way - CCIE Blog - IPexpert
GNS3 on Windows 7 the IPexpert Way - CCIE Blog - IPexpert
GNS3 on Windows 7 the IPexpert Way - CCIE Blog - IPexpert
- No tags were found...

Create successful ePaper yourself
Turn your PDF publications into a flip-book with our unique Google optimized e-Paper software.
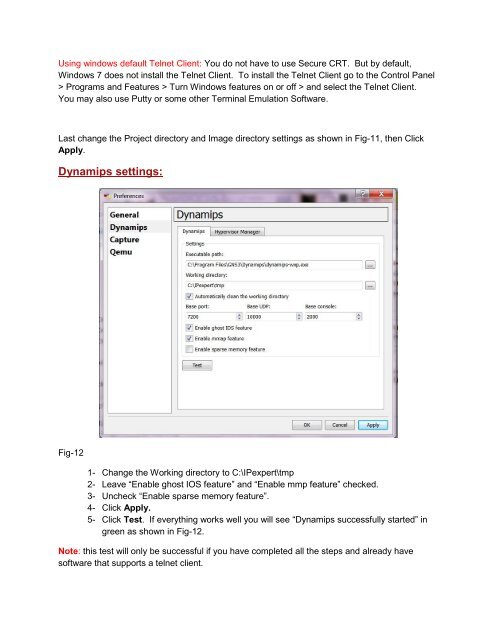
Using windows default Telnet Client: You do not have to use Secure CRT. But by default,<strong>Windows</strong> 7 does not install <strong>the</strong> Telnet Client. To install <strong>the</strong> Telnet Client go to <strong>the</strong> C<strong>on</strong>trol Panel> Programs and Features > Turn <strong>Windows</strong> features <strong>on</strong> or off > and select <strong>the</strong> Telnet Client.You may also use Putty or some o<strong>the</strong>r Terminal Emulati<strong>on</strong> Software.Last change <strong>the</strong> Project directory and Image directory settings as shown in Fig-11, <strong>the</strong>n ClickApply.Dynamips settings:Fig-121- Change <strong>the</strong> Working directory to C:\<strong>IPexpert</strong>\tmp2- Leave “Enable ghost IOS feature” and “Enable mmp feature” checked.3- Uncheck “Enable sparse memory feature”.4- Click Apply.5- Click Test. If everything works well you will see “Dynamips successfully started” ingreen as shown in Fig-12.Note: this test will <strong>on</strong>ly be successful if you have completed all <strong>the</strong> steps and already havesoftware that supports a telnet client.